

1. Overview
The pre-filling and filing of ITR-2 service is available to registered users on the e-Filing portal. This service enables individual taxpayers and HUFs to file ITR-2 through the e-Filing portal.This user manual covers the process for filing ITR-2 through online mode.
2. Prerequisites for availing this service
| General |
|
| Others |
|
ITR-2 has the following sections that you need to fill before submitting the form, a summary section where you review your tax computation and pay tax and finally submit the return for verification:
- 3.1 Part A General
- 3.2 Schedule Salary
- 3.3 Schedule House Property
- 3.4 Schedule Capital Gains
- 3.5 Schedule 112A and Schedule-115AD(1)(iii) proviso
- 3.6 Schedule Other Sources
- 3.7 Schedule CYLA
- 3.8 Schedule BFLA
- 3.9 Schedule CFL
- 3.10 Schedule VI-A
- 3.11 Schedule 80G and Schedule 80GGA
- 3.12 Schedule AMT
- 3.13 Schedule AMTC
- 3.14 Schedule SPI
- 3.15 Schedule SI
- 3.16 Schedule EI
- 3.17 Schedule PTI
- 3.18 Schedule FSI
- 3.19 Schedule TR
- 3.20 Schedule FA
- 3.21 Schedule 5A
- 3.22 Schedule AL
- 3.23 Part B – Total Income (TI)
- 3.24 Tax Paid
- 3.25 Part B-TTI
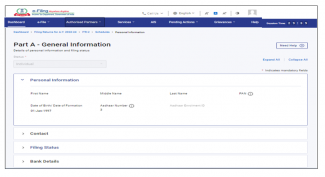
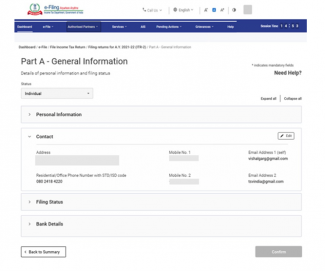
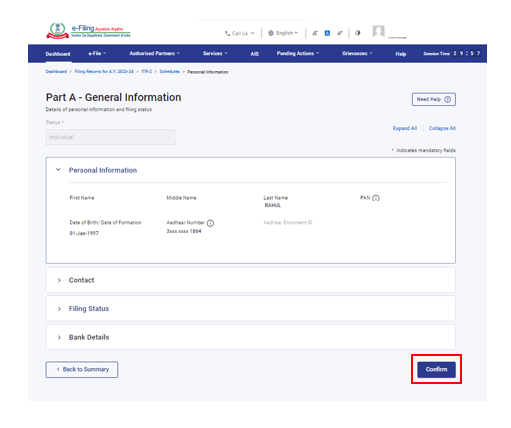
3.1 Part A General
In the Part A General section of the ITR, you need to verify the pre-filled data from your e-Filing profile. You will not be able to edit some of your personal data directly in the form. However, can make the necessary changes by going to your e-Filing profile. You can edit your contact details, filing status, residential status and bank details in the form itself.
Personal Information
Contact Details
Filing Status
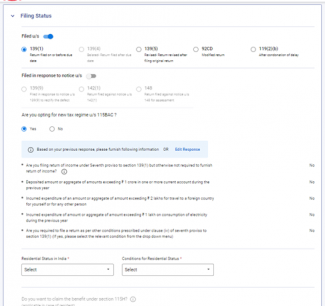
Note: In filing section Filed u/s 139(1) will be auto selected. Select Yes/No to Are you opting for new tax regime u/s 115BAC. Select Residential Status in India and Conditions for Residential Status from the drop-down menu.
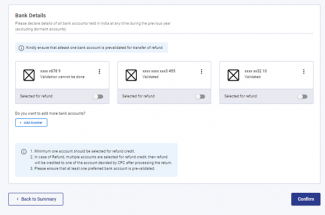
Bank Details
3.2 Schedule Salary
In Schedule Salary, you need to review / enter / edit details of your income from salary / pension, exempt allowances and deductions u/s 16.

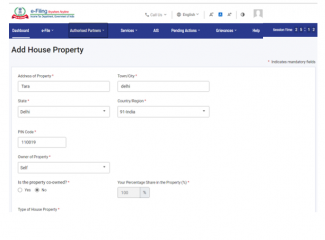
3.3 Schedule House Property
In Schedule House Property, you need to review / enter / edit details relating to house property (self-occupied, let out, or deemed let out). The details include co-owner details, tenant details, rent, interest, pass through income etc.
3.4 Schedule CG – Capital Gains
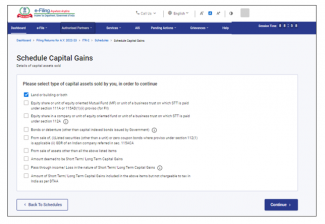
Capital Gains arising from sale / transfer of different types of capital assets have been segregated. In a case where capital gains arises from sale or transfer of more than one capital asset, which are of same type, please make a consolidated computation of capital gains in respect of all such capital assets of same type. But in case of transfer of land / building, it is mandatory to enter the computation towards each land / building. In Schedule Capital Gains, you need to enter details of your Short-Term and Long-Term Capital Gains / Losses for all types of Capital Assets owned.
3.5 Schedule 112A and Schedule-115AD(1)(iii) proviso
- In Schedule 112A, you need to review / enter / edit details about sale of equity shares of a company, an equity-oriented fund, or a unit of a business trust on which STT is paid.
- Schedule 115AD (1)(iii) proviso involves entering the same details as for Schedule 112A but is applicable to non-residents. Please confirm in personal information filing section - Whether you are an FII/FPI? If yes, provide SEBI Registration Number. If the taxpayer selects Yes, and provides SEBI Registration Number, Schedule 115AD is enabled.
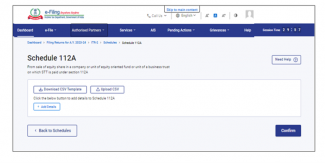
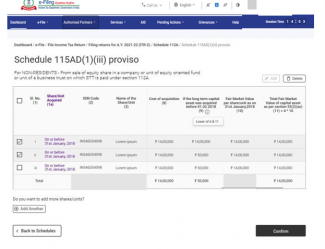
Note: If shares are bought on or before 31st January 2018, it is mandatory to enter Scrip-wise details of each transfer under Schedule 112A and Schedule-115AD(1)(iii) proviso.
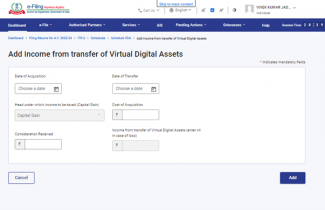
3.6 Schedule VDA
In Virtual digital Asset schedule, you need to add the income from transfer of virtual digital assets.)
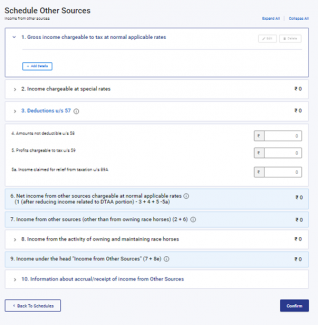
3.7 Schedule Other Sources
In Schedule Other Sources, you need to review / enter / edit details of all your income from other sources, including (but not limited to) income charged at special rates, deductions u/s 57 and income involving race horses.
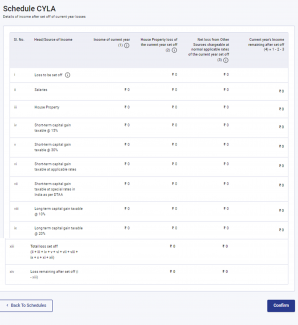
3.8 Schedule Schedule Current Year’s Loss Adjustment (CYLA)
In Schedule Current Year’s Loss Adjustment (CYLA), you will be able to view details of income after set-off of current year losses. The unabsorbed losses allowed to be carried forward out of this are taken to Schedule CFL for carry forward to future years.
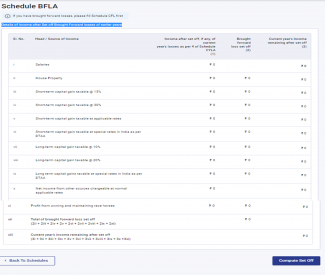
3.9 Schedule Brought Forward Loss Adjustment (BFLA)
In Schedule Brought Forward Loss Adjustment (BFLA), you can view the details of income after set-off of brought forward losses of earlier years.
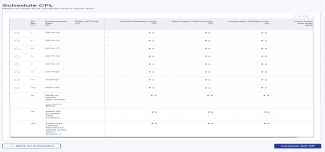
3.10 Schedule Schedule Carry Forward Losses (CFL)
In Schedule Carry Forward Losses (CFL), you can view the details of losses to be carried forward to future years.
3.11 Schedule VI-A
In Schedule VI-A, you need to add and verify any deductions you need to claim under Section 80 - Parts B, C, CA, and D (subsections as specified below) of the Income Tax Act.
Part B- Deduction in respect of certain payments
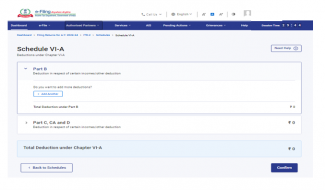
Part C, CA and D - Deduction in respect of other income / deductions

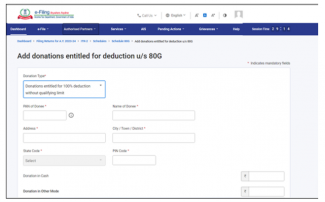
3.12 Schedule 80G and Schedule 80GGA
In Schedule 80G and Schedule 80GGA, you need to provide details of details of donations entitled for deduction under Section 80G and Section 80GGA.
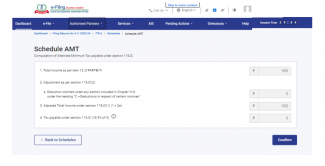
3.13 Schedule AMT
In Schedule AMT, you need to confirm the computation of Alternate Minimum Tax payable u/s 115JC.
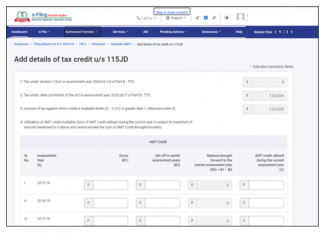
3.14 Schedule AMTC
In Schedule AMTC, you need to add details of tax credits u/s 115JD.
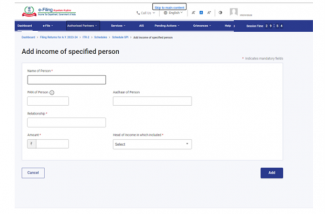
3.15 Schedule SPI
In Schedule SPI, you need to add the income of specified persons (e.g. spouse, minor child) that is includable or required to be clubbed with your income as per Section 64.
3.16 Schedule SI
In Schedule SI, you will be able to view the income that is chargeable to tax at special rates. The amount under various income types are taken from the amounts provided in the relevant Schedules i.e., Schedule OS, Schedule BFLA.
3.17 Schedule Exempt Income (EI)
In Schedule Exempt Income (EI), you need to provide your details of exempt income i.e., income not to be included in total income or not chargeable to tax. The income types included in this schedule include interest, dividend, agricultural income, any other exempt income, income not chargeable to tax through DTAA and pass through income which is not chargeable to tax.

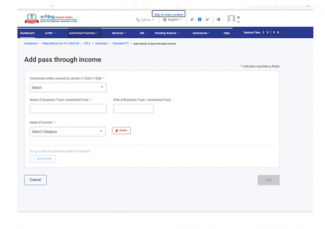
3.18 Schedule Pass Through Income (PTI)
In Schedule Pass Through Income (PTI), you need to provide details of pass through income received from business trust or investment fund as referred to in section 115UA or 115UB.
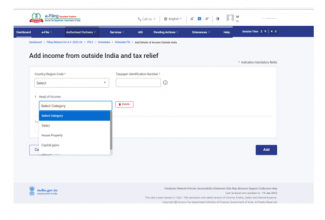
3.19 Schedule Foreign Source Income (FSI)
In Schedule Foreign Source Income (FSI), you need to report the details of income, which is accruing or arising from any source outside India. This schedule is available for residents only.
3.20 Schedule TR
In Schedule TR, you need to provide a summary of tax relief which is being claimed in India for taxes paid outside India in respect of each country. This schedule captures a summary of detailed information furnished in Schedule FSI.

3.21 Schedule FA
In Schedule FA, you need to provide details of foreign asset or income from any source outside India. This schedule need not be filled up if you are Not Ordinarily Resident or a Non-Resident.

3.22 Schedule 5A
In Schedule 5A, you need to provide the information necessary for apportionment of income between husband and wife if you are governed by the system of community of property under the Portuguese Civil Code 1860.
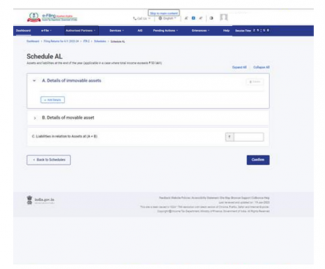
3.23 Schedule AL
If your total income exceeds ₹50 lakh, it is mandatory to disclose the details of movable and immovable assets in Schedule AL along with liabilities incurred in relation to such assets. If you are a non-resident or resident but not ordinarily resident, only the details of assets located in India are to be mentioned.
3.24 Part B – Total Income (TI)
In the Part B –Total Income (TI) section, you will be able to view your computation of total income auto-populated from all the schedules you filled in the form.

3.25 Tax Paid
In the Tax Paid section, you need to verify your tax details as paid by you in the previous financial year. Tax details include TDS from Salary / TDS from Income Other than Salary, TCS, Advance Tax and Self-Assessment Tax.

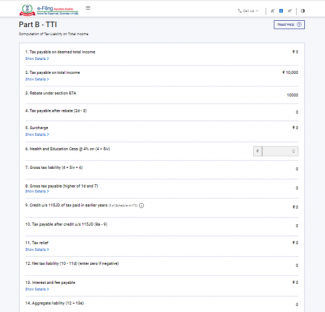
3.26 Part B-TTI
In the Part B-TTI section, you will be able to view the overall computation of total income tax liability on total income.
4. How to Access and Submit (Online Mode)
You can file and submit your ITR through following methods:
- Online Mode – Through e-Filing portal
- Offline Mode – Through Offline Utility
You can refer to the Offline Utility (for ITRs) user manual to learn more.
Follow the below steps to file and submit the ITR through online mode:
Step 1: Log in to the e-Filing portal using your user ID and password.
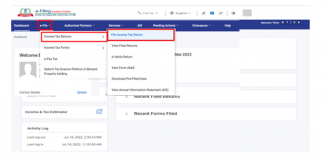
Step 2: On your Dashboard, click e-File > Income Tax Returns > File Income Tax Return.
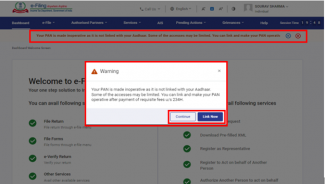
Note: For Individual users, if PAN is not linked with the Aadhaar you will see a pop-up message that your PAN is made inoperative as it is not linked with your Aadhaar.
You can click on Link Now button to link PAN with the Aadhaar, otherwise click Continue.
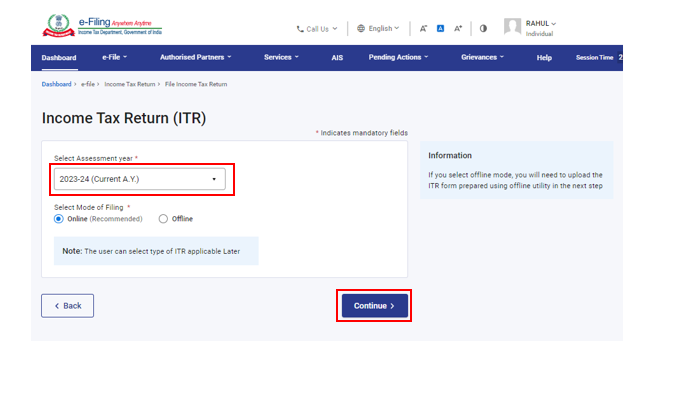
Step 3: Select Assessment Year as 2023– 24 and click Continue.
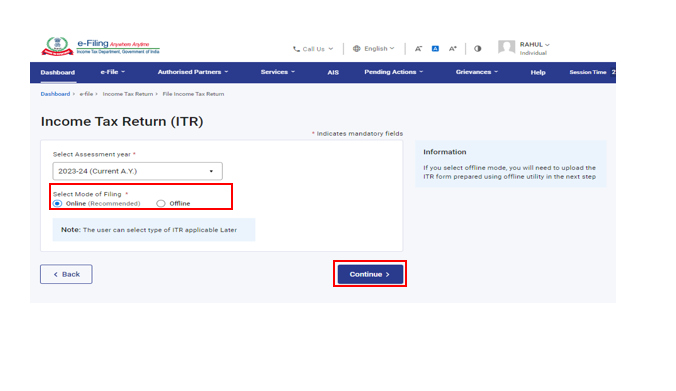
Step 4: Select Mode of Filing as Online and click Continue.
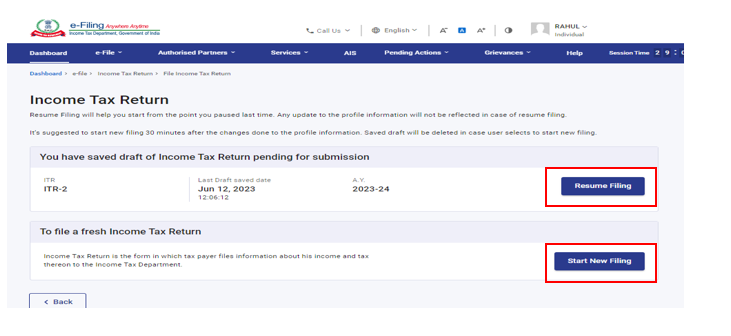
Note: In case you have already filled the Income Tax Return and it is pending for submission, click Resume Filing. In case you wish to discard the saved return and start preparing the return afresh click Start New Filing.
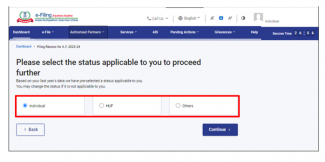
Step 5: Select Status as applicable to you and click Continue to proceed further.
Step 6: You have two options to select the type of Income Tax Return:
- If you are not sure which ITR to file, you may select Help me decide which ITR Form to file and click Proceed. Once the system helps you determine the correct ITR, you can proceed with filing your ITR.
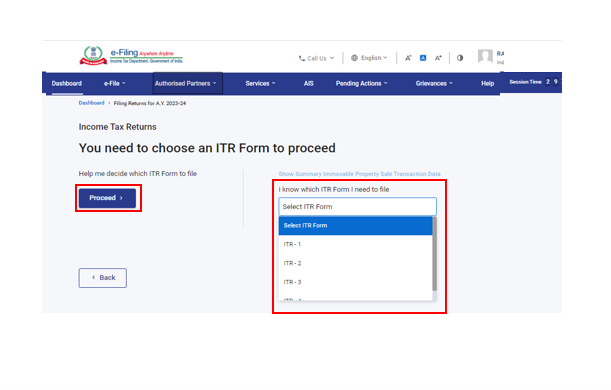
- If you are sure which ITR to file, select I know which ITR Form I need to file: Select the applicable income tax return form from the dropdown menu and click Proceed with ITR.
Note:
• In case you are not aware which ITR or schedules are applicable to you or income and deductions details, your answers in response to a set of questions will guide you in determining the same and help you in correct / error free filing of ITR.
• In case you are aware of the ITR or schedules applicable to you or income and deductions details, you can skip the questions.
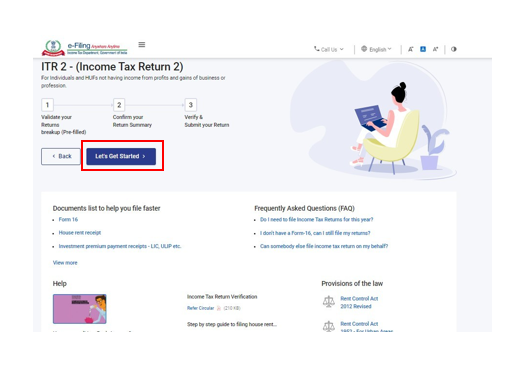
Step 7: Once you have selected the ITR applicable to you, note the list of documents needed and click Let’s Get Started.
Step 8: Review your pre-filled data and edit it if necessary. Enter the remaining / additional data (if required). Click Confirm at the end of each section.
Step 9: Enter your income and deduction details in the different sections. After completing and confirming all the sections of the form, click Proceed.

Step 10a: In case there is a tax liability
You will be shown a summary of your tax computation based on the details provided by you. If there is tax liability payable based on the computation, you get the Pay Now and Pay Later options at the bottom of the page.
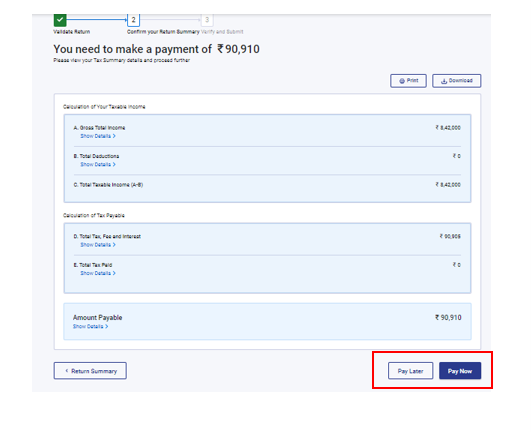
Note:
- It is recommended to use the Pay Now option.
- If you opt to Pay Later, you can make the payment after filing your Income Tax Return, but there is a risk of being considered as an assessee in default, and liability to pay interest on tax payable may arise.
Step 10b: In case there is no tax liability (No Demand / No Refund) or if you are eligible for a Refund
Click Preview Return. If there is no tax liability payable, or if there is a refund based on tax computation, you will be taken to the Preview and Submit Your Return page.
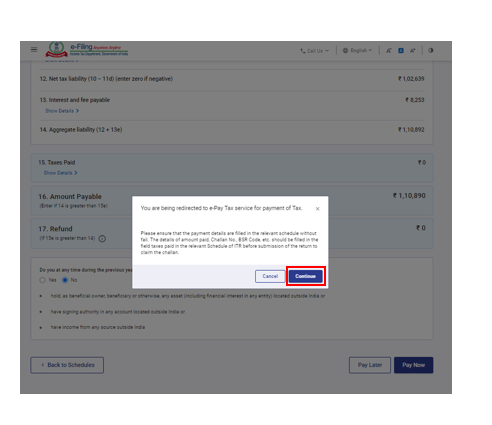
Step 11: On selecting Pay now option, you will see a pop-up message saying that you will be redirected to e-Pay Tax Service for Tax Payments. Click Continue.
Step 12: After successful payment through e-Filing portal, a success message is displayed. Click Return to Filing to complete filing of ITR.
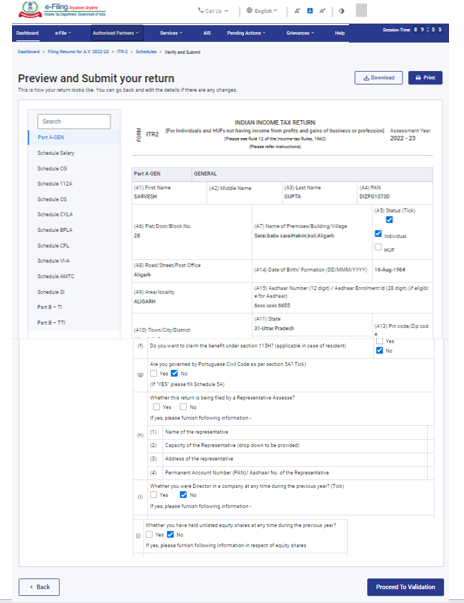
Step 13: Click Preview Return.
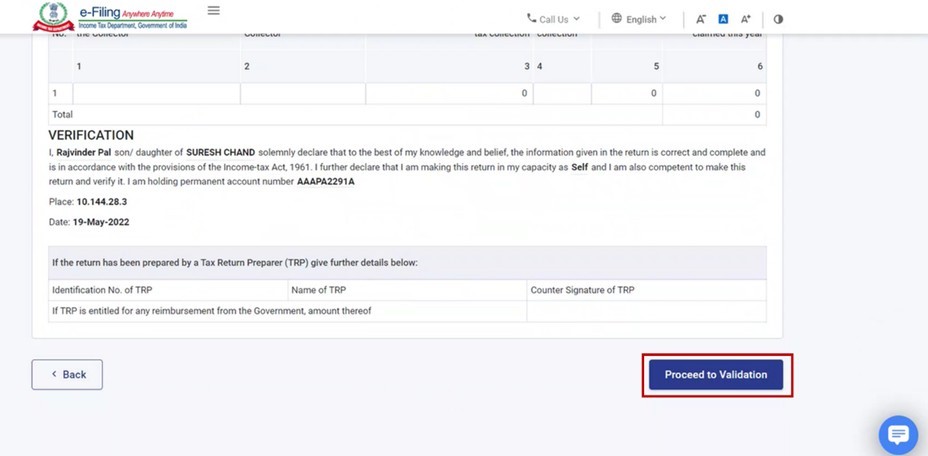
Step 14: On the Preview and Submit Your Return page, enter Place, select the declaration checkbox and click Proceed to Preview.
Note: If you have not involved a tax return preparer or TRP in preparing your return, you can leave the textboxes related to TRP blank.
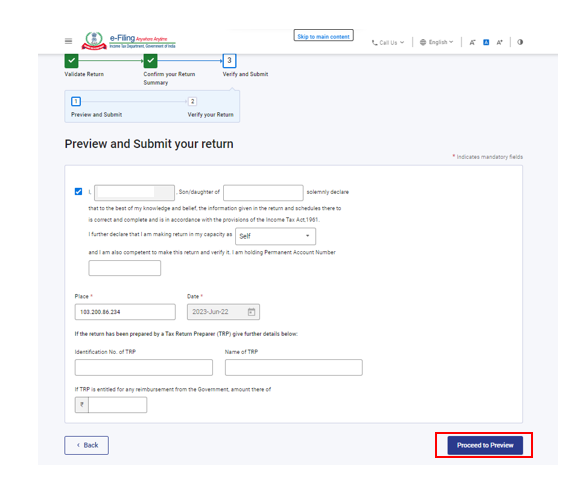
Step 15: Preview your return and click Proceed to Validation.
Step 16: Once validated, on your Preview and Submit your Return page, click Proceed to Verification.
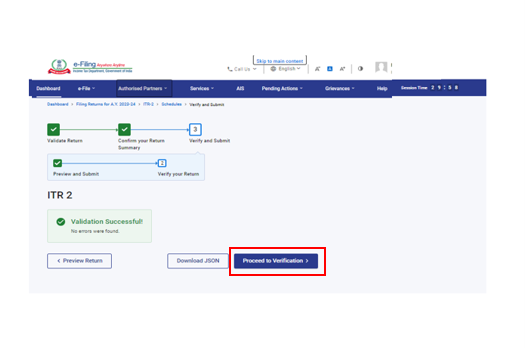
Note: If you are shown a list of errors in your return, you need to go back to the form to correct the errors. If there are no errors, you can proceed to e-Verify your return by clicking Proceed to Verification.
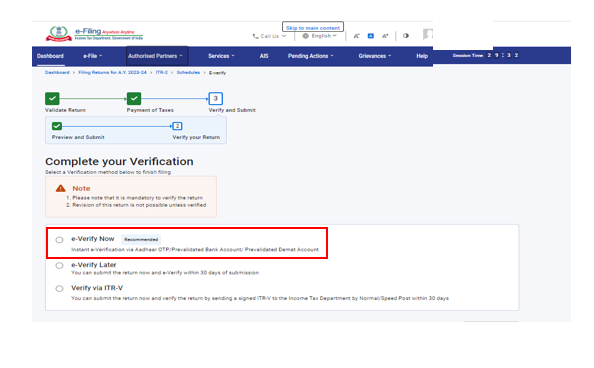
Step 17: On the Complete your Verification page, select your preferred option and click Continue.
It is mandatory to verify your return, and e-Verification (recommended option – e-Verify Now) is the easiest way to verify your ITR – it is quick, paperless, and safer than sending a signed physical ITR-V to CPC by post.
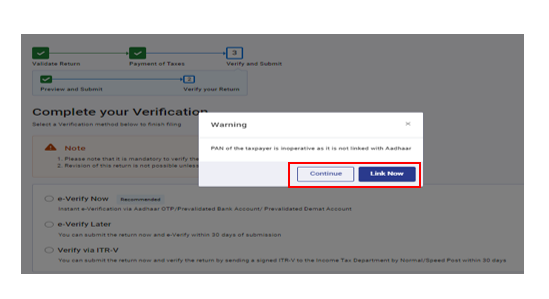
Note: If your PAN is inoperative: You will see a warning message in pop-up that PAN of the taxpayer is inoperative as it is not linked with Aadhaar.
You can link PAN with Aadhaar by clicking on Link Now option otherwise click Continue.
Note: In case you select e-Verify Later, you can submit your return, however, you will be required to verify your return within 30 days of filing of your ITR.
Step 18: On the e-Verify page, select the option through which you want to e-Verify the return and click Continue.
Note:
- Refer to How to e-Verify user manual to learn more.
- If you select Verify via ITR-V, you need to send a signed physical copy of your ITR-V to Centralized Processing Center, Income Tax Department, Bengaluru 560500 by normal / speed post within 30 days.
- Please make sure you have pre-validated your bank account and linked your PAN with the Aadhaar so that any refunds due maybe credited to your bank account.
- Refer to My Bank Account User Manual to learn more.
Once you e-Verify your return, a success message is displayed along with the Transaction ID and Acknowledgment Number. You will also receive a confirmation message on your mobile number and email ID registered on the e-Filing portal.
5. Related Topics
- Authorize/Register as Representative
- Dashboard
- Dashboard (Download Pre-Filled XML)
- e-Filed Returns
- Forgot Password?
- Reset Password
- Generate EVC
- How to e-verify
- Income tax returns (Upload)
- ITR Status (View my Returns)
- Login Here
- My Profile (including Update Profile)
- Register Yourself

