1. Overview
The pre-filling and filing of ITR-1 service is available to registered users on the e-Filing portal. This service enables individual taxpayers to file ITR-1 either online through the e-Filing portal or by accessing the offline excel and html utility. This user manual covers the process for filing ITR-1 through the online mode.
2. Prerequisites for availing this service
General |
|
Others |
Please Note: If your PAN is not linked with your Aadhaar, your PAN is made inoperative. In that case you will get a ticker message “Your PAN is made inoperative as it is not linked with Aadhaar. Some of the access may be limited. You can link and make your PAN operative after payment u/s 234H.”
|
3. About the Form
3.1 Purpose
Income Tax Return is the form in which taxpayer files information about income and tax thereon to the Income Tax Department on annual basis. Form ITR-1 can be used by Resident Individuals fulfilling criteria as per 3.2 below for filing their Income Tax Return in old or new tax regime.
3.2 Who can use it?
ITR-1 can be filed by a Resident Individual whose:
- Total income does not exceed ₹ 50 lakh during the FY
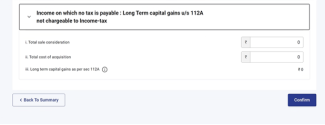
- Income is from salary, one house property, family pension income, agricultural income (up to ₹5000/-), Long-term capital gain u/s 112A up to Rs.1.25 lakhs and other sources, which include:
- Interest from Savings Accounts
- Interest from Deposits (Bank / Post Office / Cooperative Society)
- Interest from Income Tax Refund
- Interest received on Enhanced Compensation
- Any other Interest Income
- Family Pension
- Income of Spouse (other than those covered under Portuguese Civil Code) or Minor is clubbed (only if the source of income is within the specified limits as mentioned above).
ITR-1 cannot be filed by an individual who:
- is a Resident Not Ordinarily Resident (RNOR), and Non-Resident Indian (NRI)
- has total income exceeding ₹ 50 lakh
- has agricultural income exceeding ₹ 5000/-
- has income from lottery, racehorses, legal gambling etc.
- has taxable capital gains (short term and long term)
- has Long-term capital gain u/s 112A exceeding Rs.1.25 lakhs
- has invested in unlisted equity shares
- has income from business or profession
- is a Director in a company
- has tax deduction under section 194N of Income Tax Act
- has deferred income tax on ESOP received from employer being an eligible start-up
- owns and has income from more than one house property
- is not covered under the eligibility conditions for ITR-1
4. Form at a Glance
ITR-1 has five pre-filed sections that need to be validated/ edited before submitting it, and one summary section which is required to be reviewed for tax computation. The sections are as follows:
Here is a quick tour of the various sections of ITR-1:
4.1 Personal Information
In the Personal Information section of the ITR, you need to validate the pre-filled data which is auto-filled from your e-Filing profile. You will not be able to edit some of your personal data directly in the form. However, can make the necessary changes by going to profile section. You can edit your contact details, filing type details and bank details in the form.
Contact Details
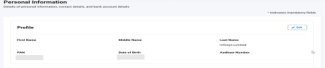
Filing Type Details
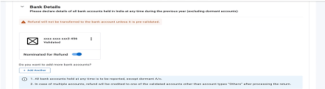
Bank Details
Please Note:
- The Finance Act 2023 has amended the provisions of Section 115BAC to make New Tax Regime the default tax regime for the assessee being an Individual, HUF, AOP, BOI and AJP. You do not want to pay tax according to the new tax regime, you will have to explicitly opt out of it and choose to be taxed under the old tax regime.
- If you want to opt out of New Tax Regime Select “Yes” in the radio button in the Filing section. To exercise this option, the assessee having income (other than income from a business or profession) must indicate choice of tax regime in the return of income to be furnished for the relevant assessment year under Section 139(1).
4.2 Gross Total Income
In the Gross Total Income section, you need to review the pre-filled information and confirm/ edit your income source details from salary / pension, house property, long term capital gains u/s 112A, and other sources (such as interest income, family pension, etc.). You can also add details of exempt income, if any.
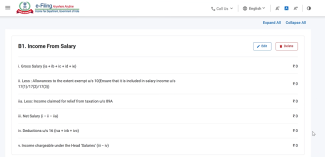
Income from Salary
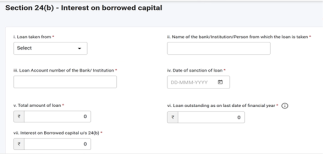
Income from one House Property and details of interest on borrowed capital


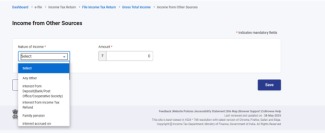
Income from Other Sources
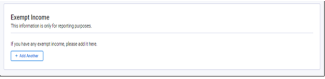
Exempt Income
Long Term capital gains u/s 112A
4.3 Total Deductions
In the Total Deductions section, you need to add, delete, and confirm any deductions applicable to you to claim under Chapter VI-A of the Income Tax Act.
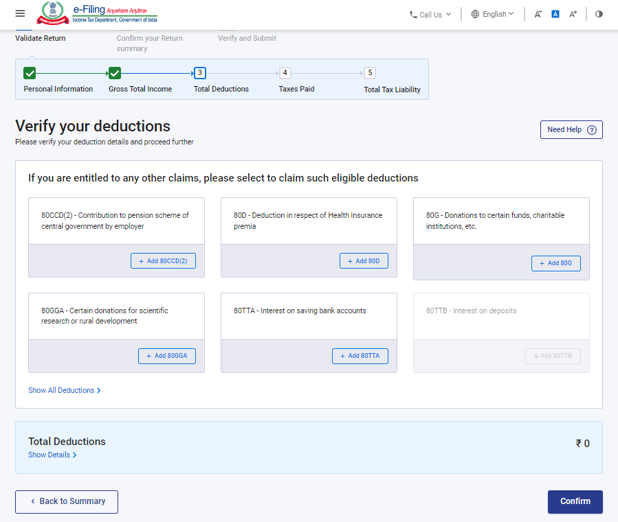
Note:
From AY 2025-26 you need to provide some additional information for claiming Deductions.


Please Note:
For A.Y 25-26, Default Regime is New Tax Regime. If you have not opted for Old Tax Regime, only Deductions under Section 80CCD (2)- Employers Contribution to Tier-1 NPS Account and Section 80CCH - Amount deposited in the Agniveer Corpus Fund will be visible to you.
4.4 Tax Paid
In the Tax Paid section, you need to confirm taxes paid by you in the previous year. Tax details include TDS from Salary / Other than Salary as furnished by Payer(s), TCS, Advance Tax and Self-Assessment Tax.

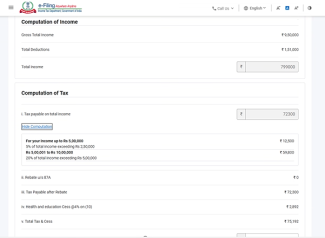
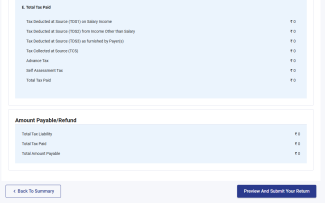
4.5 Total Tax Liability
In the Total Tax Liability section, you need to review tax liability computed as per the validated sections and the tax regime chosen.
5. How to Access and Submit ITR - 1
You can file and submit your ITR through the following methods:
- Online Mode – through e-Filing portal
- Offline Mode – through Offline Utility or Excel Utility
Follow the below steps to file and submit the ITR through online mode:
Step 1: Log in to the e-Filing portal using your user ID and password.
Step 2: On your Dashboard, click e-File > Income Tax Returns > File Income Tax Return.

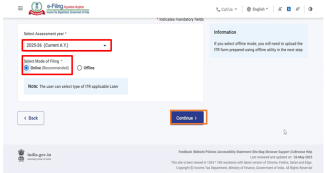
Step 3: Select Assessment Year as 2025–26 and Mode of filling as Online, then click Continue
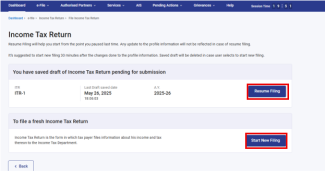
Step 4: In case you have already filled the Income Tax Return and it is pending for submission, click Resume Filing. In case you wish to discard the saved return and start preparing the return afresh,click Start New Filing.
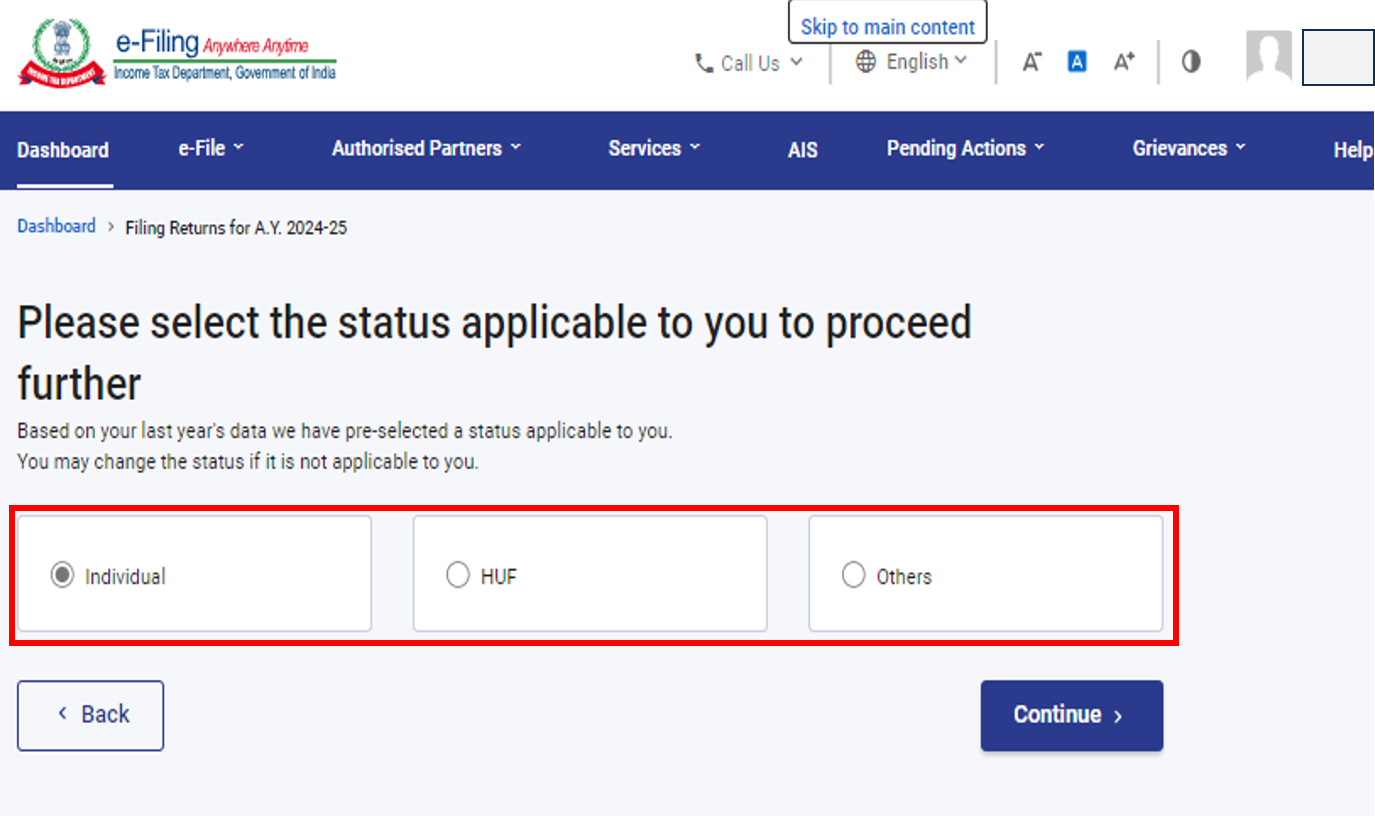
Step 5: Select Status as applicable to you and click Continue to proceed further.
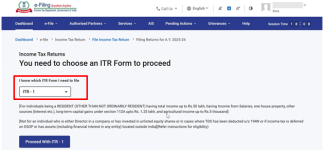
Step 6: Select the ITR form and click Proceed.
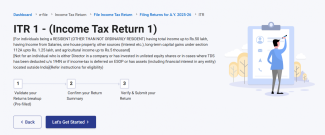
Step 7: Once you have selected the ITR applicable to you, note the list of documents needed and click Let’s Get Started.

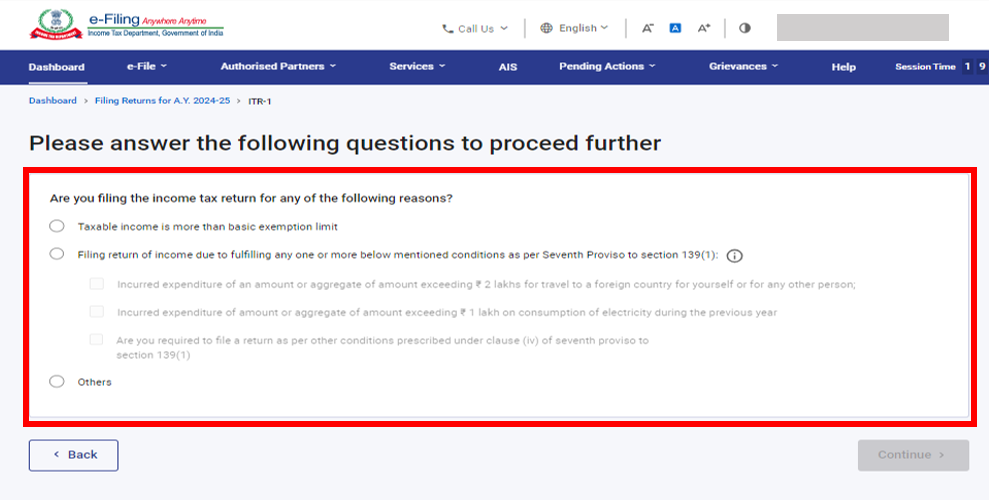
Step 8: Select the checkbox applicable to you regarding reason for filing ITR and click Continue.
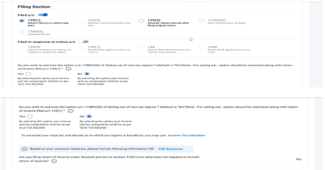
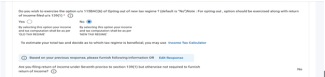
Step 9: For AY 2025-26 New Tax Regime is the default Tax Regime. Option “No” will be Auto Selected for the question “If you want to opt out of New Tax Regime”. Select “Yes” in the Personal Information Section, if you wish to file your return under Old Tax Regime.
Review your pre-filled data and edit it if necessary. Enter the remaining / additional data (if required). Click Confirm at the end of each section.


Please note:
Before selecting the tax regime, please note that certain deductions and exemptions are not available in the new tax regime. To know more refer to video on Old vs. New tax Regime (Part-1)
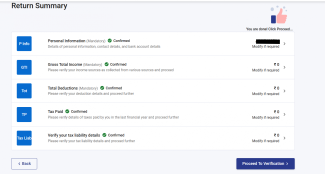
Step 10: Enter/ Edit your income and total deductions details in the different sections. After completing and confirming all the sections of the form, click Proceed.
Step 10a: In case there is a tax liability
After clicking on total tax liability, you will be shown a summary of your tax computation based on the details provided by you. If there is tax liability payable based on the computation, you will get the Pay Now and Pay Later options at the bottom of the page.

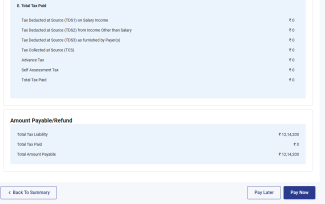
Note:
- It is recommended to use the Pay Now option.
- If you opt to Pay Later, you can make the payment after filing your Income Tax Return, but there is a risk of being considered as taxpayer in default, and liability to pay interest on tax payable may arise.
Step 10a(i) : If you click on “Pay Now” you will be redirected to e-pay Tax service. Click Continue.
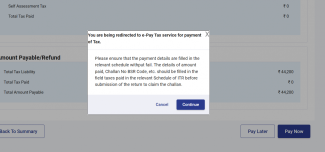
- Note: You will be taken to e-Pay Tax page on the portal for making tax payment after you click Continue. Refer to e-Pay Tax user manuals to learn more.
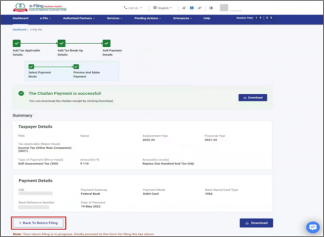
Step 10a(ii): After successful payment through e-Filing portal a success message is displayed. Click Back to Return Filing to complete filing of ITR.
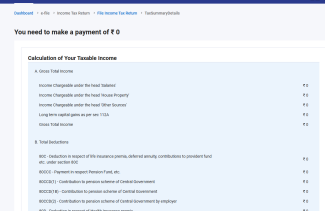
Step 10b: In case there is no tax liability (No Demand / No Refund) or if you are eligible for a Refund
Click Preview Return. If there is no tax liability payable, or if there is a refund based on tax computation, you will be taken to the Preview and Submit Your Return page.
Step 11: On the Preview and Submit Your Return page, select the declaration checkbox and click Proceed to Validation
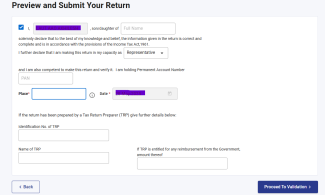
Note: If you have not involved a tax return preparer or TRP in preparing your return, you can leave the textboxes related to TRP blank.
Step 12: Once internal validations is successful then click on Preview
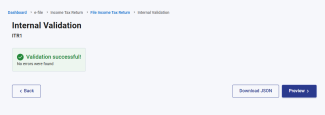
Note: If you are shown a list of errors in your return, you need to go back to the form to correct the errors. If there are no errors, you can proceed to Preview your return.
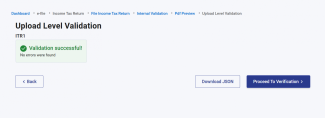
Step 13: Click on Preview of Return and proceed to validation
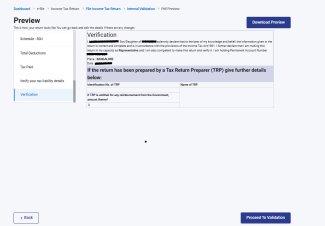
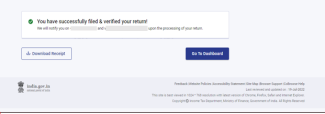
Step 14: Once return is successfully validated with Upload level validation then click on Proceed to Verification
Step 15: On the Complete your Verification page, select your preferred option and click Continue.
It is mandatory to verify your return, and e-Verification (recommended option – e-Verify Now) is the easiest way to verify your ITR – it is quick, paperless, and safer than sending a signed physical ITR-V to CPC by speed post.
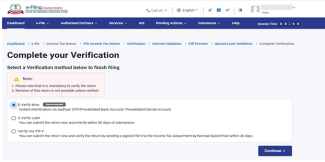
Note: In case you select e-Verify Later, you can submit your return, however, you will be required to verify your return within 30 days of filing of your ITR.
Step 16: On the e-Verify page, select the option through which you want to e-Verify the return and click Continue.
Note:
- Refer to How to e-Verify user manual to learn more.
- If you select Verify via ITR-V, you need to send a signed physical copy of your ITR-V to Centralized Processing Center, Income Tax Department, Bengaluru 560500 by speed post within 30 days.
- Please make sure you have pre-validated your bank account so that any refunds due maybe credited to your bank account.
- Refer to My Bank Account user manual to learn more.
Please Note: As per Notification No. 2 of 2024 dated 31/03/2024-
- Where the return of income is uploaded and e-verification/lTRV is submitted within 30 days of uploading – In such cases the date of uploading the return of income shall be considered as the date of furnishing the return of income.
- Where the return of is uploaded but e-verification or ITR-V is submitted after 30 days of uploading – In such cases the date of e-verification/ITR-V submission shall be treated as the date of furnishing the return of income and all consequences of late filing of return under the Act shall follow, as applicable.
- The duly verified ITR-V in prescribed format and in the prescribed manner shall be sent either through ordinary or speed post or in any other mode to the following address only: Centralised Processing Centre, Income Tax Department, Bengaluru - 560500, Karnataka.
- The date on which the duly verified ITR-V is received at CPC shall be considered for the purpose of determination of the 30 days period from the date of uploading of return of income.
- It is further clarified that where the return of income is not verified after uploading within the specified time limit such return shall be treated as invalid.