

Form 42 User Manual
1. Overview & Purpose of the form
An Indian resident who wishes to obtain a certificate of residence, as per sections 159(1) and 159(2) of the Income-tax Act 2025, must apply in Form No.42 to the Assessing Officer.
After the Assessing Officer receives the application and is satisfied with the details, he shall issue the certificate of Residence in Form No.43 to the applicant.
2. Prerequisites for availing this service
• The user shall be a registered user on the e-Filing portal.
• Status of PAN of the user should be "Active".
• Users should have a valid DSC, if user wished to verify the form through DSC mode, and it must be registered on the e-filing portal and not expired.
3. Who can use it?
All registered users having valid PAN on the e-Filing portal can apply for Tax Residency Certificate in Form No.42.
4. Step-by-Step Guide
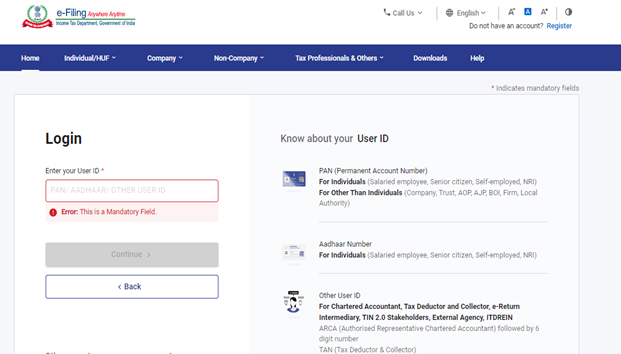
Step 1: Log in to the e-Filing portal with your User ID and Password.
Step 2: Enter the User ID (PAN) and Password and click on ‘Continue’.
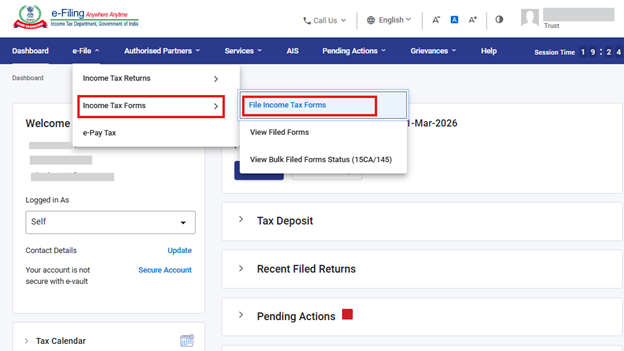
Step 3: Go to e-file >Income Tax Forms > File Income Tax Forms.
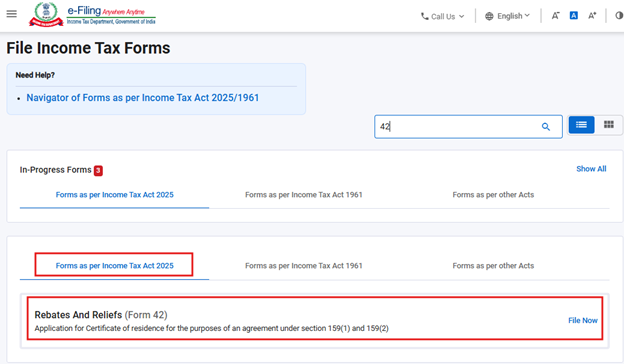
Step 4: Select the Form as per Income Tax Act 2025 tab.
Click on Forms as per Income Tax Act, 2025 and select “Form No. 42” and click File now.
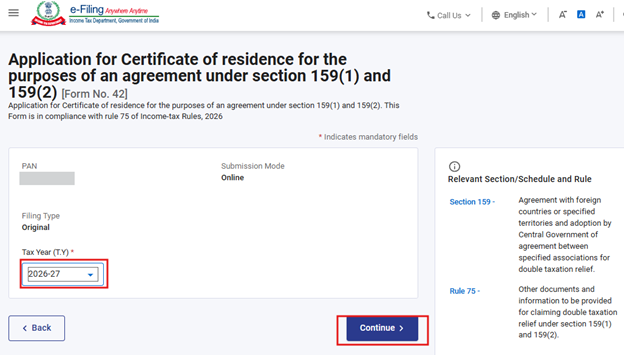
Step 5: Select the applicable Tax Year (T.Y) and click on Continue button.
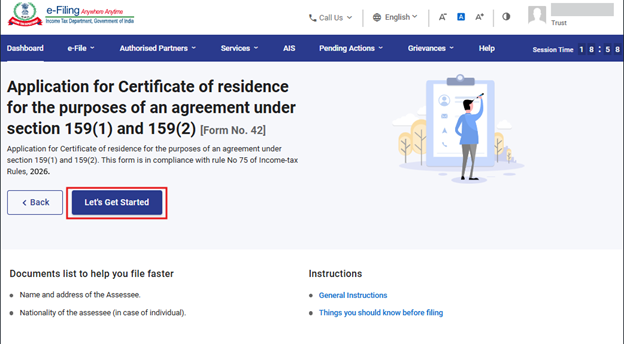
Step 6: Click on Let’s Get Started.
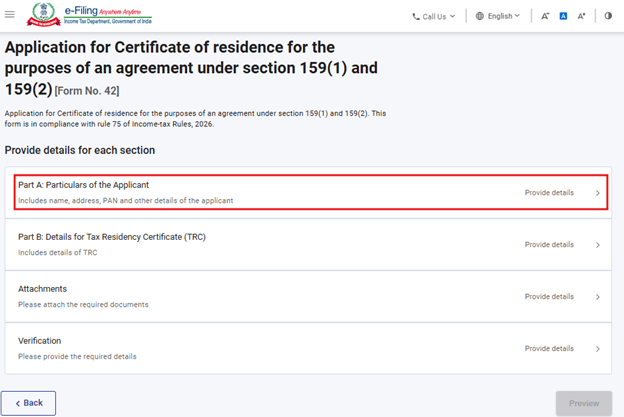
Step 7: Post clicking on ‘Let’s Get Started”; user will be navigated to Panel screen. Select the 1st Panel- Part A: Of the Applicant
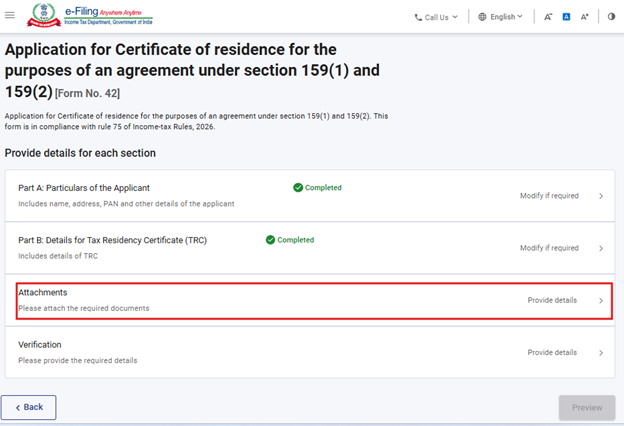
Form No. 42 is divided into four panels, namely-
i) Part A: Particulars of Applicant
ii) Part B: Details for Tax Residency Certificate (TRC)
iii) Attachments
iv) Verification
Users need to fill in the details and save each panel before moving to the next. To start, the user should select the first panel and begin entering the required information.
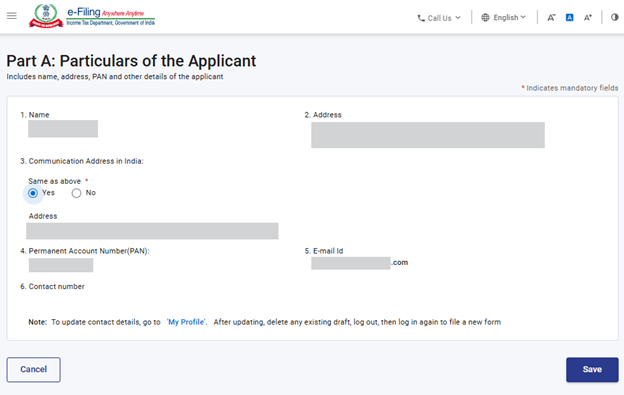
Step 8: Confirm the Particulars and click on Save.
The user shall enter the details asked for inside the panel. This panel may be prefilled to the extent possible. After completing all entries, the user shall select ‘Save’ to save the details and proceed to next panel.
Note: Please ensure that all mandatory details under "My Profile" section including address are completed. If the user updates any detail in the “My Profile” section, please delete the existing draft and file the form afresh so that the changes are properly reflected.
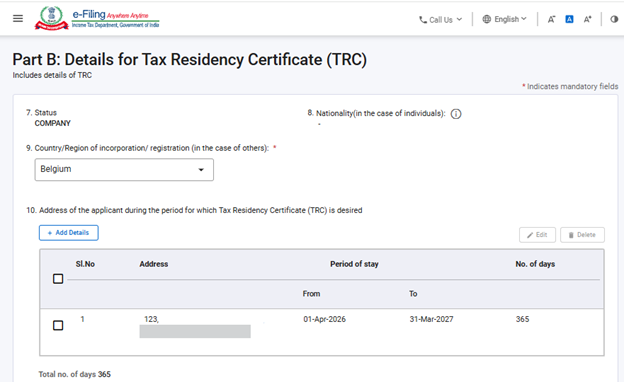
Step 9: Post saving the 1st panel, select the 2nd Panel- Part B: Details for Tax Residency Certificate (TRC).

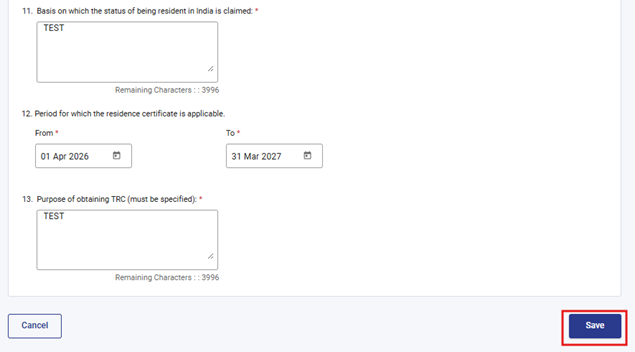
Step 10: Enter the details in Part B and click on Save.
Field 8 applies only to Individuals, while Field 9 applies to all applicants other than Individuals. In Field 10, the user must provide the applicant’s address for the year for which the TRC is desired.
Step 11: Post saving the 2nd panel, select the 3rd Panel-Attachments.
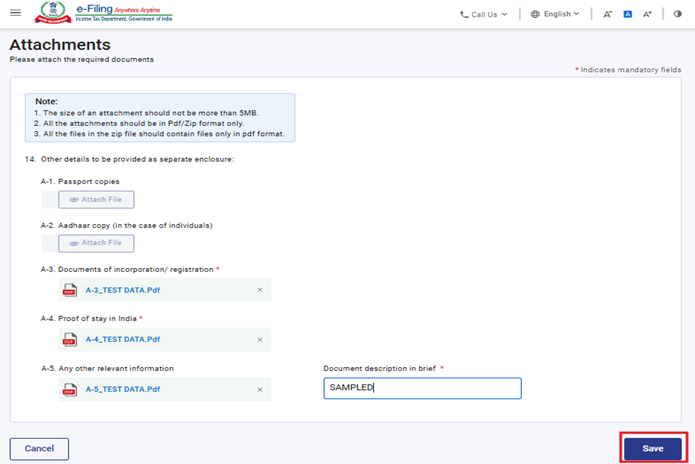
Step 12: In the Attachments panel user shall attach required documents and shall click on ‘Save’ to proceed.
Attachments A 1 and A 2 apply only to Individual applicants, while Attachment A 3 applies to applicants other than Individuals.
User can also attach any other documents which he wants to submit in ‘A-5’ attachment.
Step 13: Post Attachment panel, User shall proceed to Panel 4- Verification.
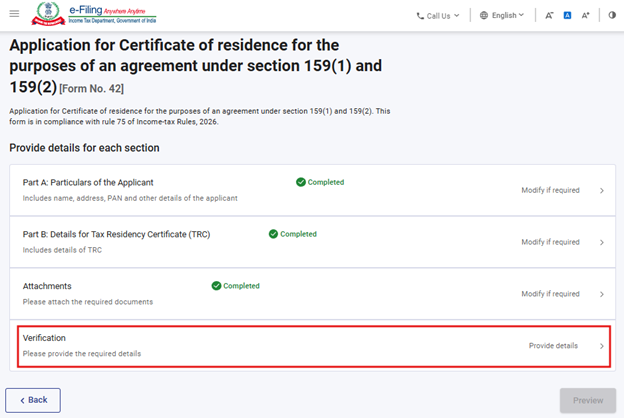
Step 14: User shall enter the details in the Verification Panel. Select ‘Save’ to procced further.
Please note that the user may modify the Verifier’s details by updating the “My profile” section.

Step 15: After all the panels are saved, “completed” mark shall appear in front of the panel heading. Select “Preview” button to proceed further.
If any panel is incomplete, “Not completed” mark shall appear. Users shall click on such panel, enter the required details and save the panel. Then user may proceed to “Preview”.
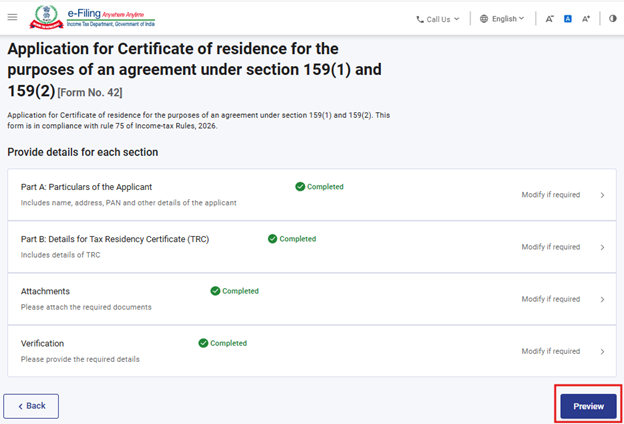
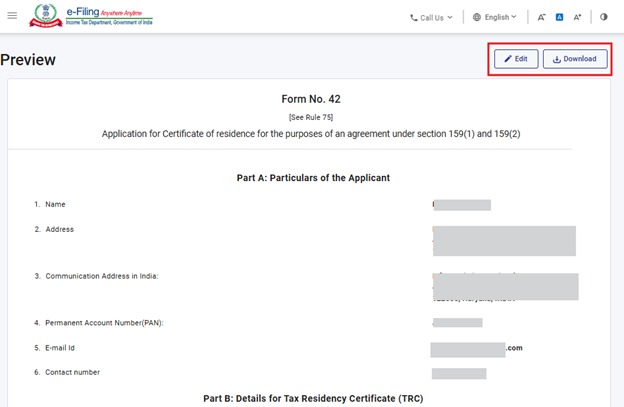
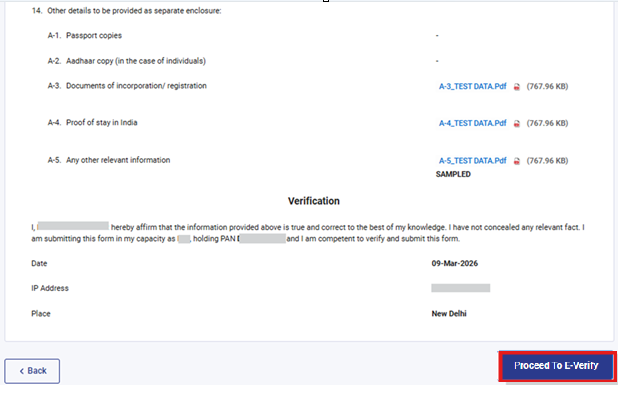
Step 16: On click of “preview” button, user shall be navigated to Preview screen where he can verify the details provided and later shall click on “Proceed To E-Verify”.
All the fields and inputs provided by the user in the form will be displayed on the preview screen. The user should review these details before proceeding. If any changes are required, the user can click the “Edit” button to modify the information within the form. The user also has the option to download the preview screen as a PDF, but this PDF is only a copy of the pre filing view and NOT the final filed form. To continue with the filing process, the user must click the “Proceed To E-Verify” button.
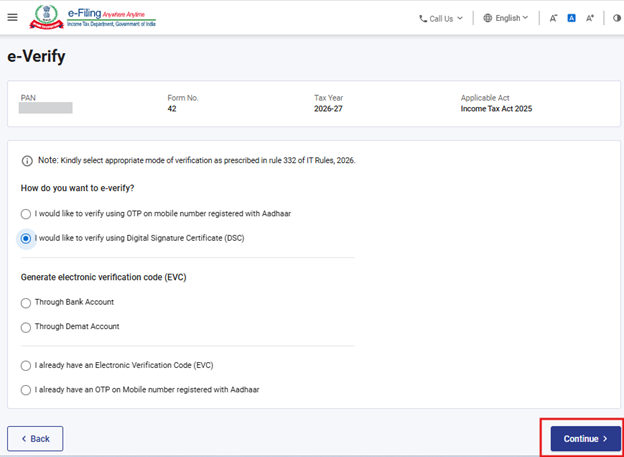
Step 17: On clicking Yes, user will be navigated to the ‘E-Verify’ page where he can verify the Form No.42 using OTP/EVC/DSC (as applicable to PAN). The user shall click on ‘Continue’ button to submit the form
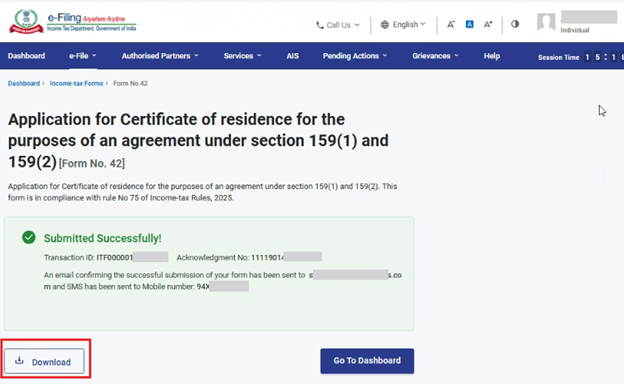
Step 18: Once the form is successfully submitted, confirmation message shall be displayed on the screen and Acknowledgement receipt will be generated. User can click on “Download” button to view the receipt.
After successful e-Verification, a success message is displayed along with a Transaction ID and Acknowledgement Receipt Number. Please keep a note of the Transaction ID and Acknowledgement Receipt Number for future reference. You will also receive a confirmation message on the email ID(s) and mobile number(s) registered with the e-Filing portal.
Click on Download button to download the Acknowledgement receipt.
Step 19 : After successful submission of Form No. 42 the user can view the filled form under - On your Dashboard, click e-File > File Income Tax Forms > View Filed Forms> View Filed Form tab under Income Tax Act 2025.
Note: Refer view filled form user manual to learn more.
Note: Refer to the How to e-Verify user manual to learn more.
5. Related Topics
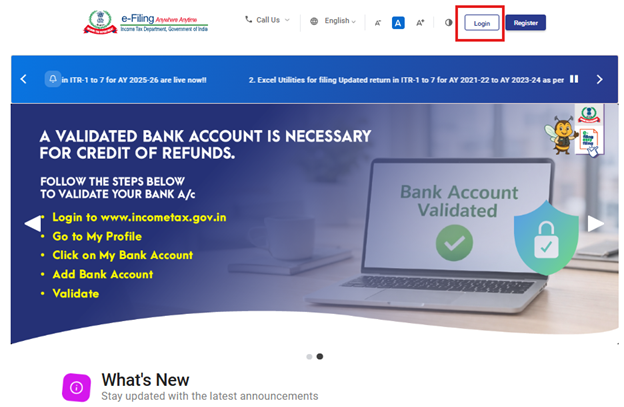
• Login
• Dashboard
• How to e-Verify
• Register Digital Signature Certificate (DSC)
6.Glossary
| Acronym/Abbreviation | Description/Full Form |
| DSC | Digital Signature Certificate |
| EVC | Electronic Verification Certificate |
| ARN | Acknowledgement Receipt Number |
| PY | Previous Year |
| FY | Financial Year |
| TY | Tax Year |

