Form 145
1. Overview
Form 145 is a new form that replaces the old Form 15CA for sending money outside India. It needs to be filled by anyone who wants to make a foreign payment, and it must be submitted before the money is sent. The form helps the Income Tax Department know why the money is being sent and whether any tax needs to be paid on it. Form 145 also asks for clear details about the purpose of the remittance from a fixed list, which makes the process easier and reduces mistakes. In some cases, a Chartered Accountant must first give Form 146 (earlier Form 15CB) before you can file Form 145. If the amount of transaction crosses prescribed limit (Rs 5 Lakhs) and tax implication is there as mentioned in Part C since it is not covered under part B. You can submit Form 145 in online and offline mode on the Income Tax portal.
2. Prerequisites for availing this service
• Registered user of the e-Filing portal with valid user ID and password.
• CA should have filed Form 146 (for Part - C only).
3. About the Form
3.1 Purpose
This form enables the users to file Information to be furnished for payments to a non-resident not being a company, or to a foreign company. Form 145 is filed for each remittance made by a person responsible for such remittance, before remitting the amount.In some cases, a Certificate from Chartered Accountant in form 146 is required for uploading the Form 145 online.
3.2 Who can use it?
Any category of taxpayer, Authorized Signatory and Representative Assessee can use Form 145 to furnish information regarding payment made to a Non-Resident, not being a Company, or to a Foreign Company.
3.3 Form at a Glance
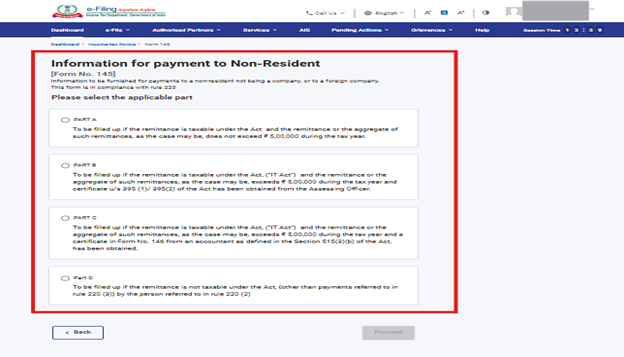
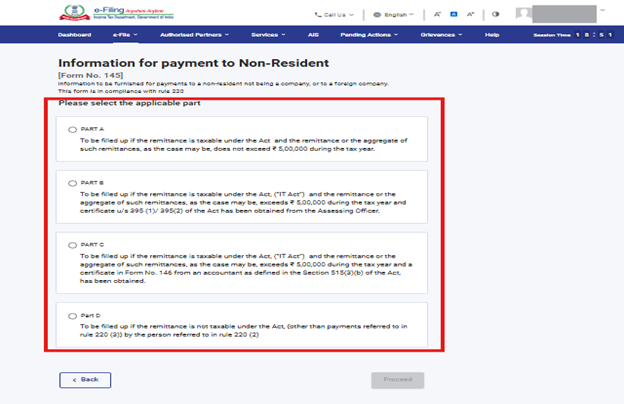
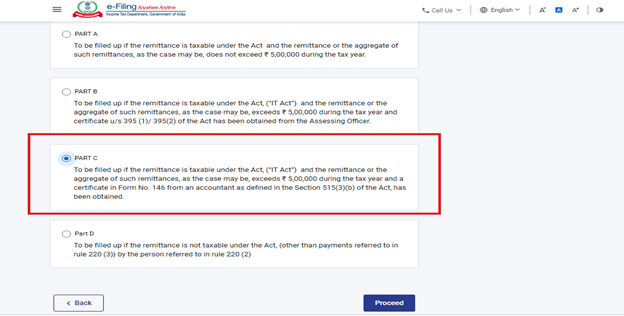
Form 145 has four sections:
- Part A - To be filled up if the remittance is taxable under Act and the remittance or the aggregate of such remittances, as the case may be, does not exceed ₹ 5,00,000 during the tax year.
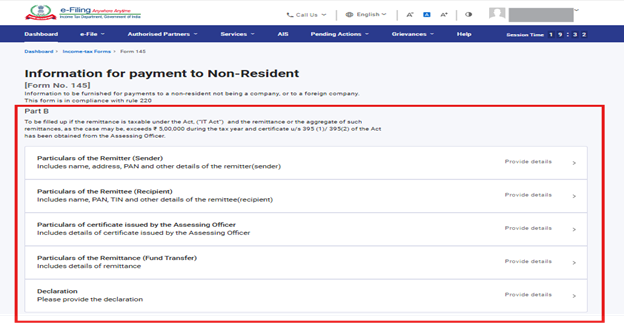
- Part B - To be filled up if the remittance is taxable under the Act ("IT Act") and the remittance or the aggregate of such remittances, as the case may be, exceeds ₹ 5,00,000 during the tax year and certificate u/s 395 (1)/ 395(2) of the Act has been obtained from the Assessing Officer.
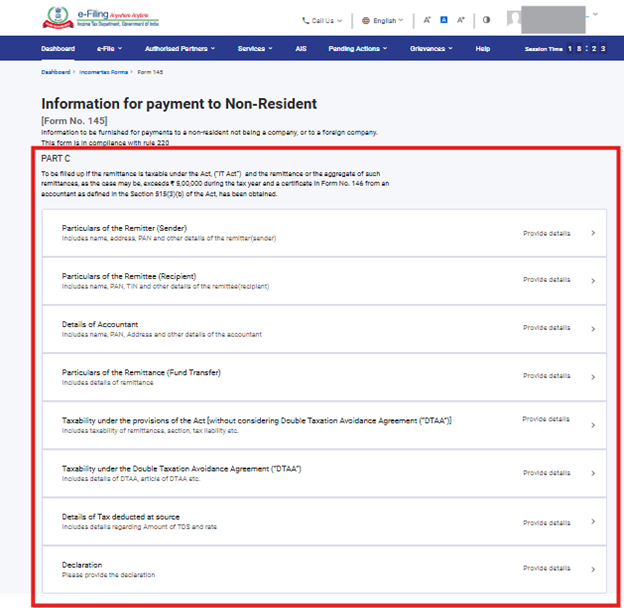
- Part C - To be filled up if the remittance is taxable under Act ("IT Act") and the remittance or the aggregate of such remittances, as the case may be, exceeds ₹ 5,00,000 during the tax year and a certificate in Form No. 146 from an accountant as defined in the Section 515(3)(b) of the Act, has been obtained.
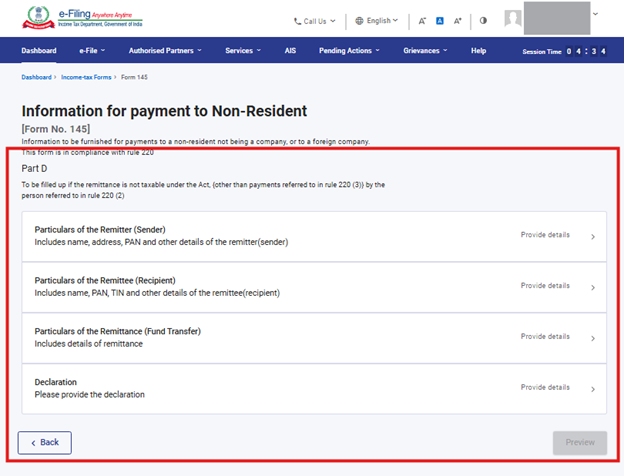
- Part D - To be filled up if the remittance is not taxable under the Act other than payments referred to in Rule 220(3) by the person referred to in Rule 220(2).
3.3.1 Part A:
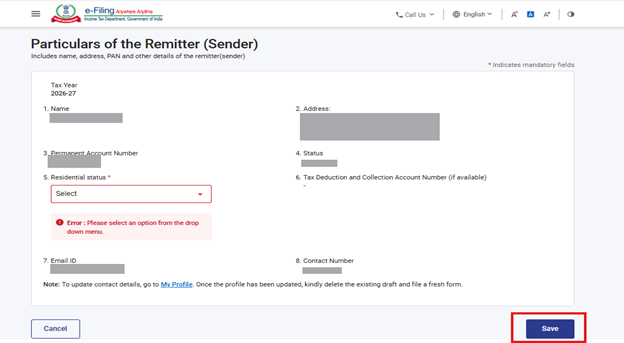
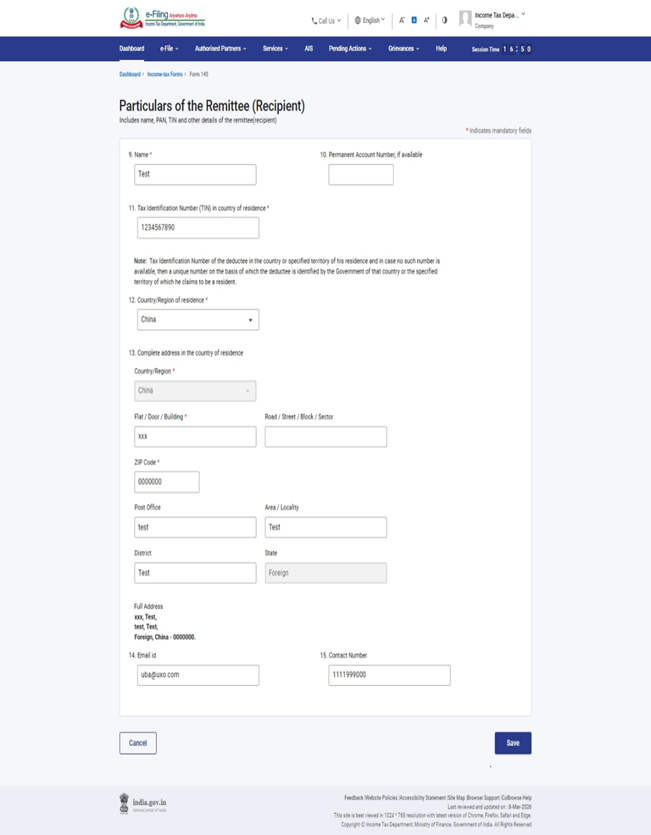
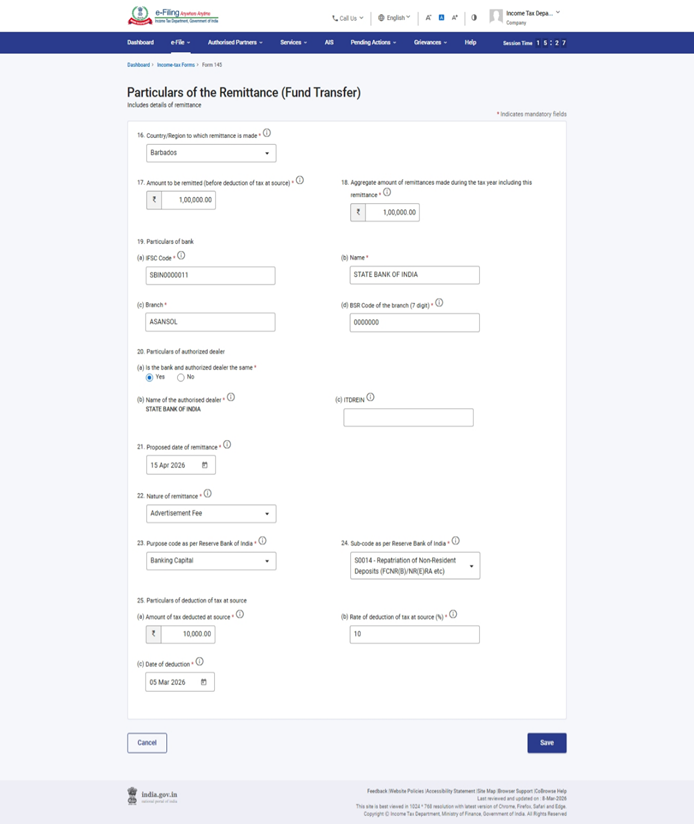
Enter the Particulars of remitter, remittee and remittance. Part A also includes the Declaration from the person submitting Form 145.

3.3.2 Part B:
Enter the Particulars of remitter, remittee, AO Certificate details and the remittance details. Part B also includes the Declaration from the person submitting Form 145.
3.3.3 Part C:
All the Panels such as Particulars of Remitter and Remittee, Details of Accountant, Particulars of Remittance (Fund transfer), Taxability under the provisions of the Act [without considering Double Taxation Avoidance Agreement (“DTAA”)], Taxability under the Double Taxation Avoidance Agreement (“DTAA”), Details of Tax deducted at source and Declaration will be prefilled based on ARN details provided of Filed Form 146.
3.3.4 Part D:
Enter the Particular of remitter, remittee and the remittance details. Part D also includes the Declaration from the person submitting Form 145.
4. How to Access and Submit
You can fill and submit Form 145 through the following methods:
• Online Mode - through e-Filing portal.
• Offline Mode - through Offline Utility
Note: Refer to the Offline Utility (Statutory Forms) user manual to learn more.Follow the below steps to fill and submit Form 145 through online mode.
5. Step-by-Step Guide
5.1 Step-by-Step Guide to file Part A,B and D
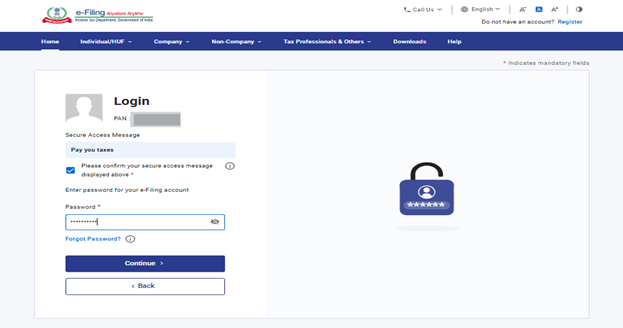
Step 1: Log in to the e-Filing portal with your User ID and Password.

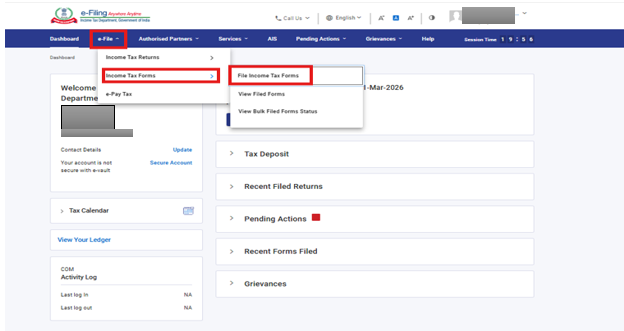
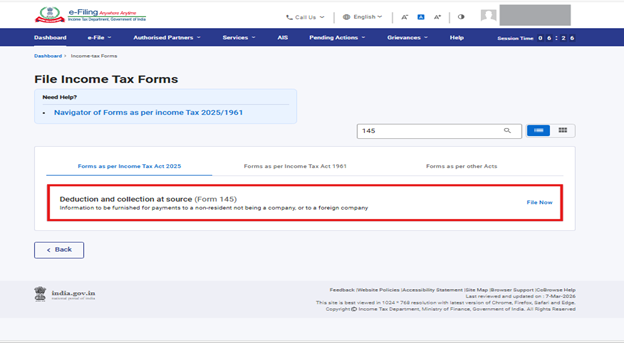
Step 2: Go to e-file >Income Tax Forms > File Income Tax Forms.
Step 3: Select Tab "Forms as per Income Tax Act 2025".
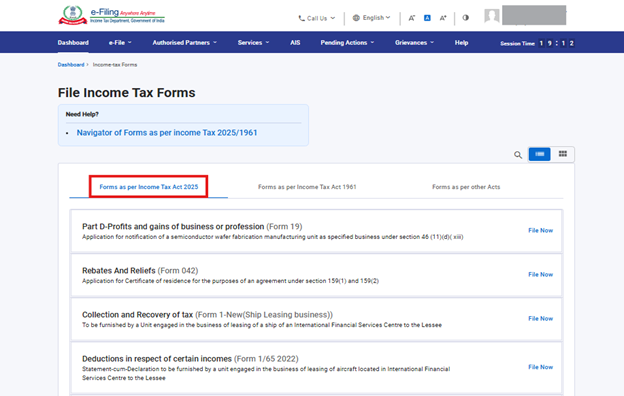
Step 4: Select/ Search Form 145.
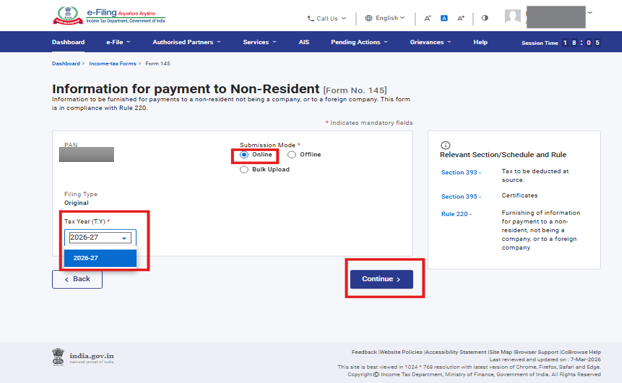
Step 5: Select Online and Tax Year then click on Continue.
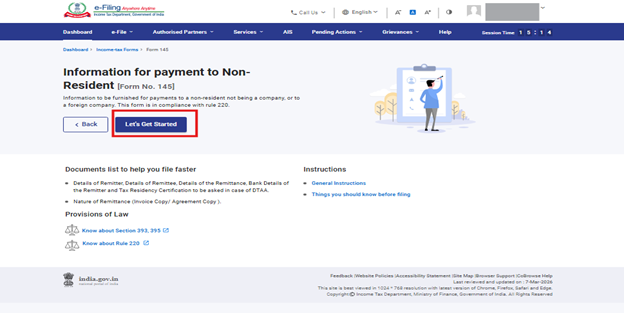
Step 6: Click on Let's Get Started.
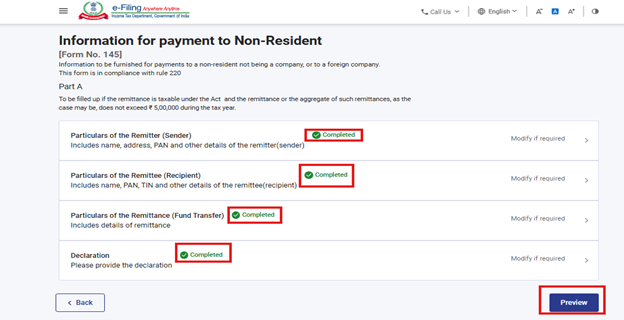
Step 7: On click of Let's Get Started, Form 145 is displayed. Select the applicable section and fill all the required details. Click Proceed.
Step 7.1: Complete each Panel of selected Part and Preview button will be enabled after completing all the Panels of Part A or Part B or Part D. (Example for Part A shown below.)
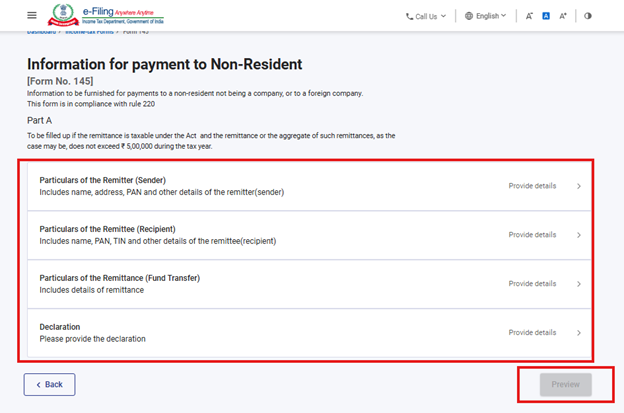
Step 7.2: Fill up detail required in each panel and click on save.
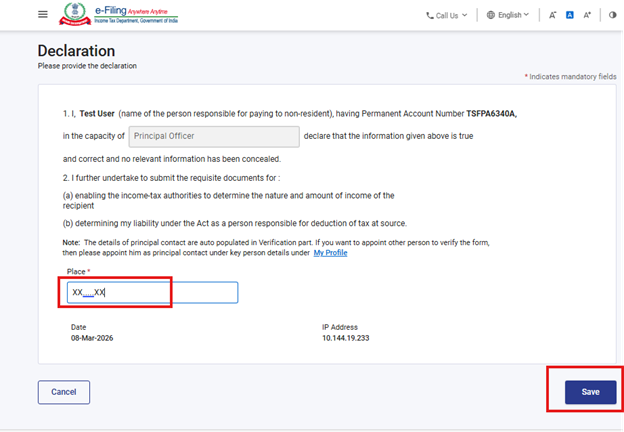
Step 7.3: When all required fields in a panel are filled, a 'Completed' mark will appear. After all panels are completed, the Preview button will become active."
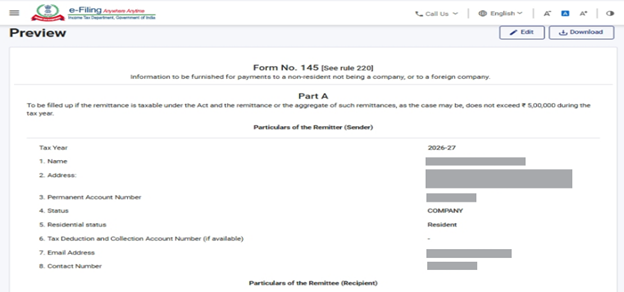
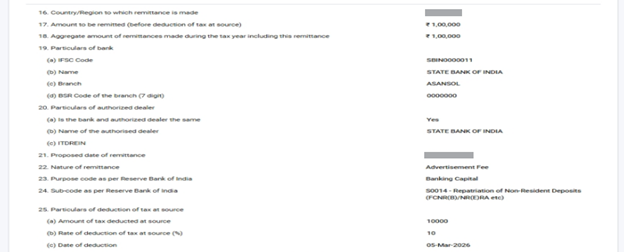
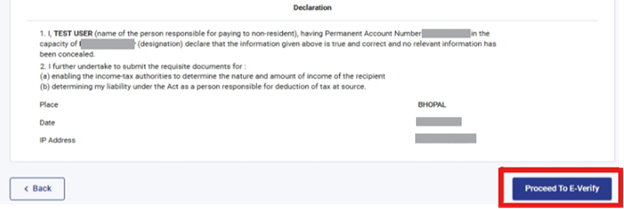
Step 8: On the Preview page, verify the details and click Proceed to e-Verify.
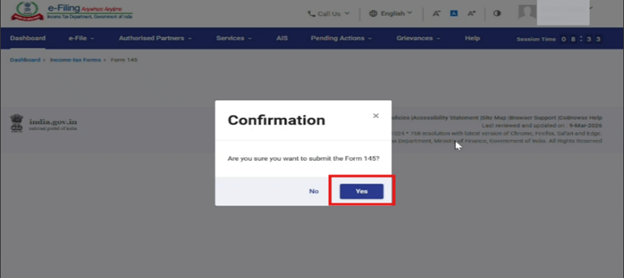
Step 9: Click Yes to submit. On clicking Yes, you will be taken to the e-Verify page.
Step 10: You can e-Verify the Form through any of the modes of Verification.
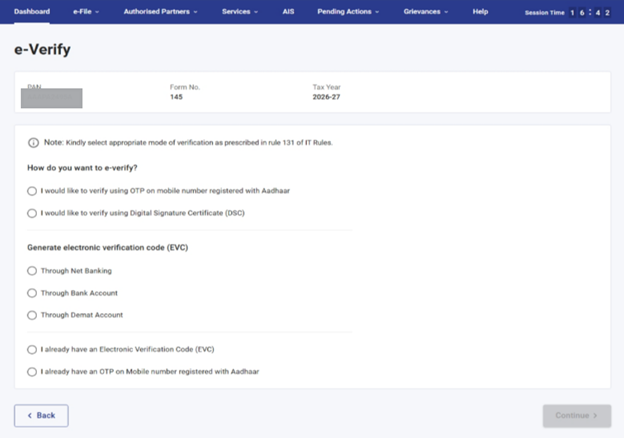
Note: Refer to the How to e-Verify user manual to learn more.
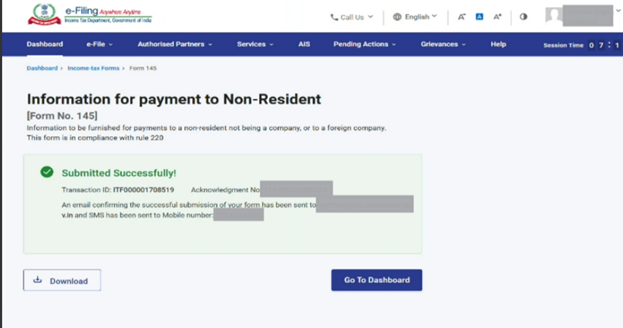
After successful e-Verification, a success message is displayed along with a Transaction ID and Acknowledgement Number. Please keep a note of the Transaction ID and Acknowledgement Number for future reference. You will also receive a confirmation message on your email ID and mobile number registered with the e-Filing portal.
Step 11: To submit the form click on Yes.
Step 12: Submission will be Successful once you submit the form.

5.2 If you want to fill Form 145 - Part C
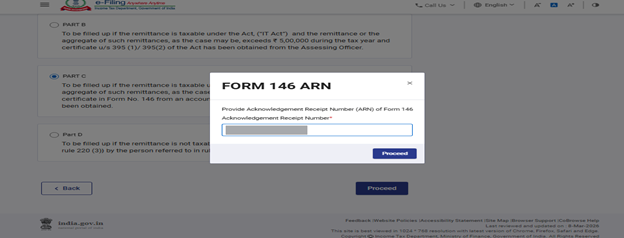
Step 1: Choose Part C of the form.
Step 2: "If you have not added a CA, please select one to assign the form. You can refer to the 'My CA' user manual for help. After adding a CA, they will fill Form 146. Once Form 146 is submitted, an acknowledgement receipt will be generated. Using Acknowledgement no. mentioned on receipt, you can proceed to file Form 145 - Part C."
Step 3: Enter Acknowledgement Number of form 146 filled by CA for logged in User.
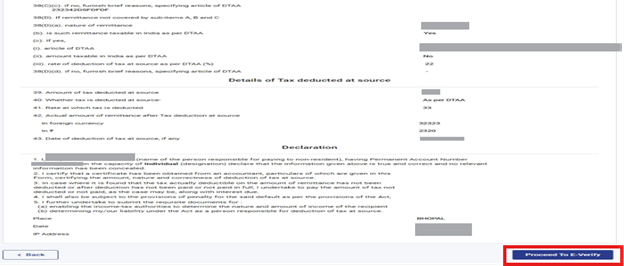
Step 4: Open each panel, review the information prefilled from Form 146 submitted by the CA, and save the panel. After completing all panels, click on Preview to verify the details submitted by the CA in Form 146.
Step 5: Preview will appear as shown in image. Verify Details once again and click on proceed to e-verify.
Step 6: Click on yes on Confirmation Pop up to E-Verify.
Step 7: You can e-Verify the Form through any of the modes of Verification.
Note: Refer to the How to e-Verify user manual to learn more.
After successful e-Verification, a success message is displayed along with a Transaction ID and Acknowledgement Number. Please keep a note of the Transaction ID and Acknowledgement Number for future reference. You will also receive a confirmation message on your email ID and mobile number registered with the e-Filing portal.
Step 8: To submit the form click on Yes.

Step 9: Submission will be Successful once you submit the form.