1. Overview
Any taxpayer choosing offline mode (rather than online mode) to file Income Tax Returns needs to use the Offline Utility for ITRs. With the utilities, you can file Income Tax Returns (ITRs) by uploading the utility-generated JSON:
- Post login to the e-Filing portal, or
- Directly through the offline utility
This service on the e-Filing portal offers two separate offline utilities for filing ITRs which are as follows:
- ITR-1 to ITR-4, and
- ITR-5 to ITR-7
2. Prerequisites for availing this service
- Registered user on the e-Filing portal
- Valid user ID and password for filing ITR through the offline utility
- Downloaded offline utility for ITR-1 to ITR-4, or ITR-5 to ITR-7
3. Step-by-Step Guide
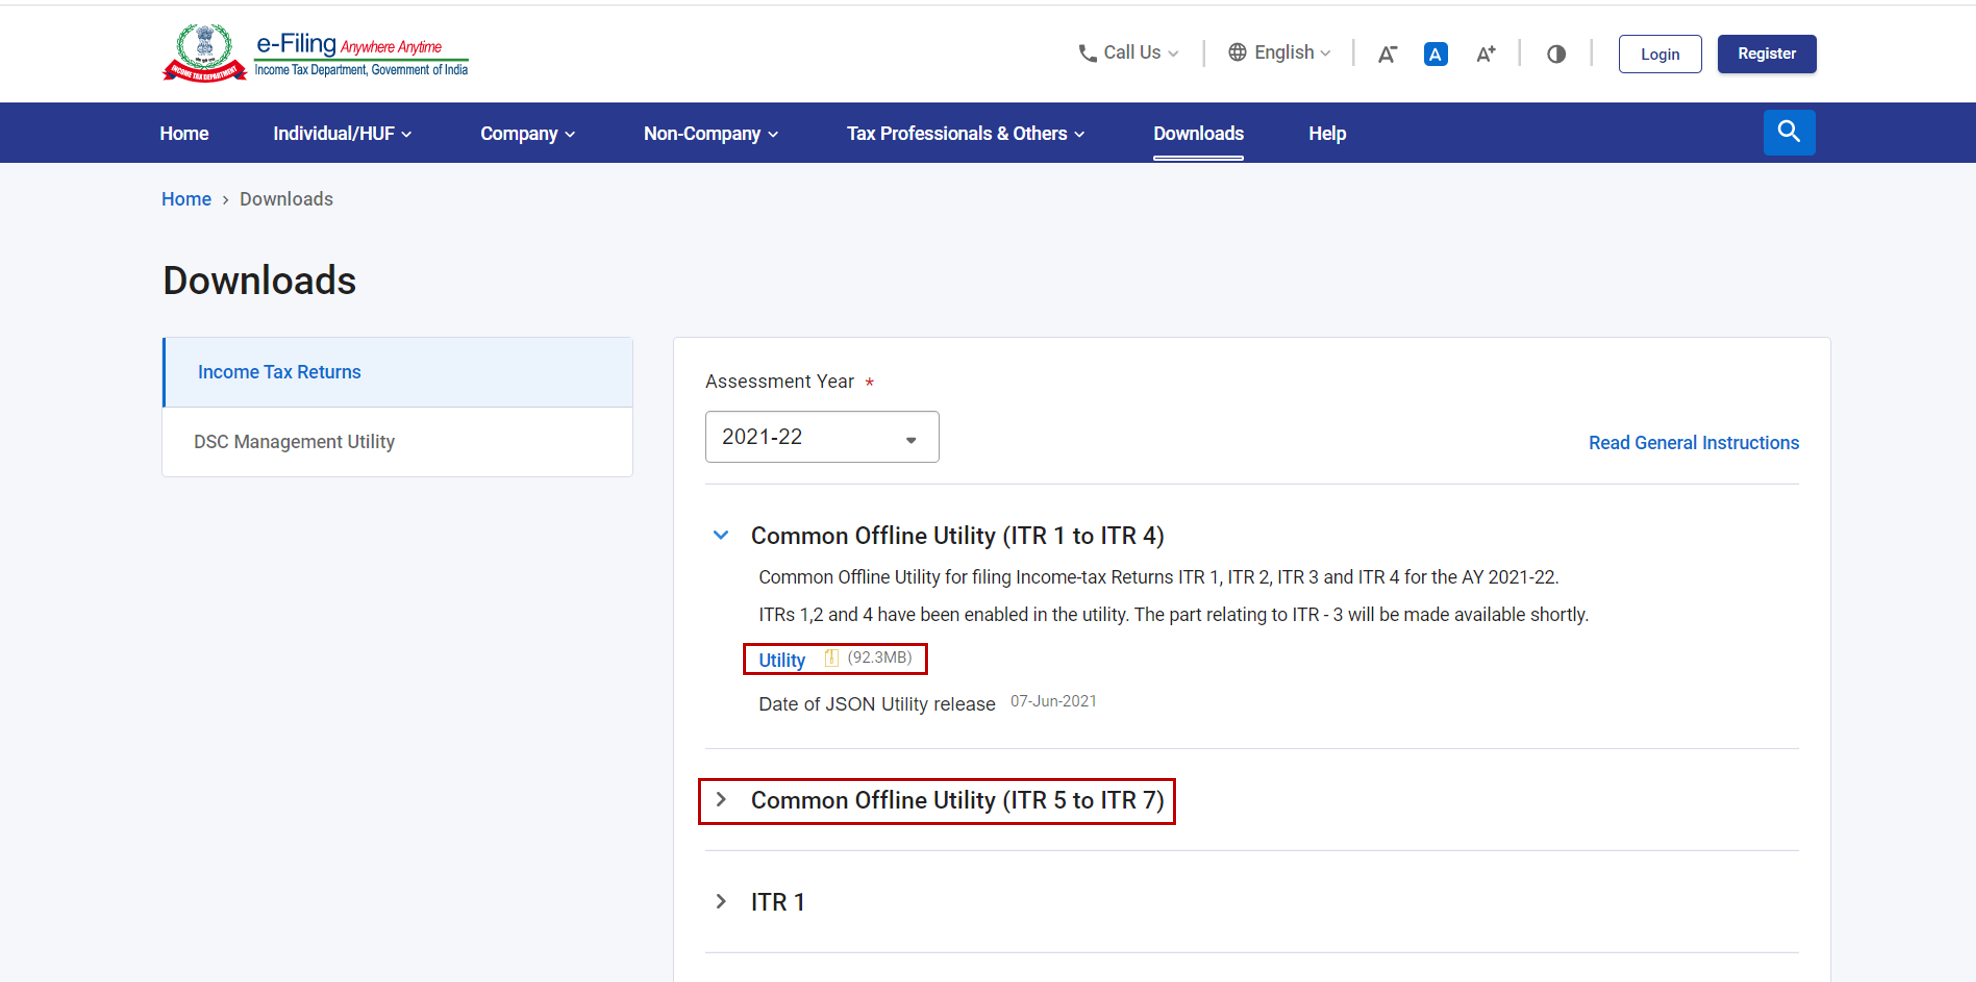
Step 1: Without logging in to the e-Filing portal, you can download the relevant offline utility from Home > Downloads. Install it on your computer and proceed to Step 2.
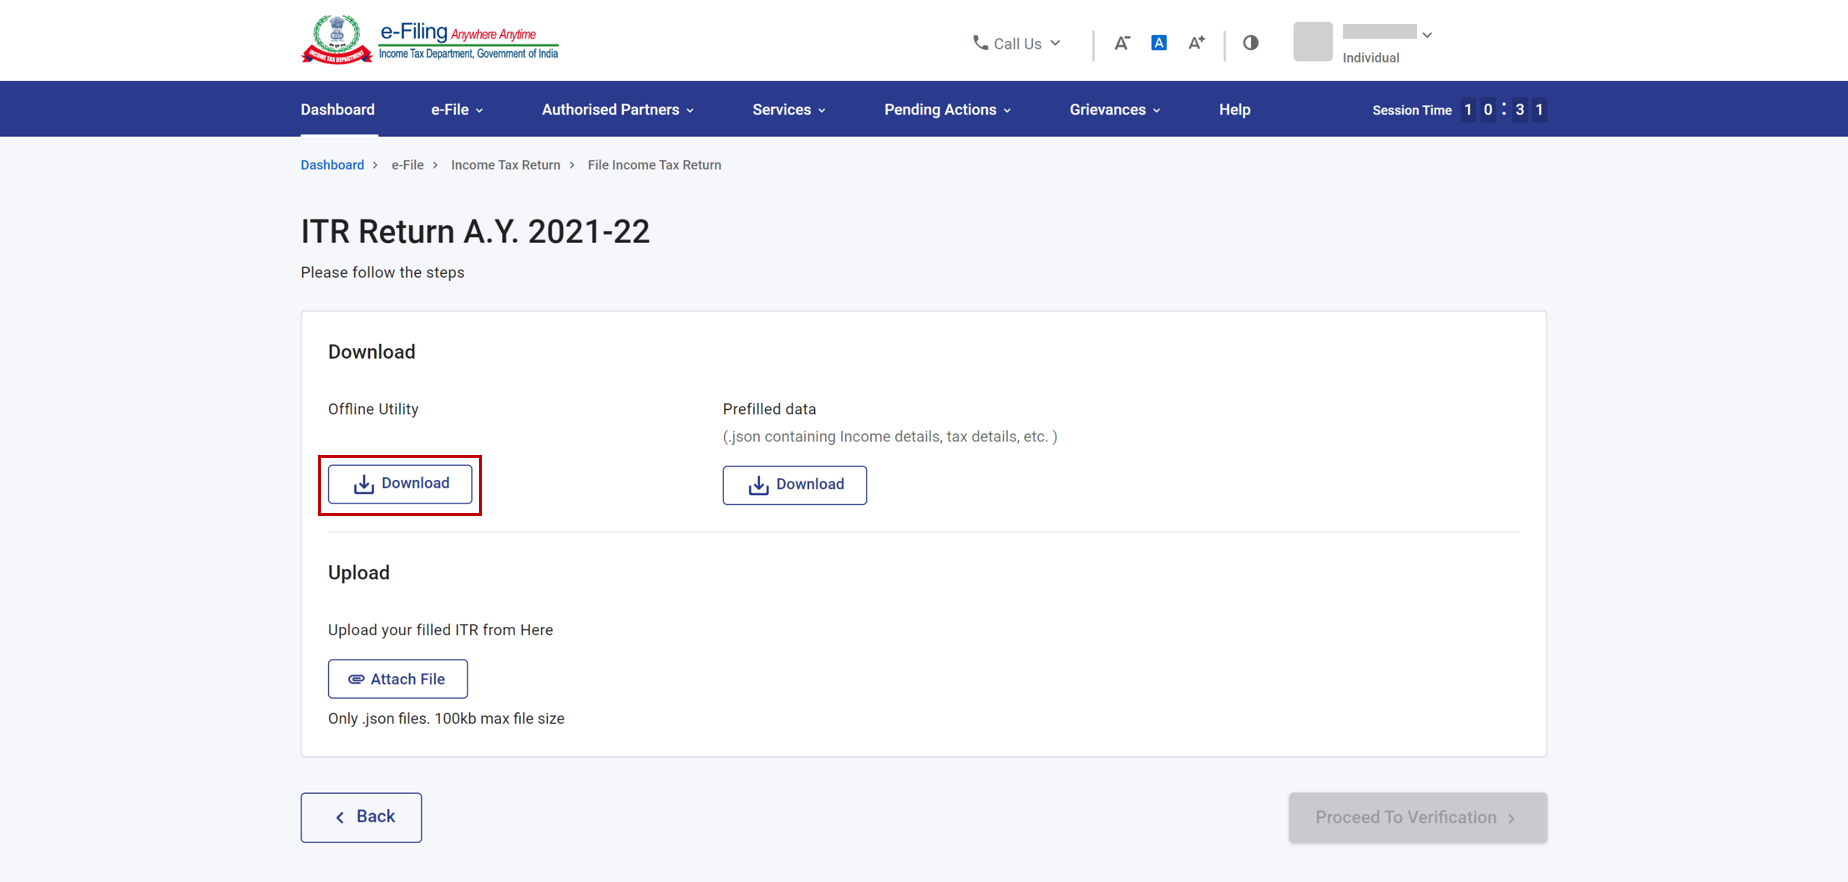
Step 1a: Alternately, you can download the offline utility after logging in to the e-Filing portal, and clicking e-File > Income Tax Returns > File Income Tax Return > Select the current AY and Mode of Filing (Offline). Then, click Download under the Offline Utility option.
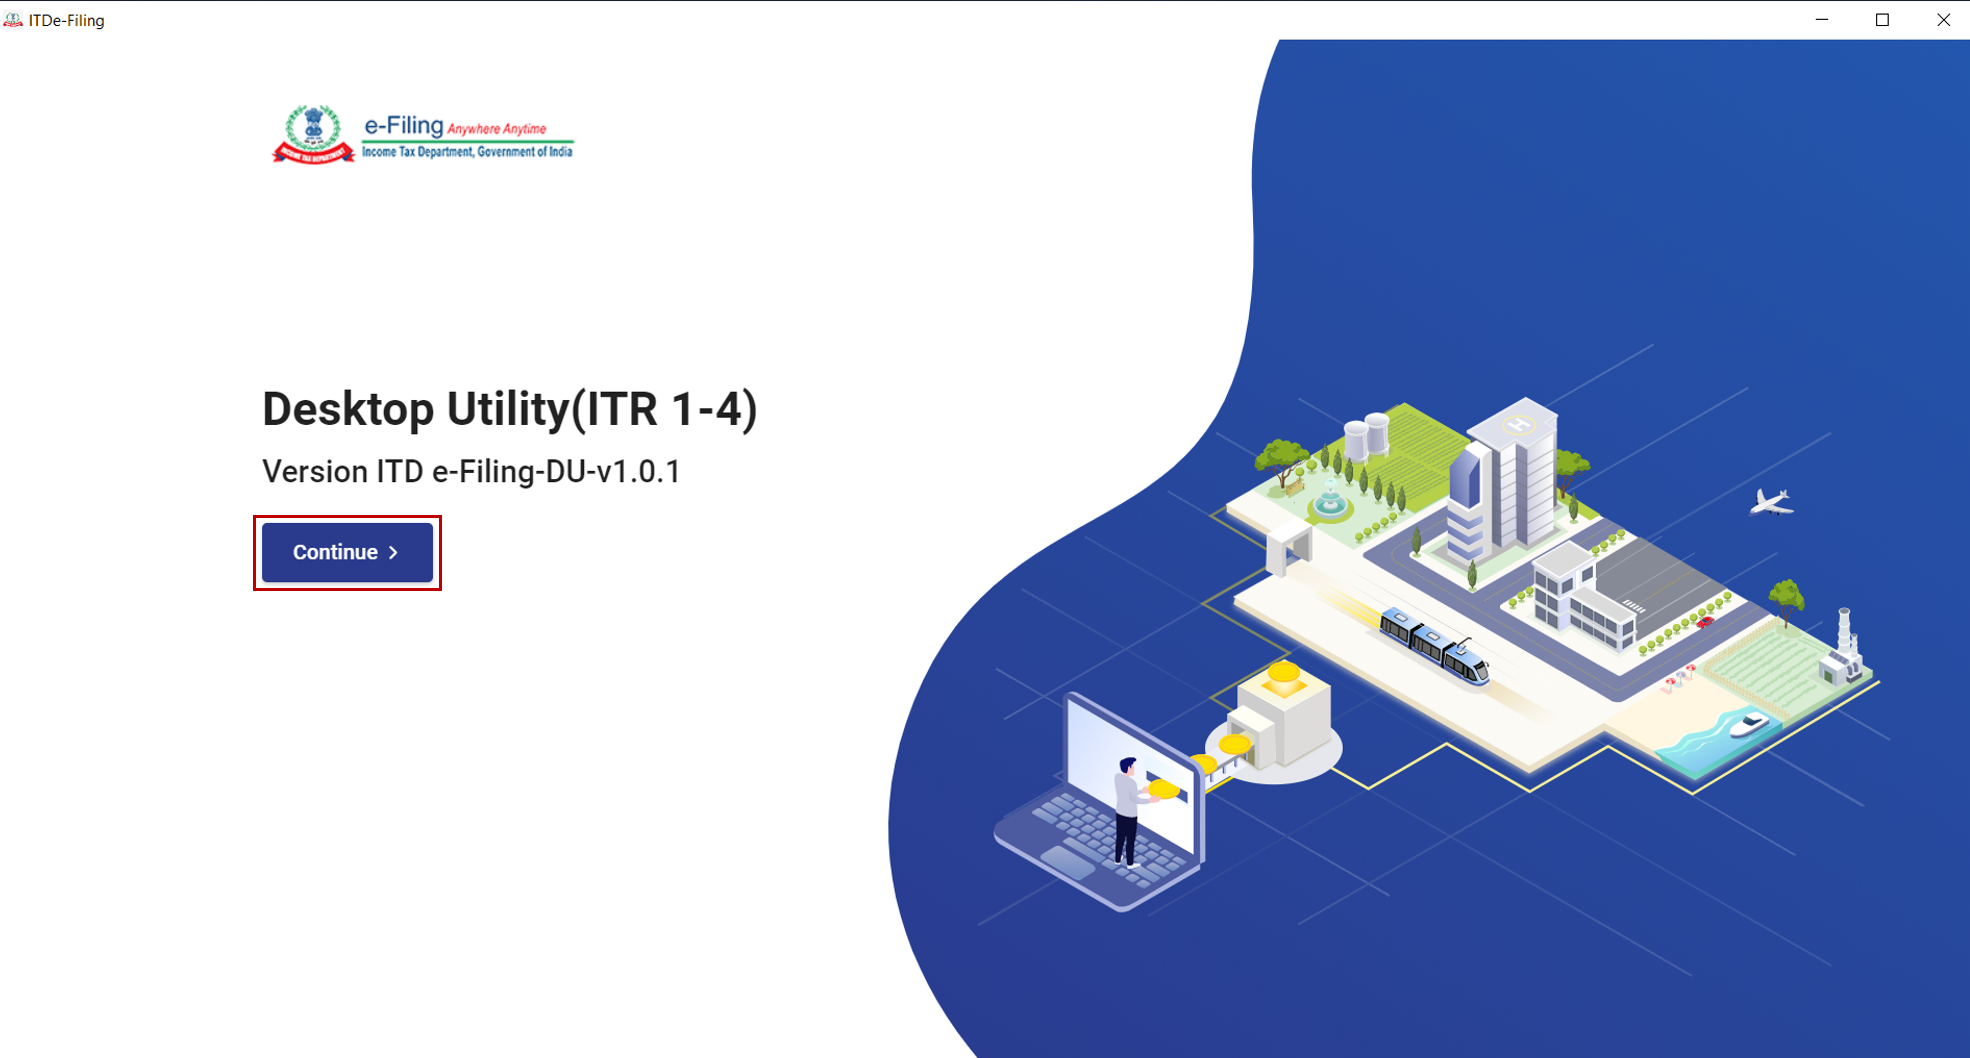
Step 2: Install and open the offline utility. If previously installed, the utility version will get updated when you are connected to the internet (in case of version updates). Click Continue.
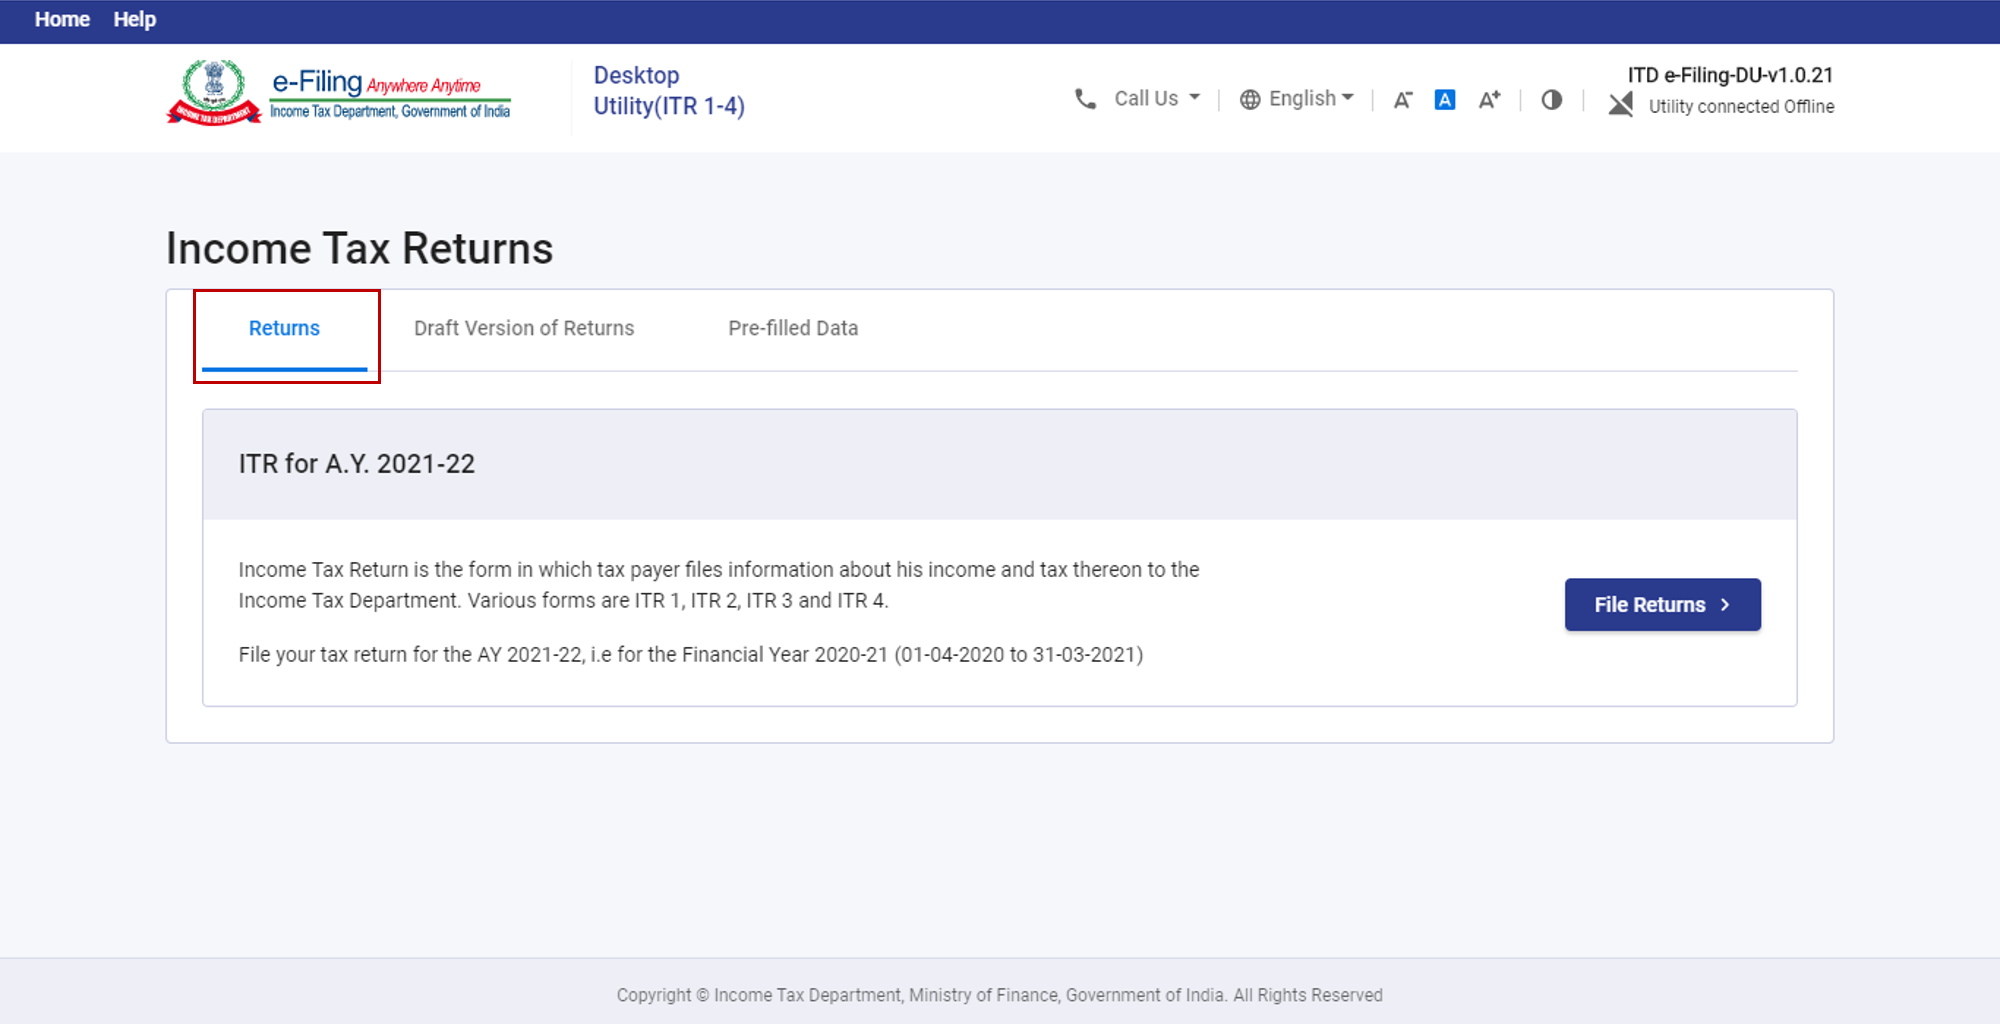
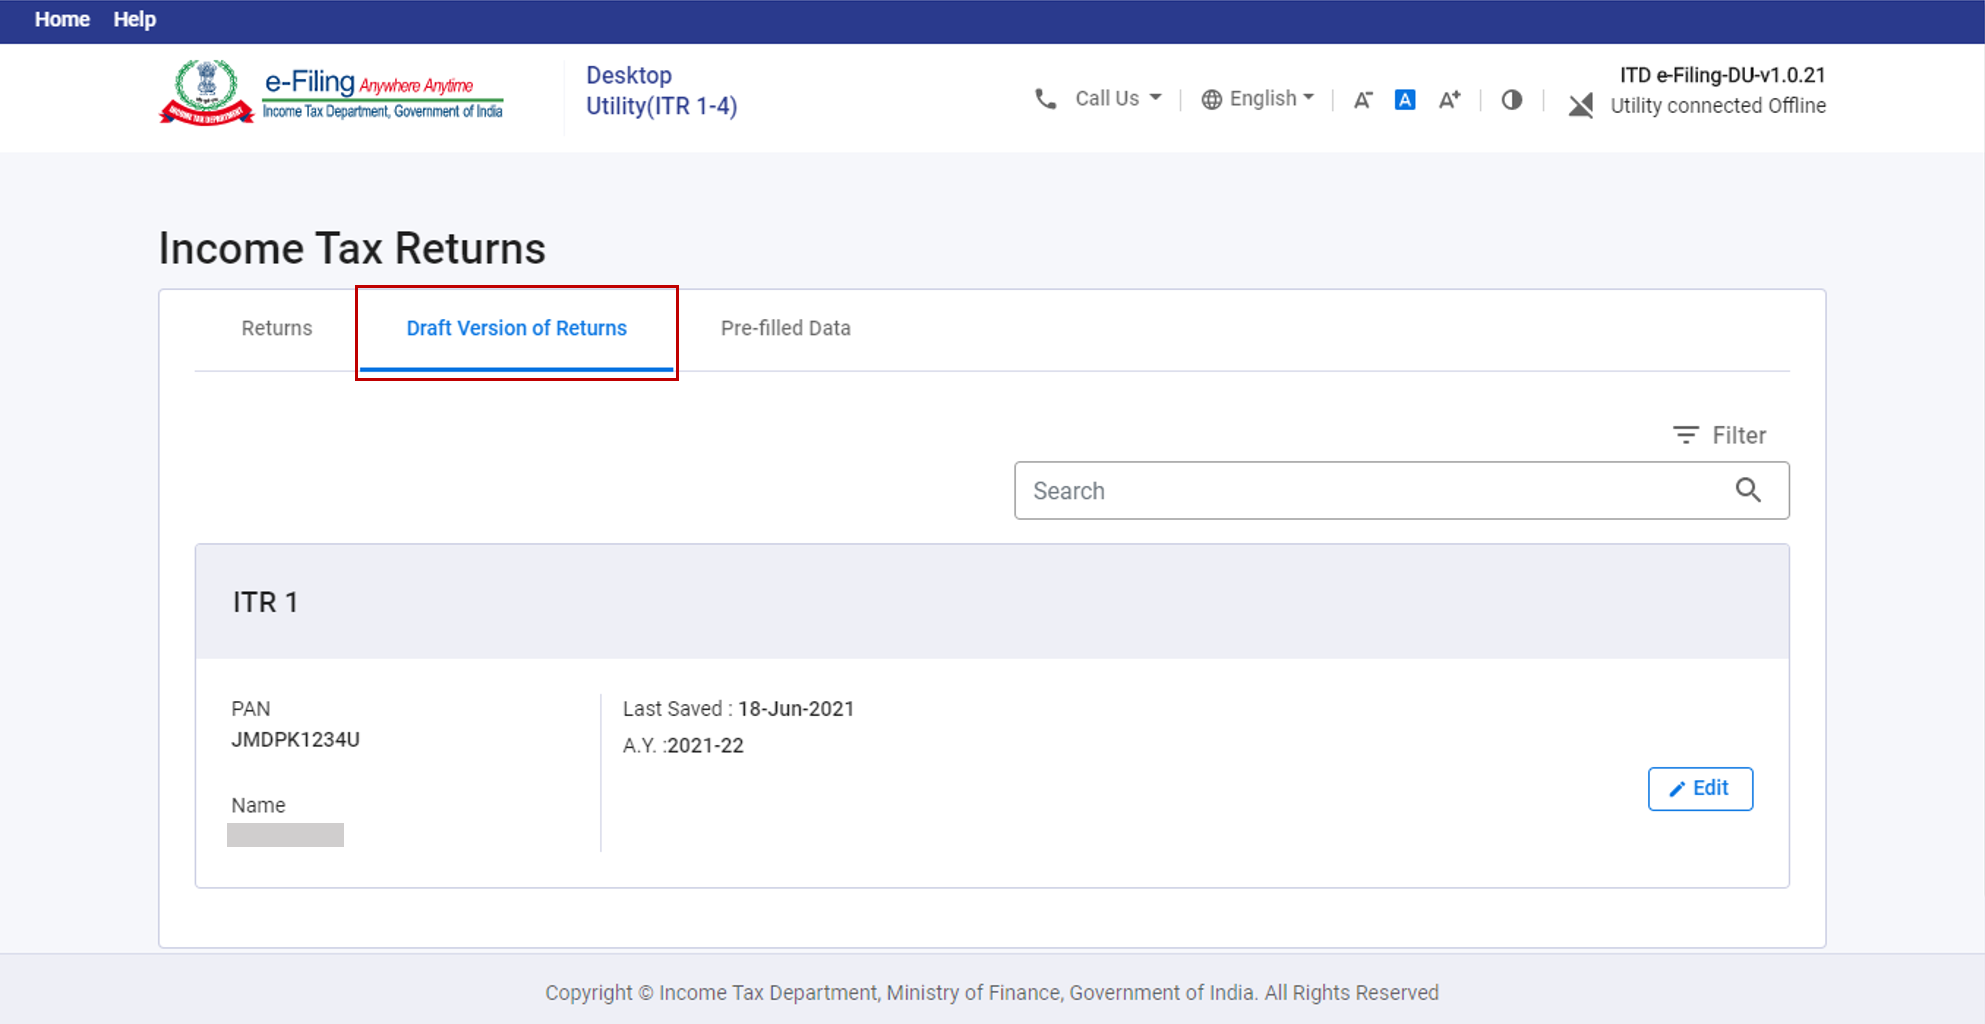
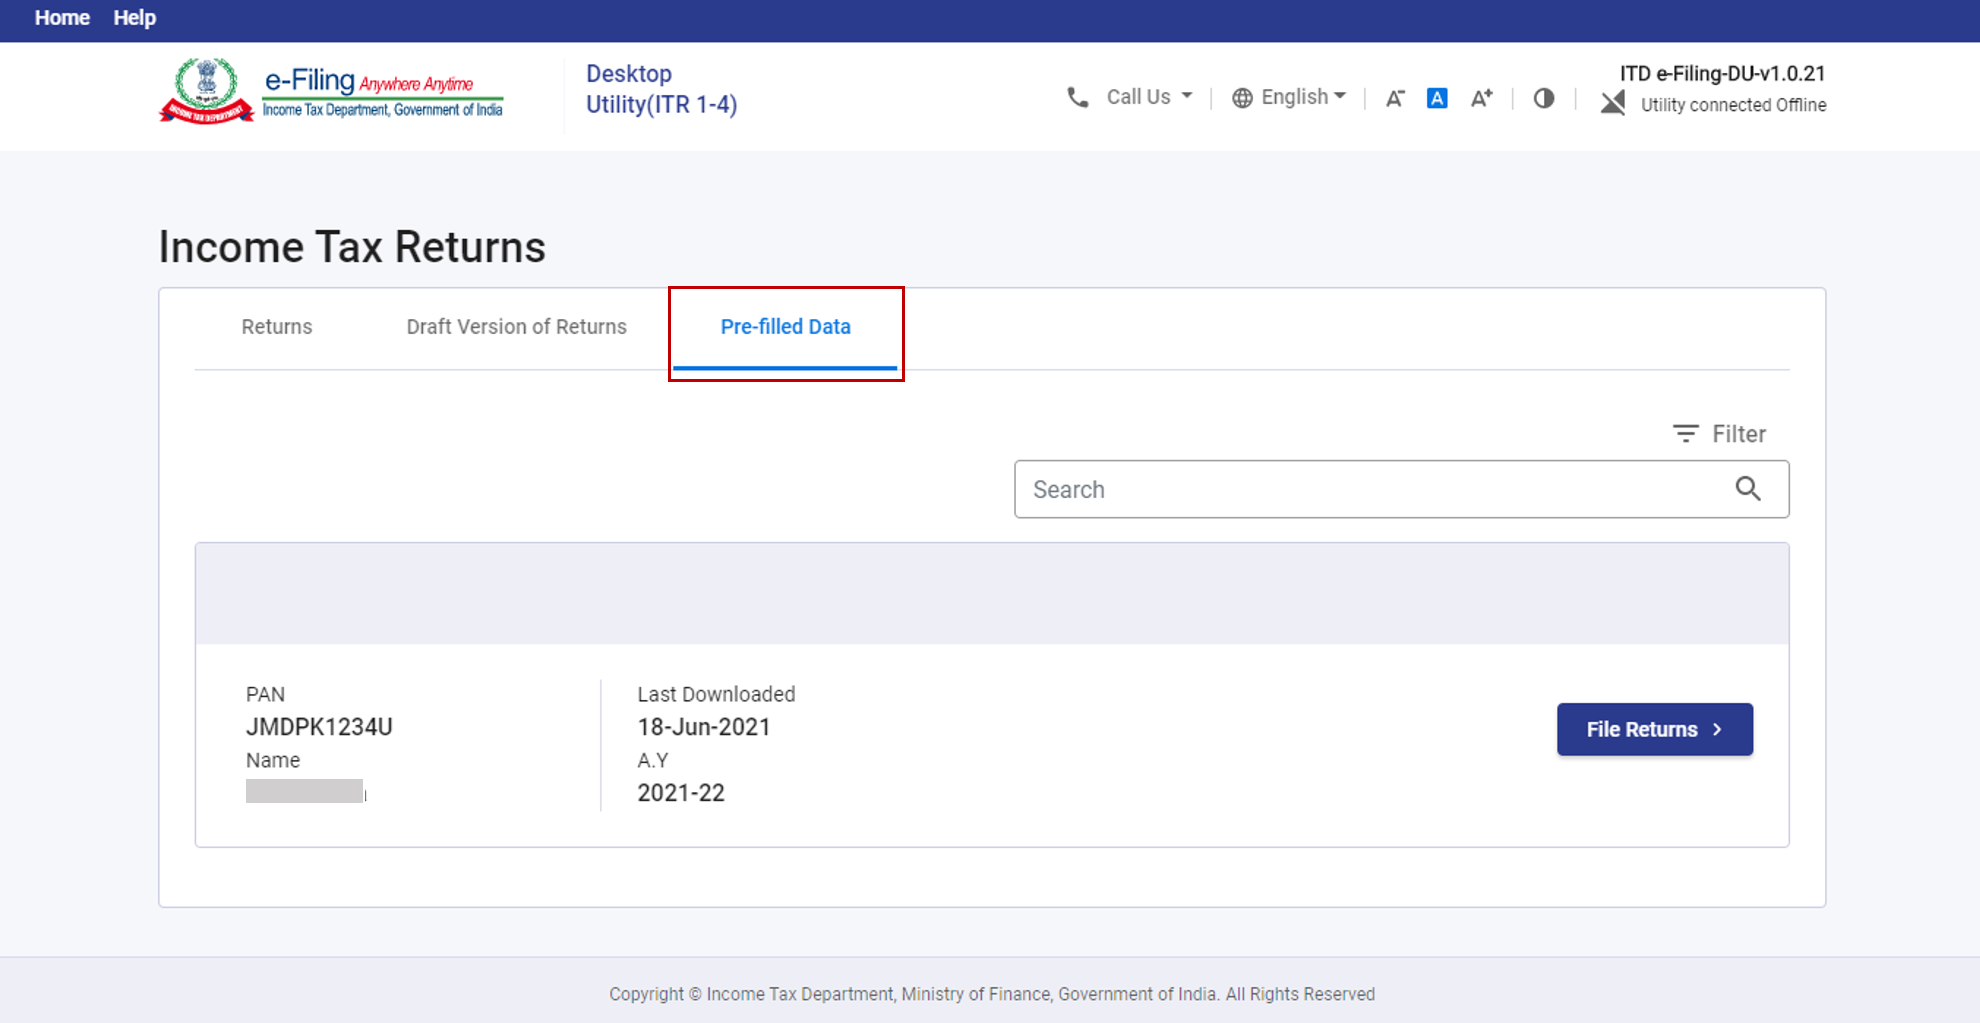
Step 3: You will be taken to the Income Tax Returns page, where you will see the following tabs and their contents:
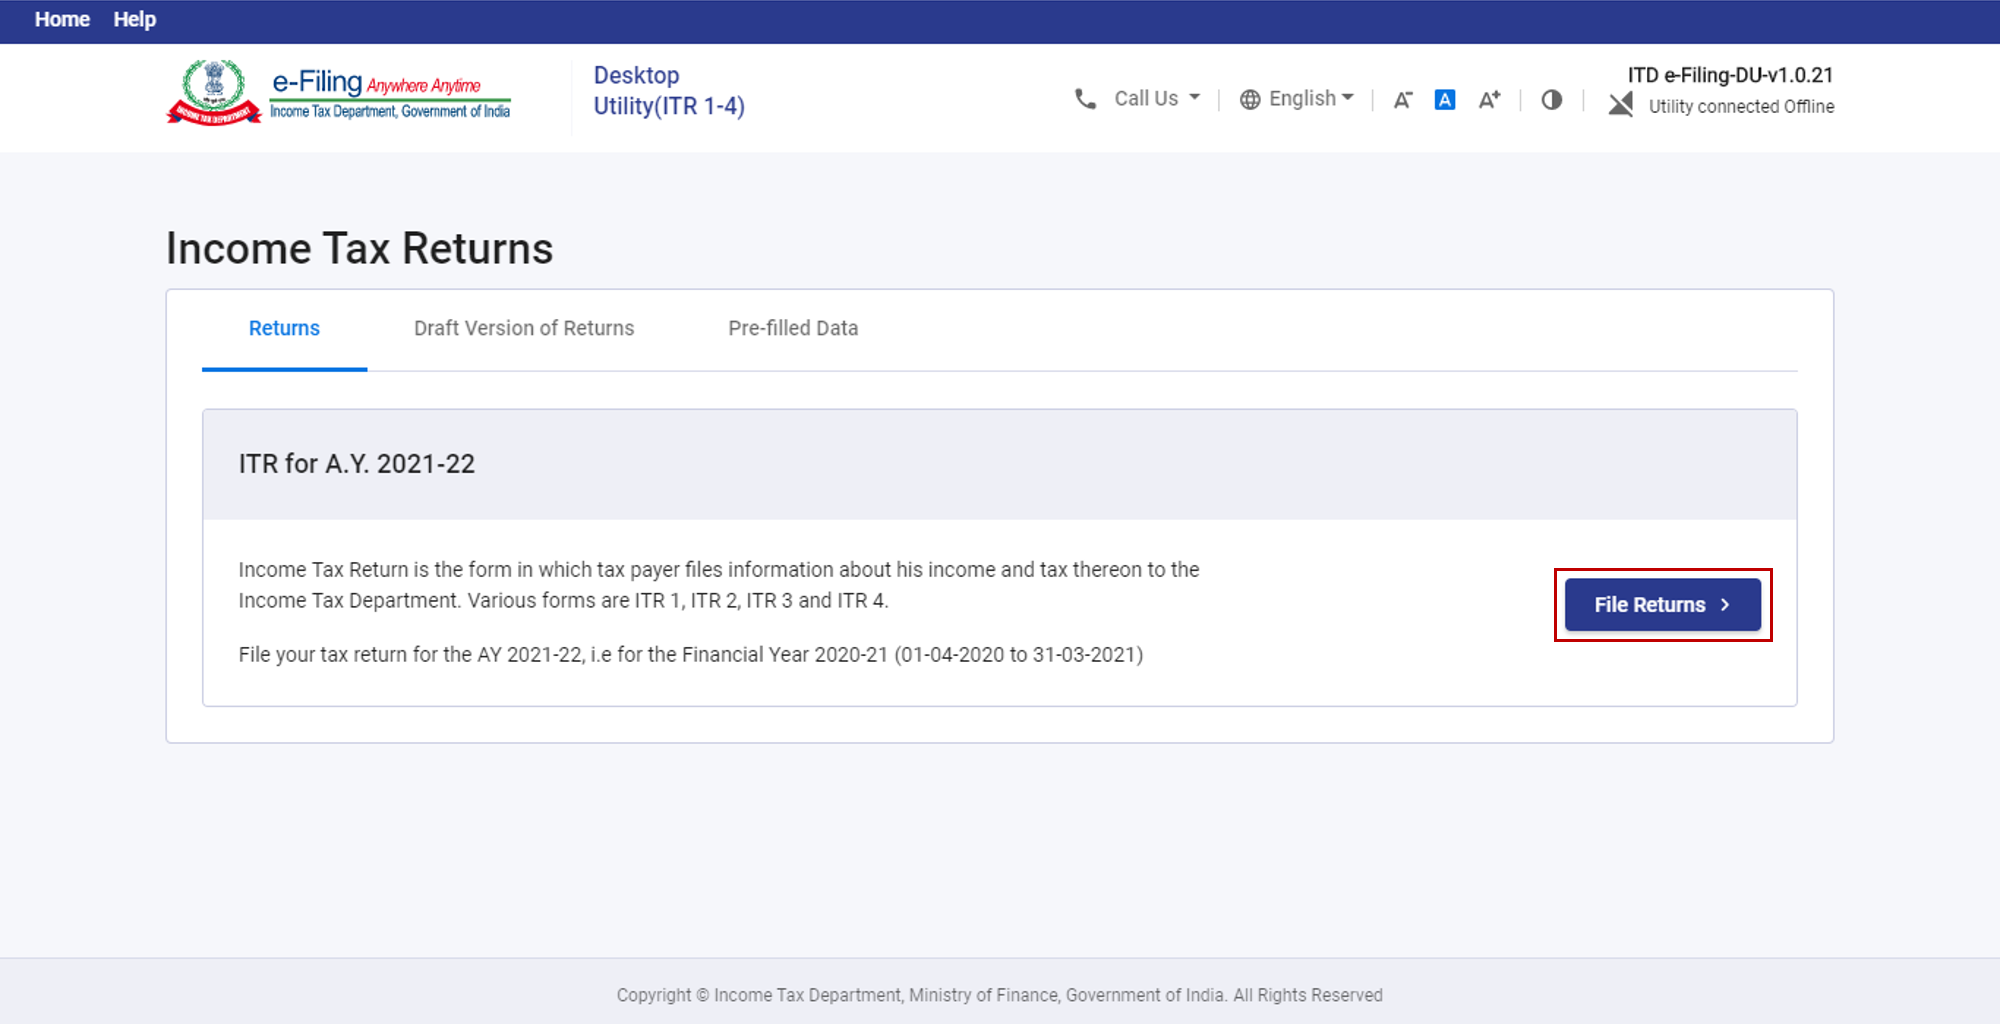
- Returns - All your ITRs (based on the AY) are present here. You can start filing a new return from here, by clicking File Returns.
- Draft Version of Returns – If you wish to edit a partially filled ITR draft, click Edit on the relevant draft from the Draft Version of Returns tab.
- Pre-filled Data – All the pre-filled JSON files downloaded from e-Filing (with details such as PAN, Name, Last import, and AY) are present here. By clicking File Returns on the relevant JSON, you can start your return filing process with the pre-filled data available.
Note:
- JSON is a file format used when downloading or importing your pre-filled return data into the offline utility, and is also used when generating your prepared ITR in the offline utility.
- Refer to section 4.4 File, Preview and Submit Income Tax Returns to learn the return filing process in the offline utility.
Step 4: Under the Returns tab, click File Returns on the ITR for the relevant AY to start with the ITR filing process.
Note:
- Click File Returns from the Returns tab to start filing a fresh return.
- If you have already downloaded / imported your pre-filled data into the offline utility, you can start filing your return by clicking File Returns from the Pre-filled Data tab.
To learn how to file Income Tax Returns using the Offline Utility, refer to the following sections:
| For Income Tax Returns (ITR-1 to ITR-4 and ITR-5 to ITR-7) | |
| Download Pre-Filled Data (JSON file) | Refer to Section 4.1 |
| Import Pre-Filled Data (JSON file) | Refer to Section 4.2 |
| Import Draft ITR filled in online mode (applicable to ITR forms available in online mode) |
Refer to Section 4.3 |
| File, Preview and Submit Income Tax Returns | Refer to Section 4.4 |
4.1 Download Pre-Filled Data (JSON)
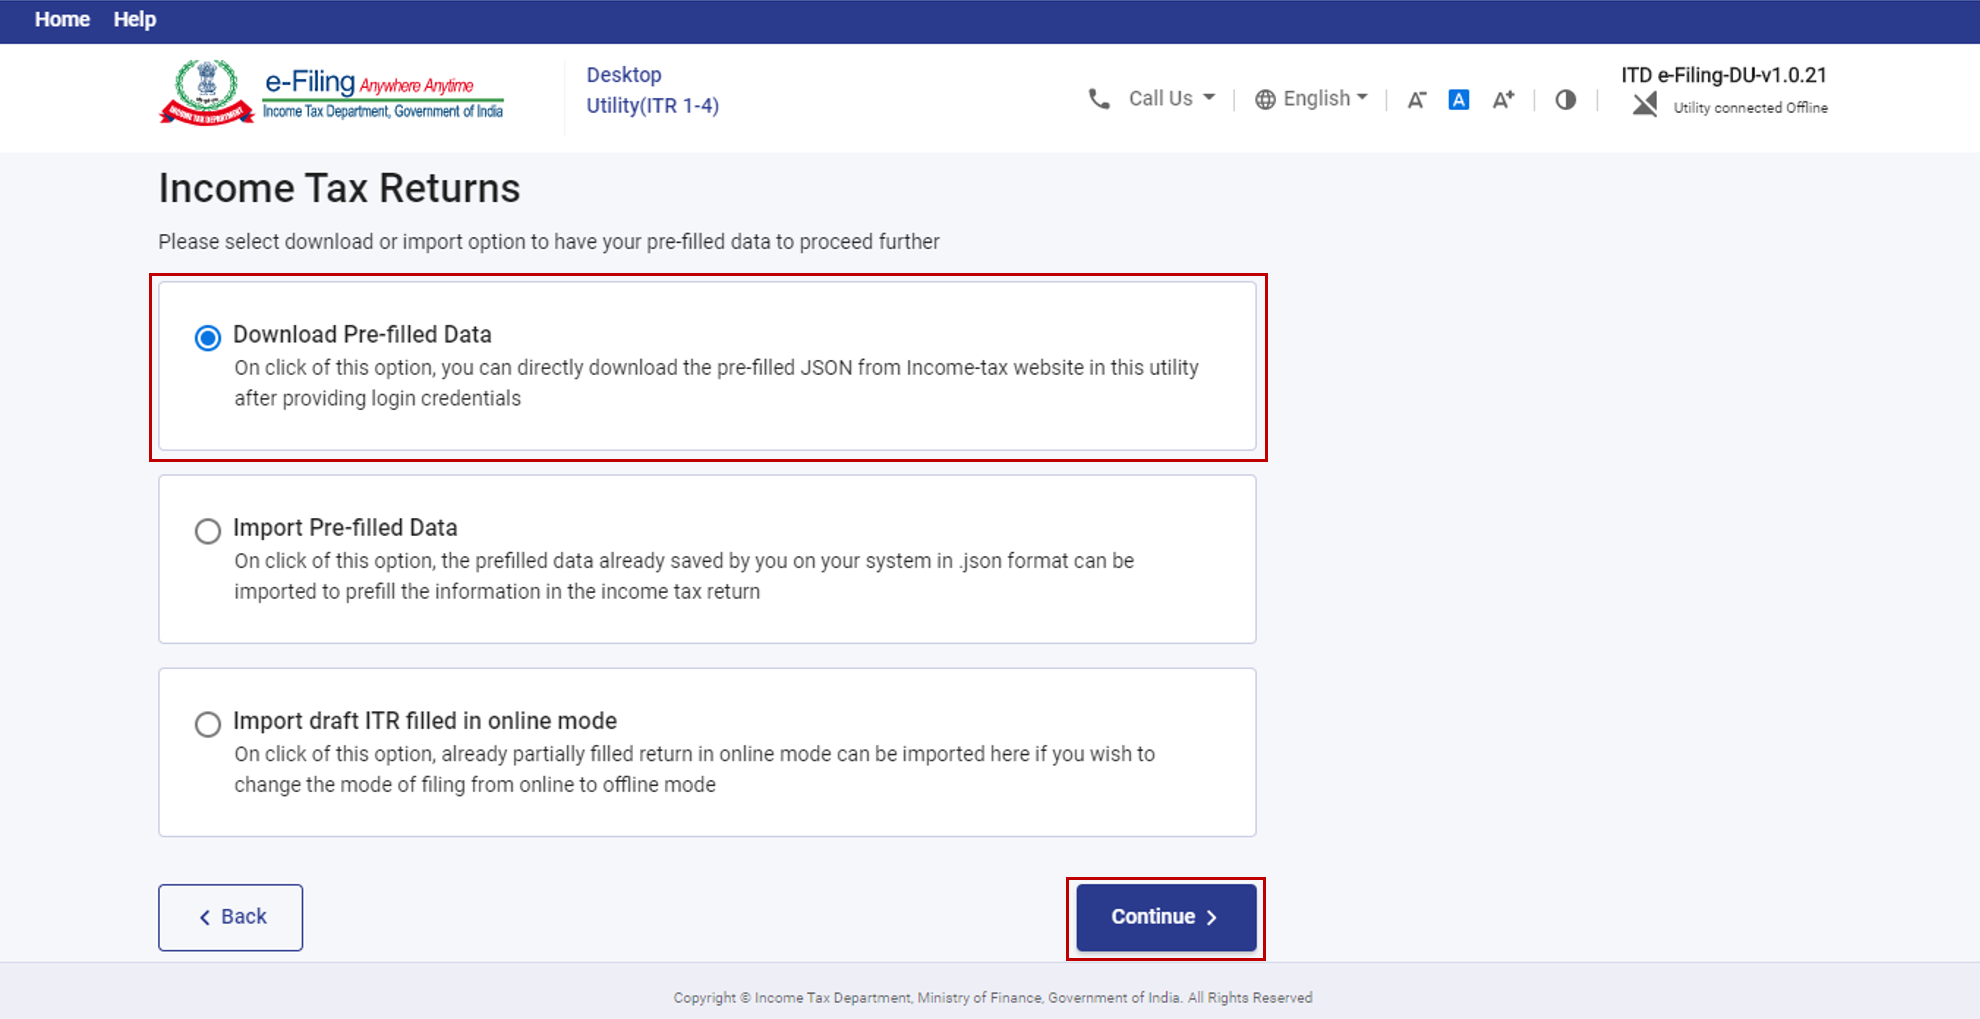
Step 1: After you click File Returns under the Returns tab, you will arrive on this page. Click Download Pre-filled Data and click Continue.
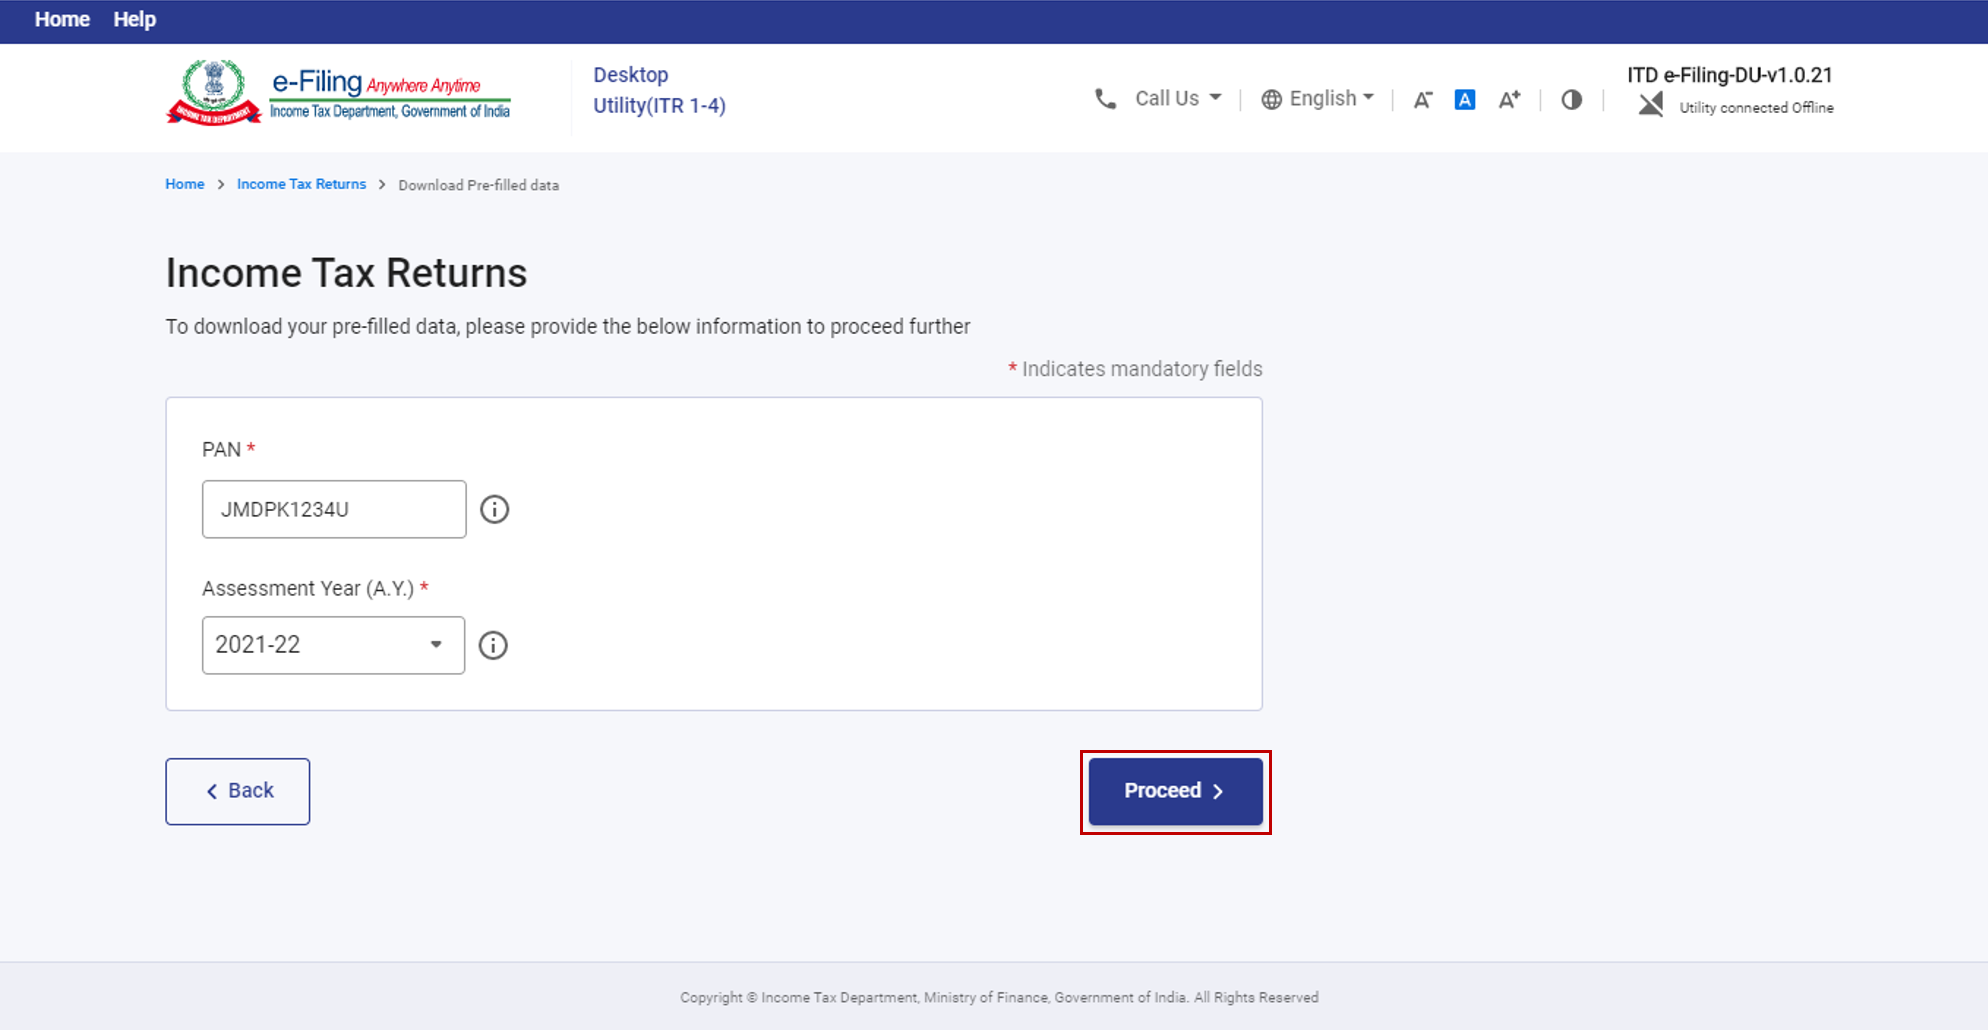
Step 2: Enter your PAN, select the Assessment Year as 2021-22, and click Proceed.
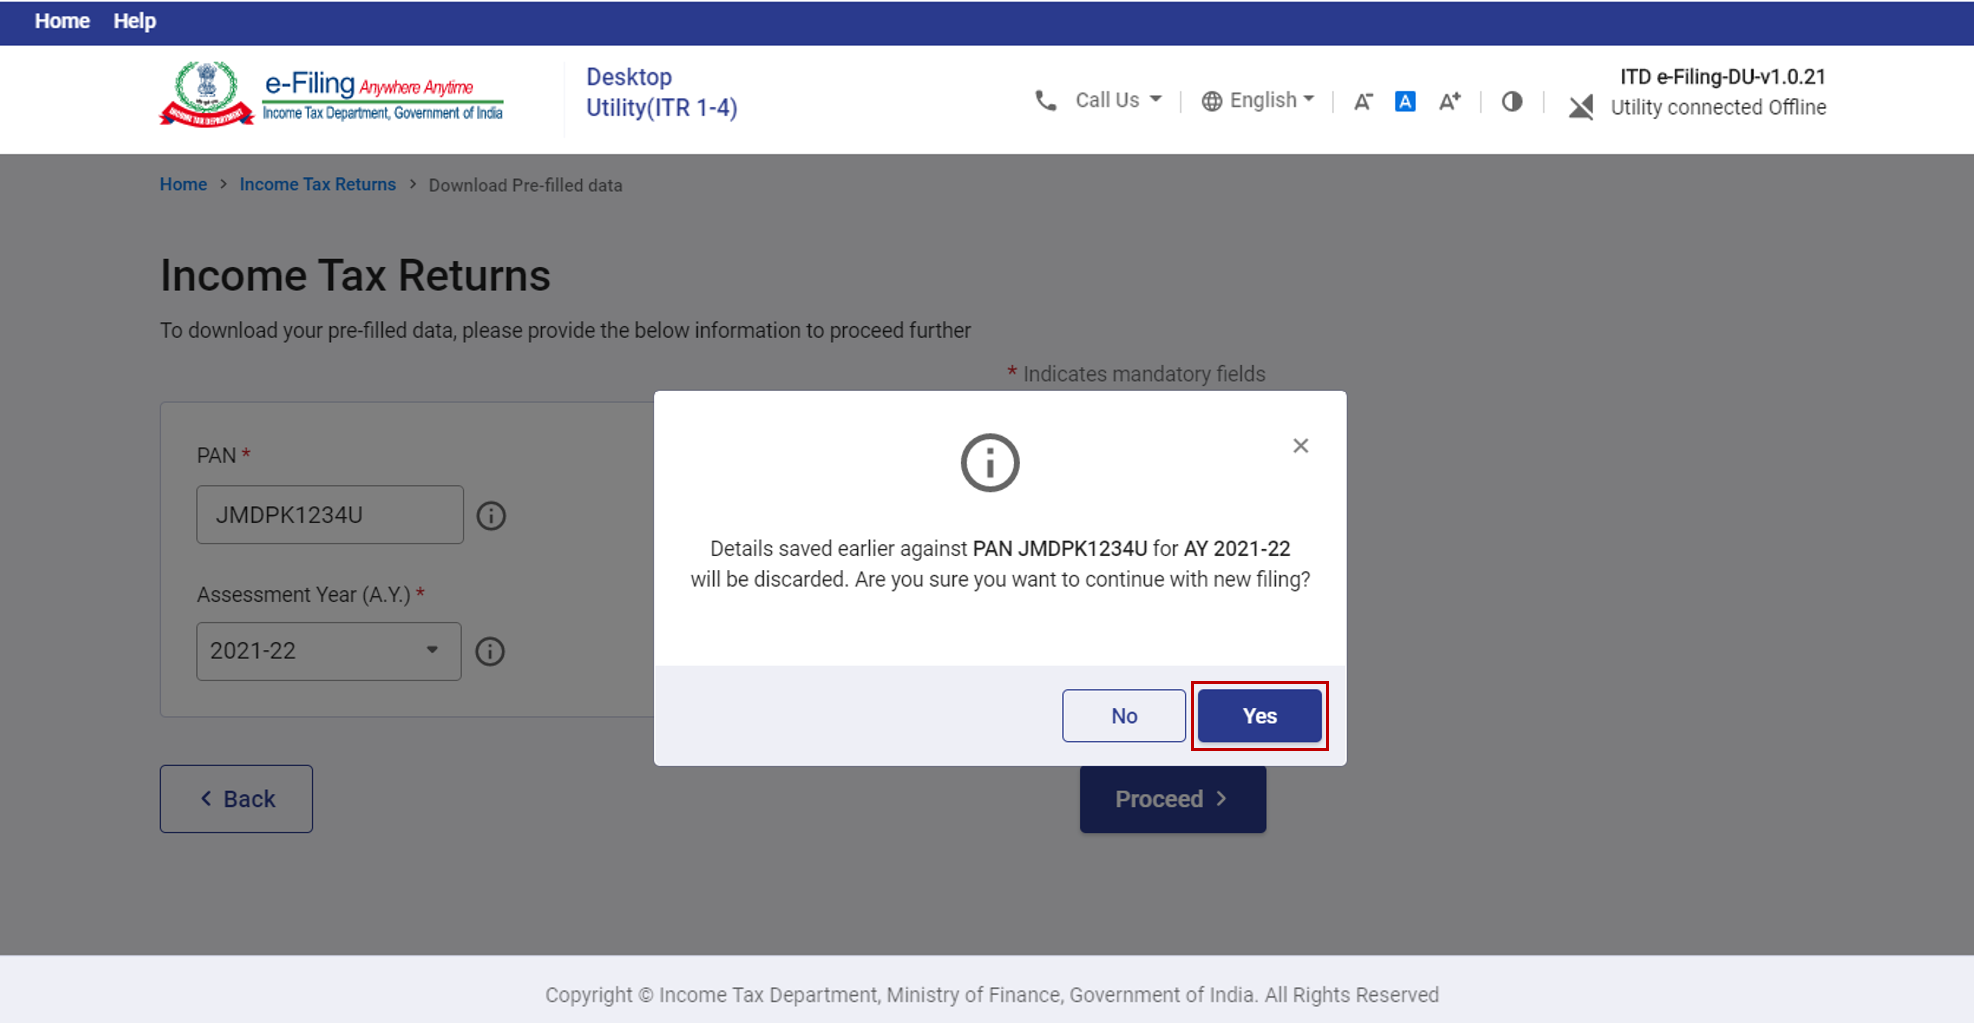
Step 3: You will get a message warning you that the details saved against your PAN will be discarded if you continue with a new filing. Click Yes.
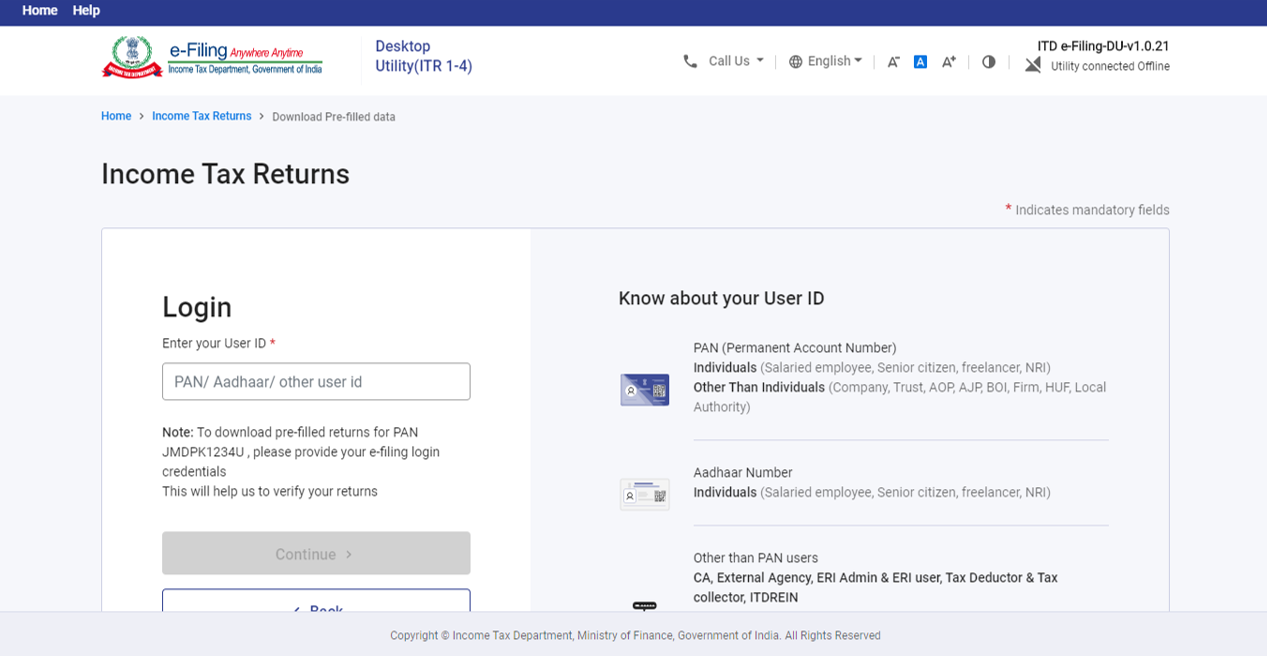
Step 4: You will be taken to the Login page, where you can log in to e-Filing through the Offline Utility itself.
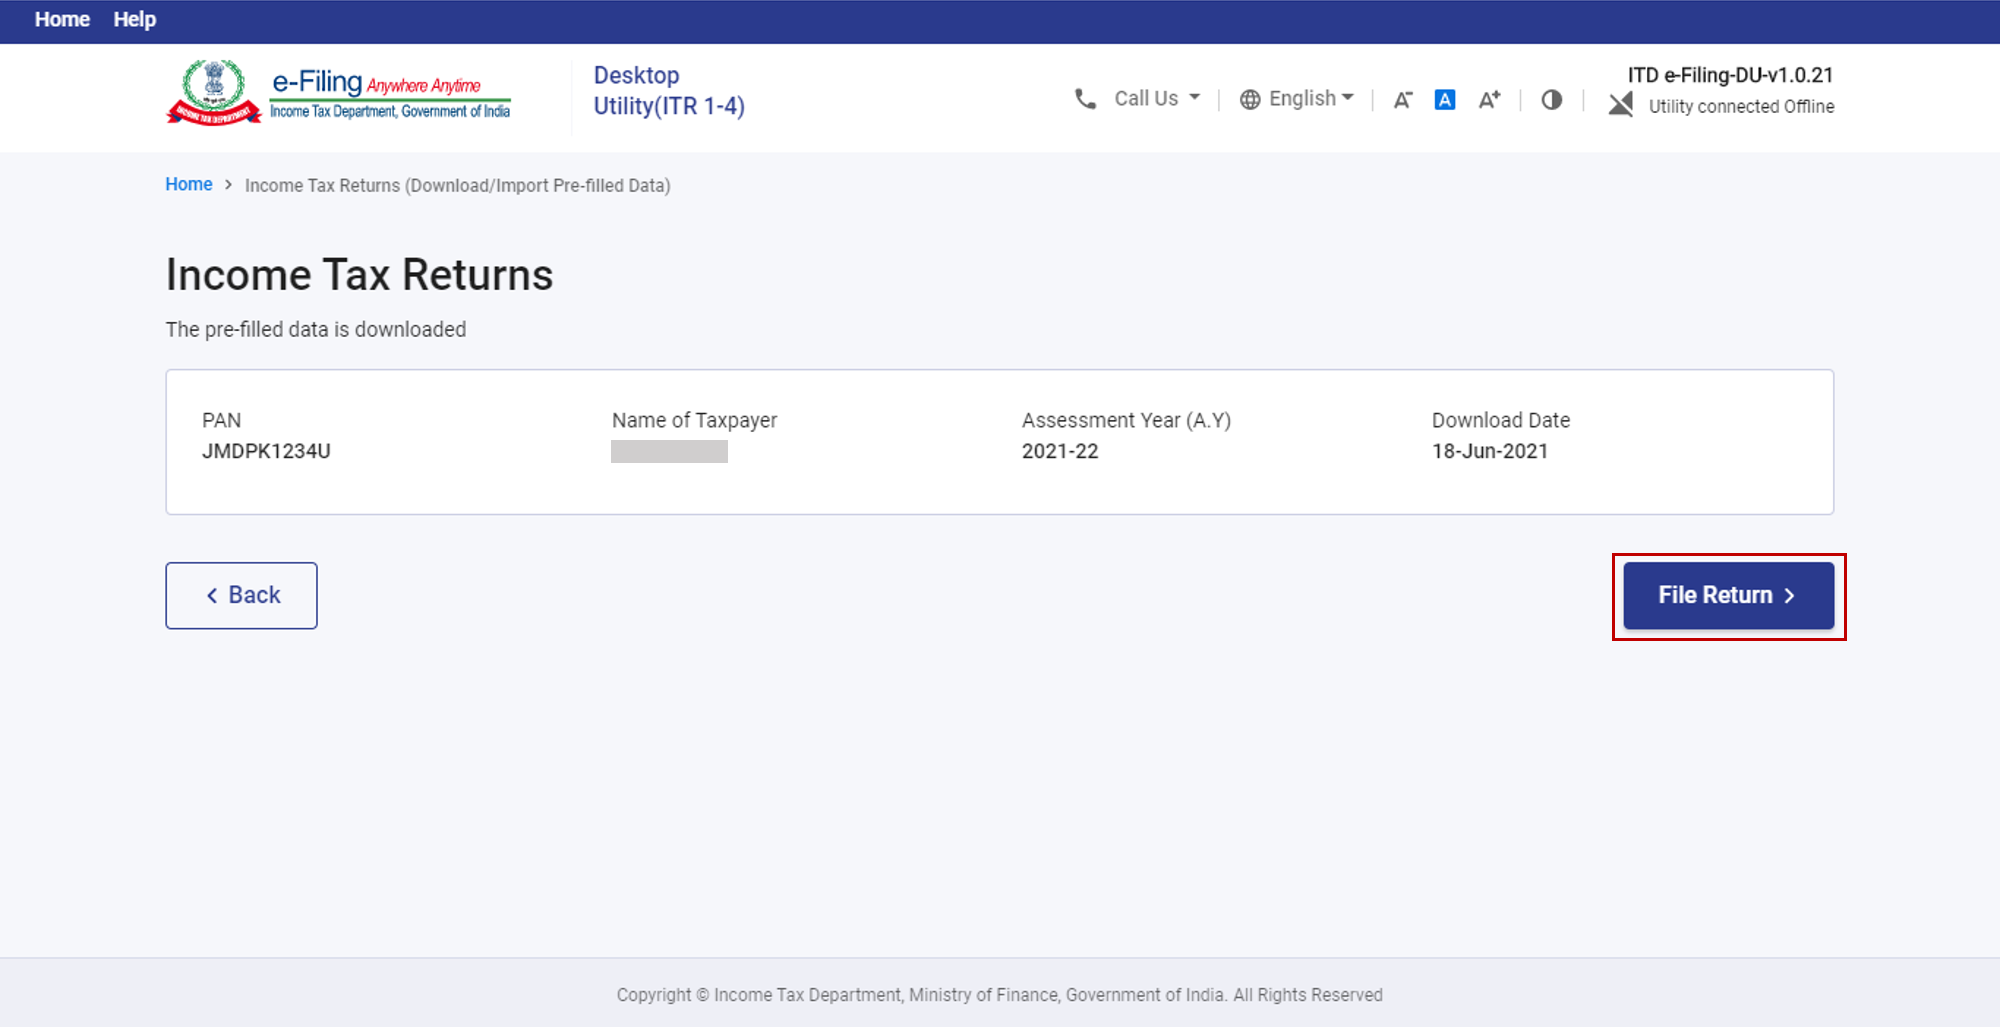
Step 5: Post login, you will see your pre-filled data downloaded for the PAN and AY you entered. Click File Return
Then, you will be taken to the page where you need to select your status (Individual / HUF / Other), to continue with the filing process.
Refer to section 4.4 File, Preview and Submit Income Tax Returns to learn the rest of the process.
4.2 Import Pre-Filled Data (JSON)
Step 1: After you click File Returns under the Returns tab, you will arrive on this page. Click Import Pre-filled Data and click Continue.
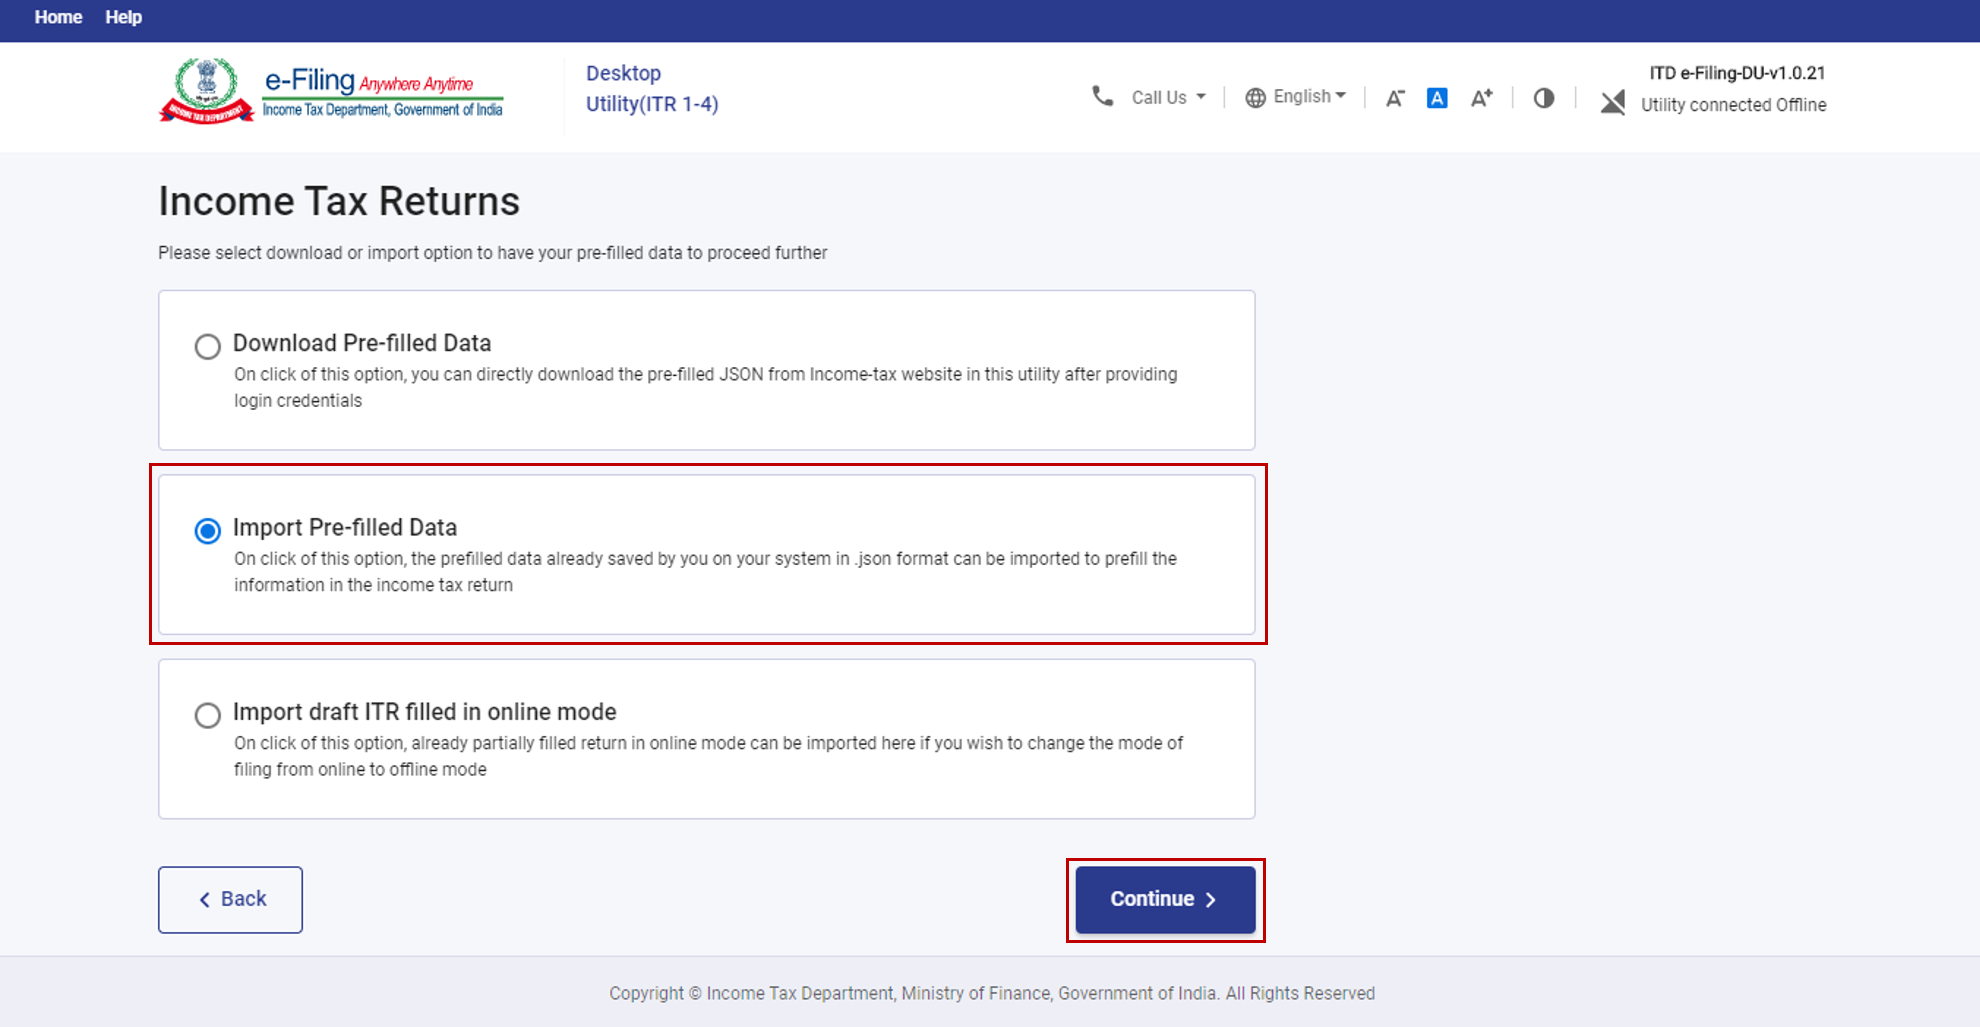
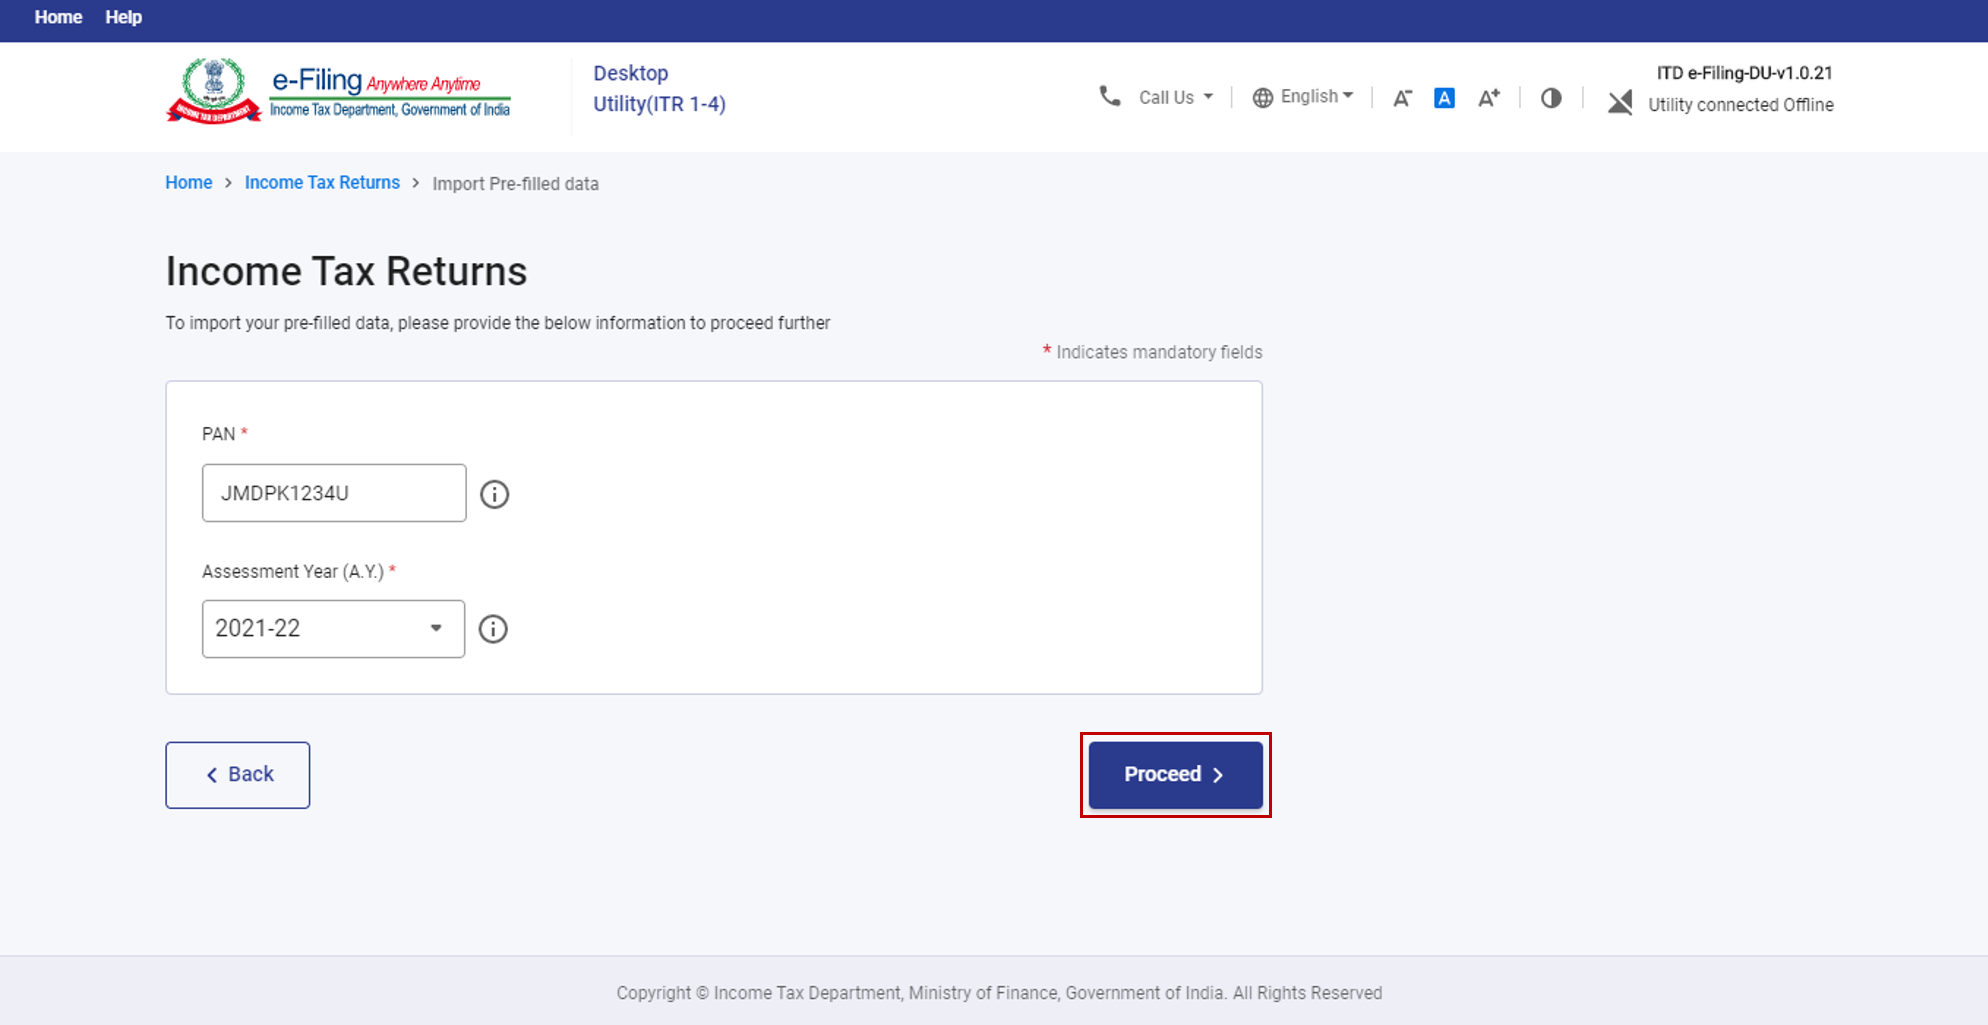
Step 2: Enter your PAN, select the Assessment Year (AY) as 2021-22, and click Proceed.
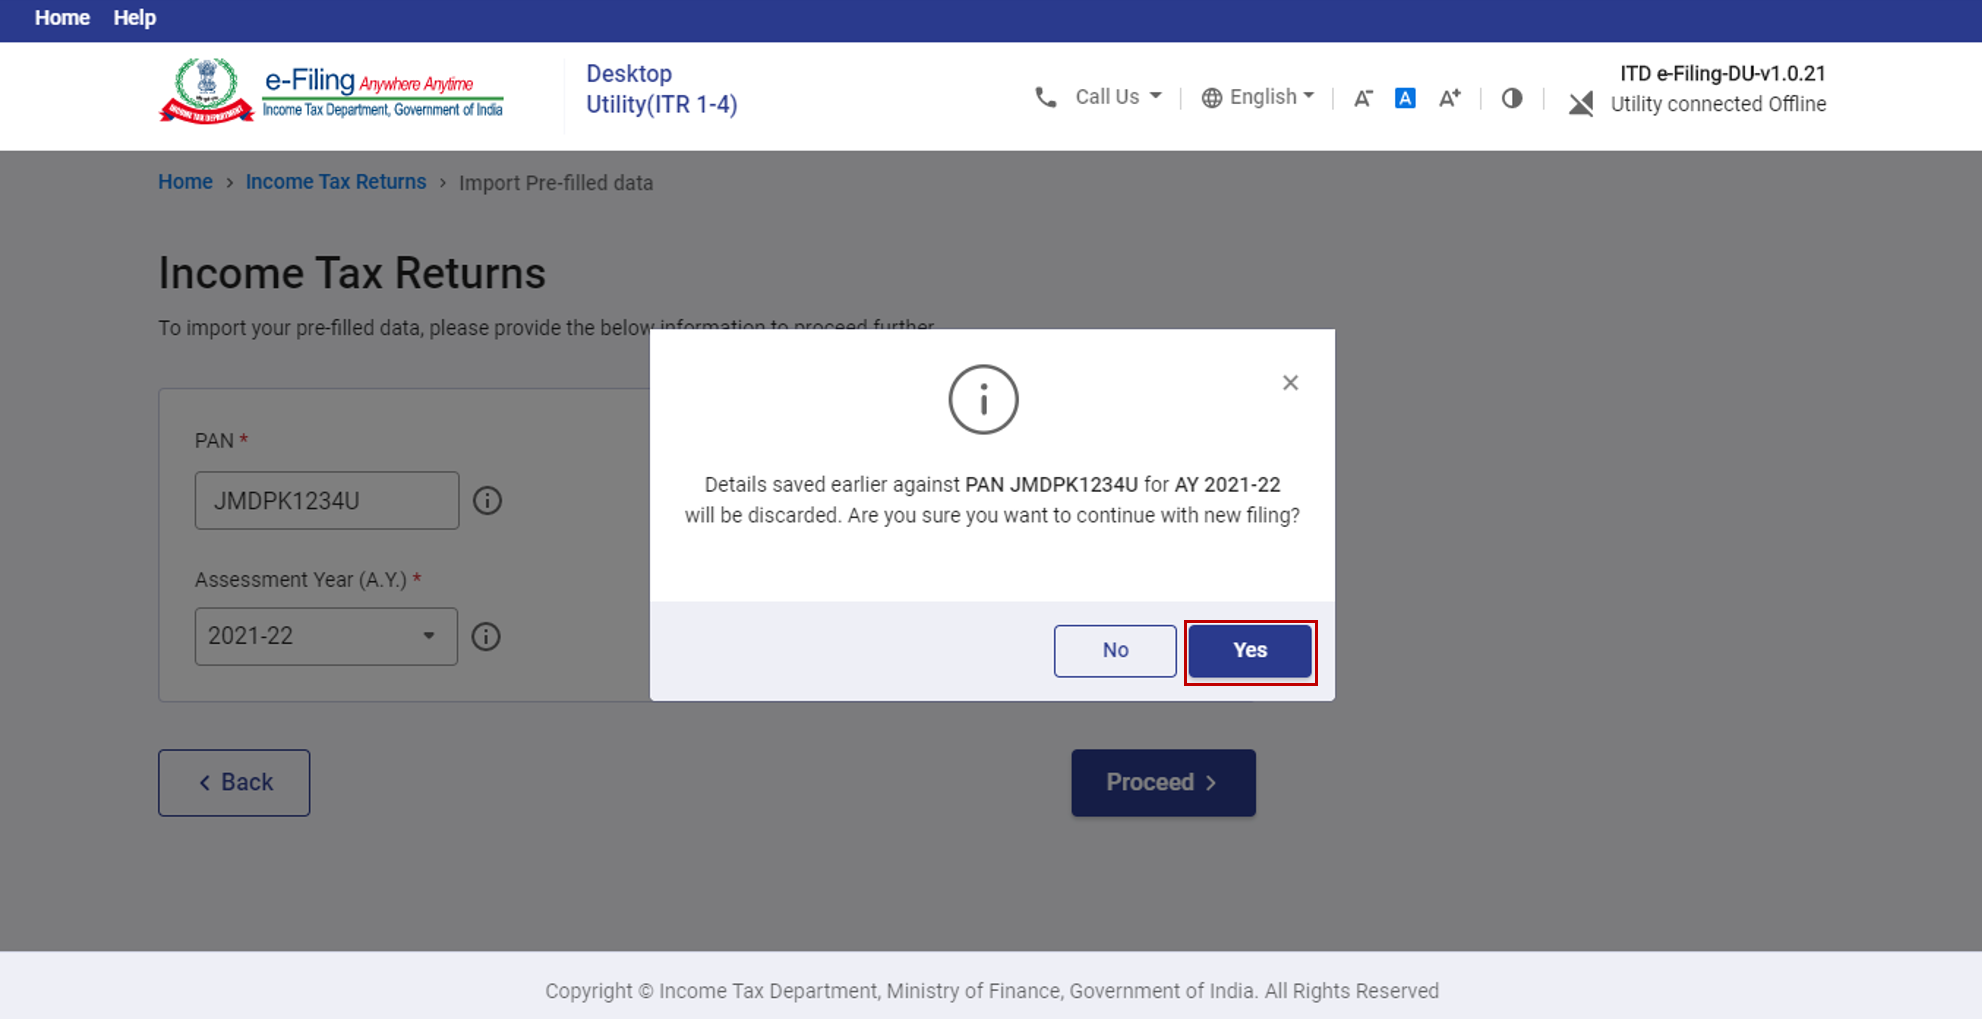
Step 3: Click Yes if you want to proceed.
Step 4: Click Attach file, select the pre-filled data (JSON file) which you downloaded from the e-Filing portal and saved on your computer.
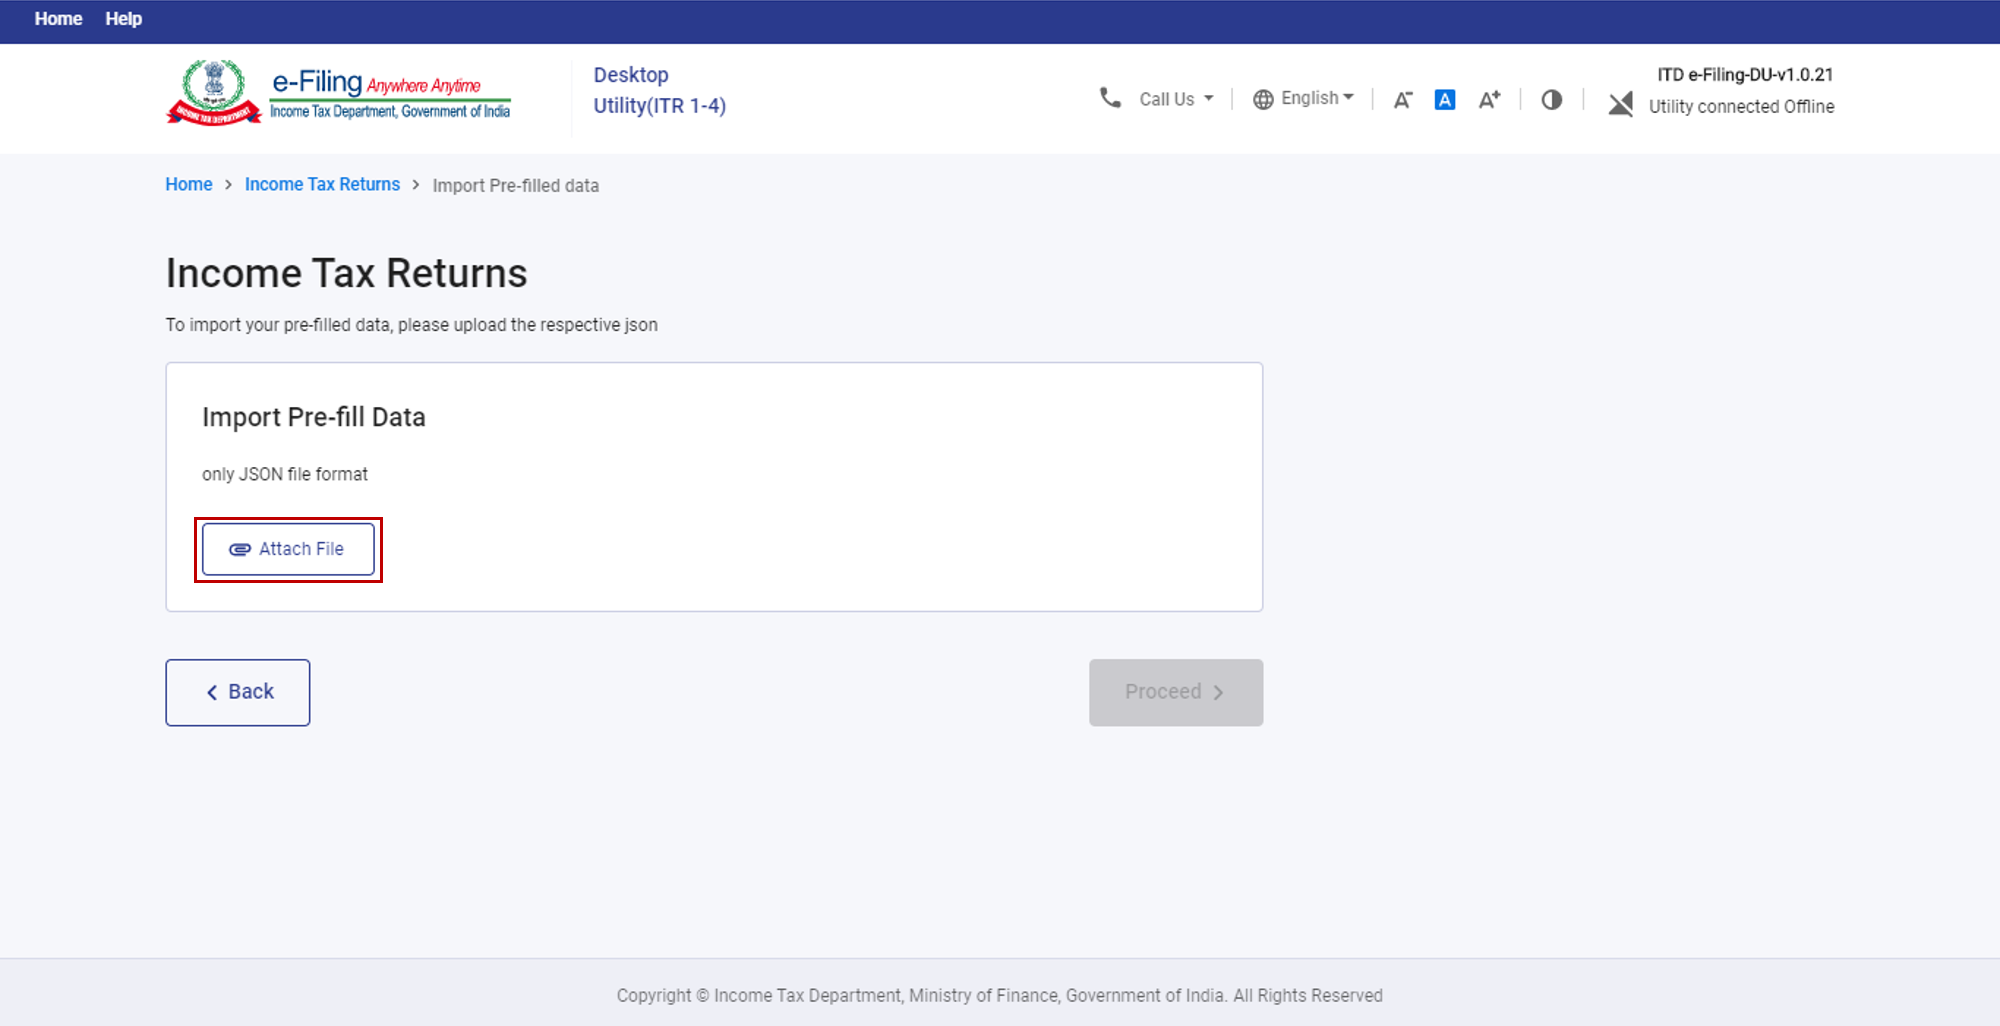
Step 5: Once the JSON is uploaded, click Proceed, and the system will validate the JSON file imported.
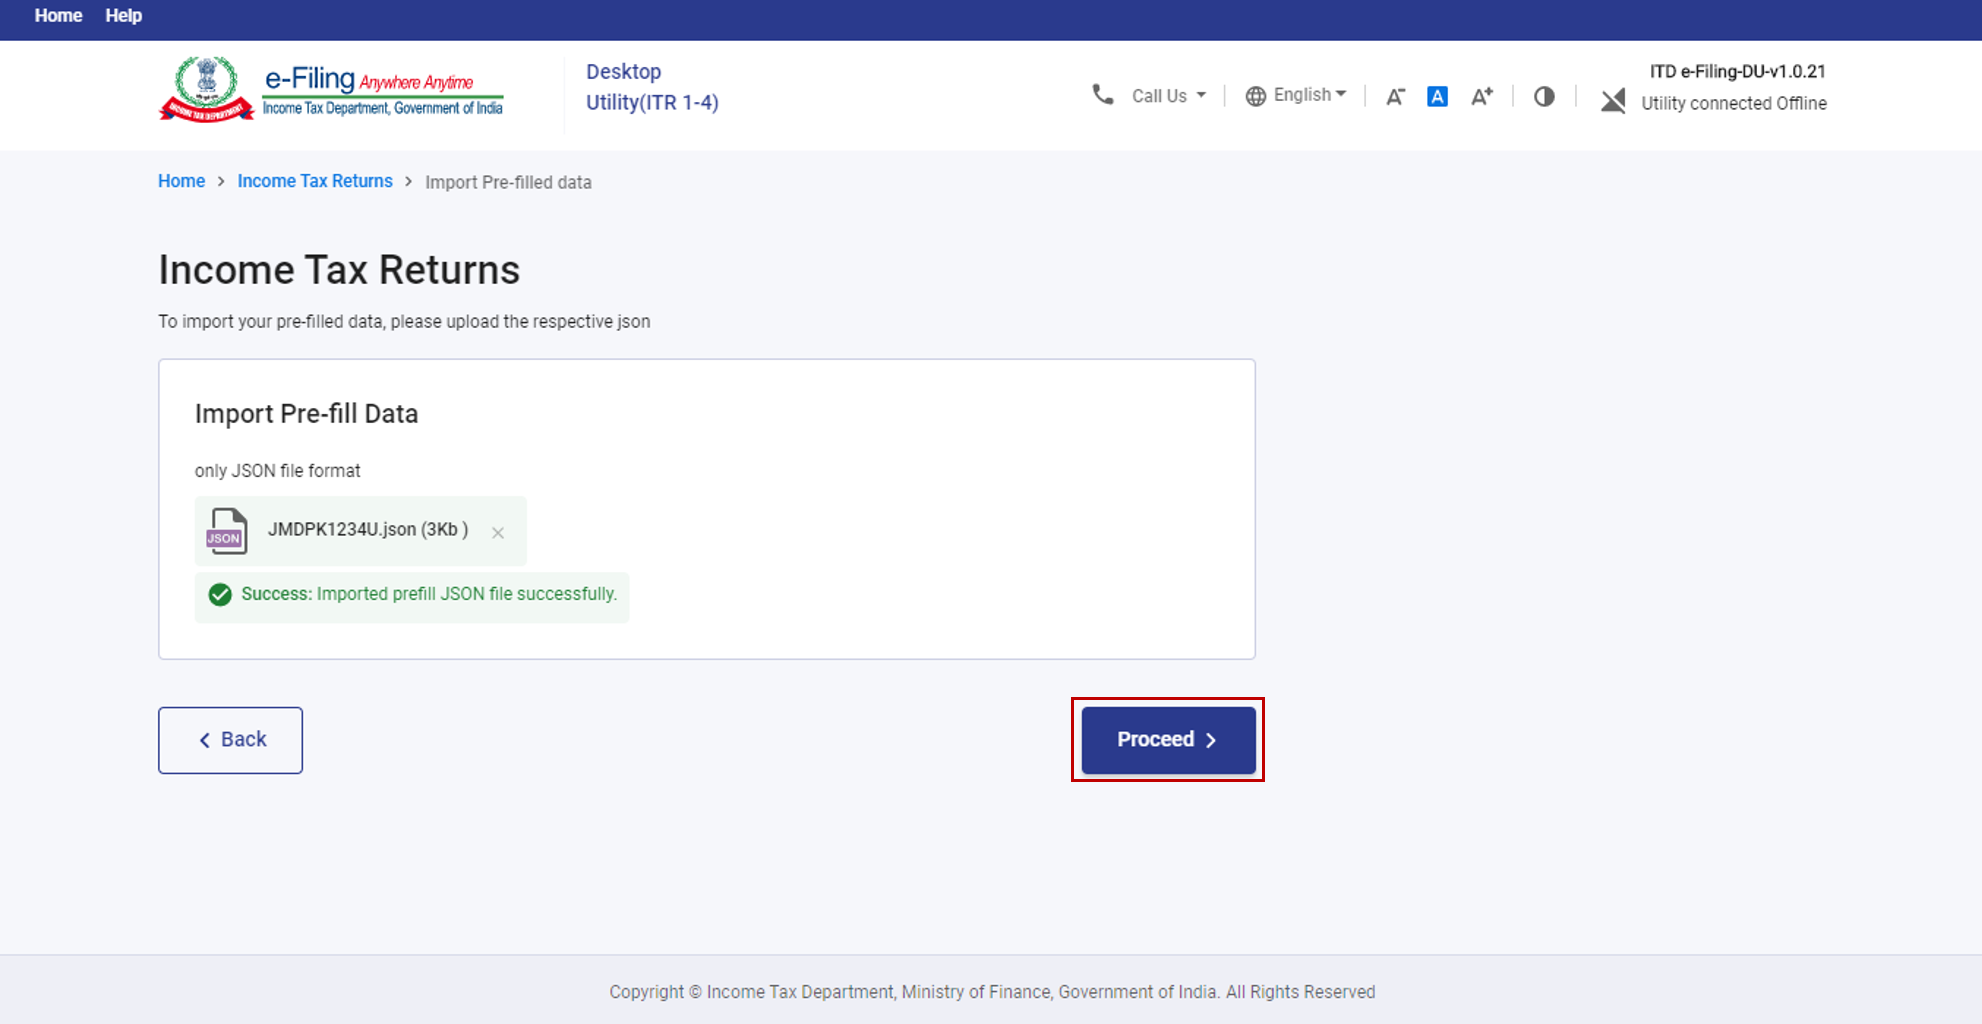
Step 6: Once the validation is successful, you will see details of pre-filled data downloaded. Click File Return. You can pre-fill all the data from the imported JSON, and proceed to file your return. You will be taken to the ITR form selection page.
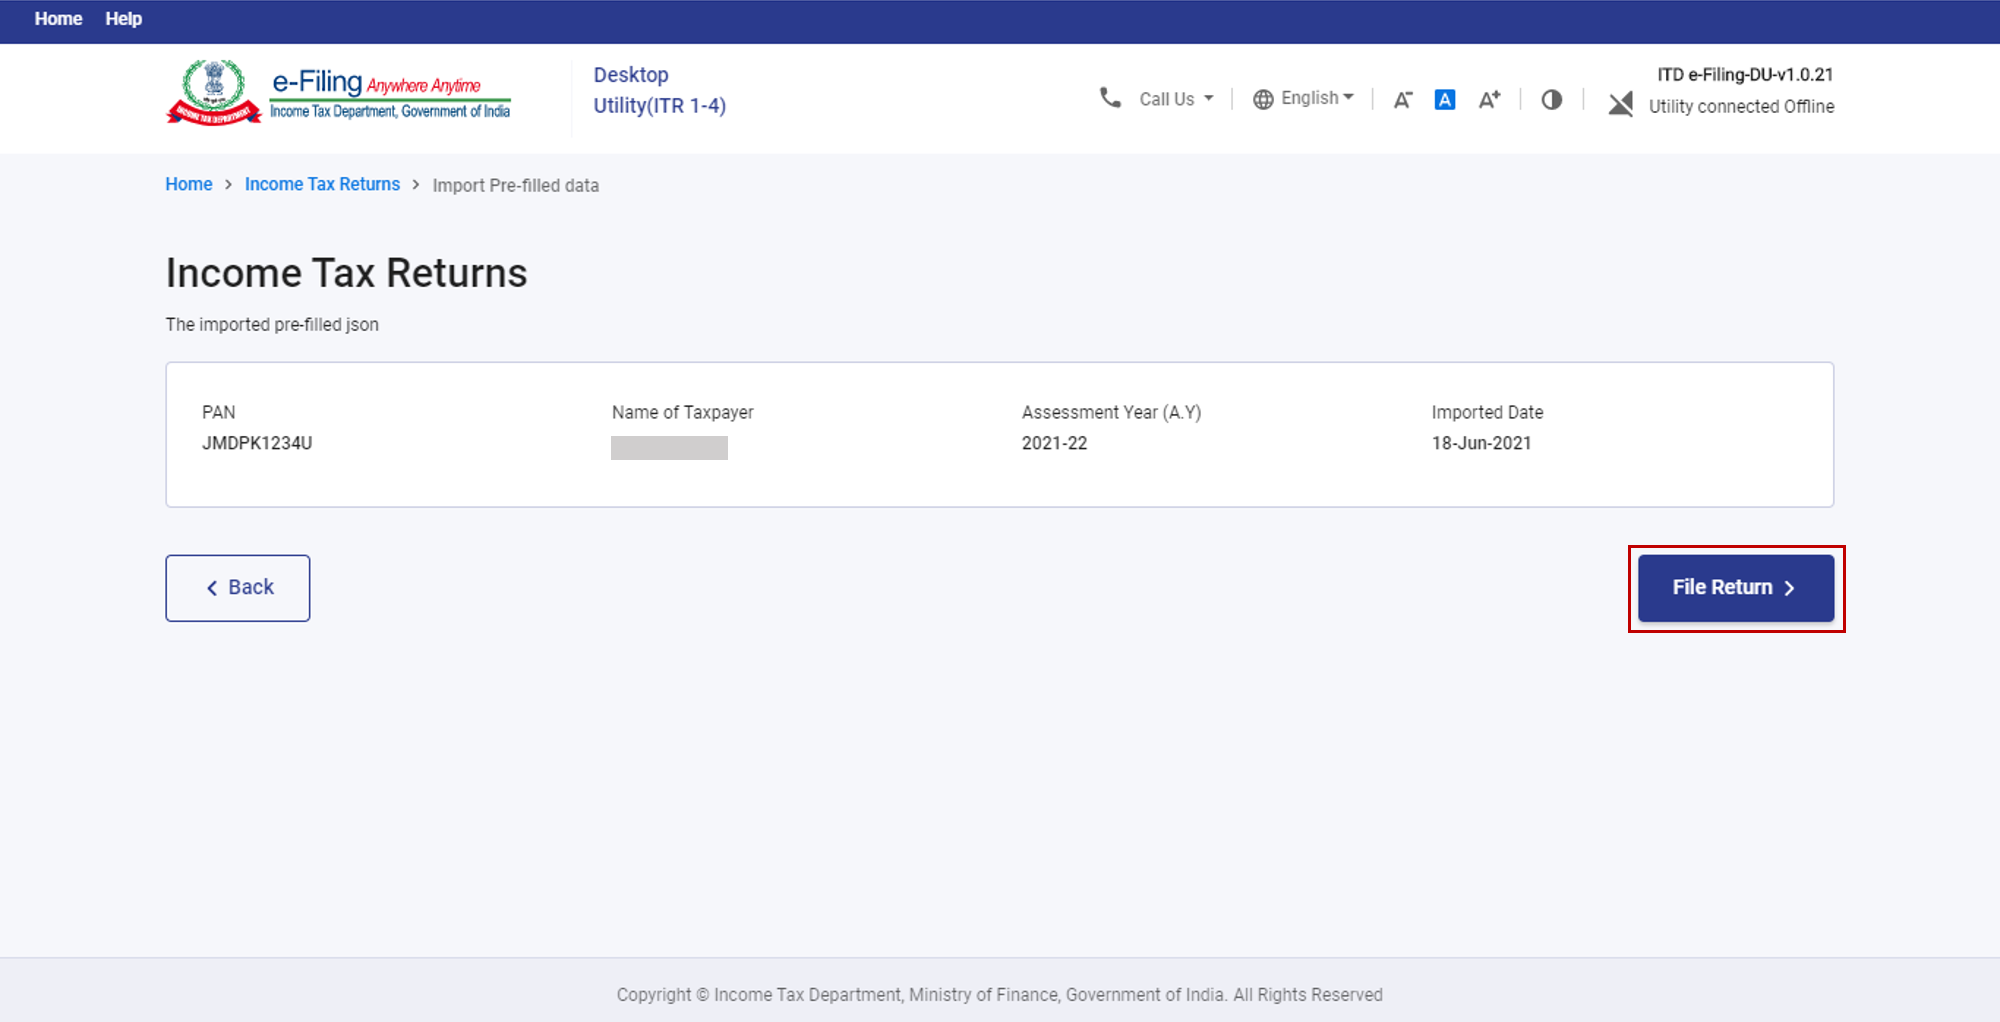
Then, you will be taken to the page where you need to select your status (Individual / HUF / Other), to continue with the filing process.
Refer to section 4.4 File, Preview and Submit Income Tax Returns to learn the rest of the process
4.3 Import Draft ITR filled in online mode
Step 1: After you click File Returns under the Returns tab, you will arrive on this page. Click Import draft ITR filled in online mode, and click Continue.
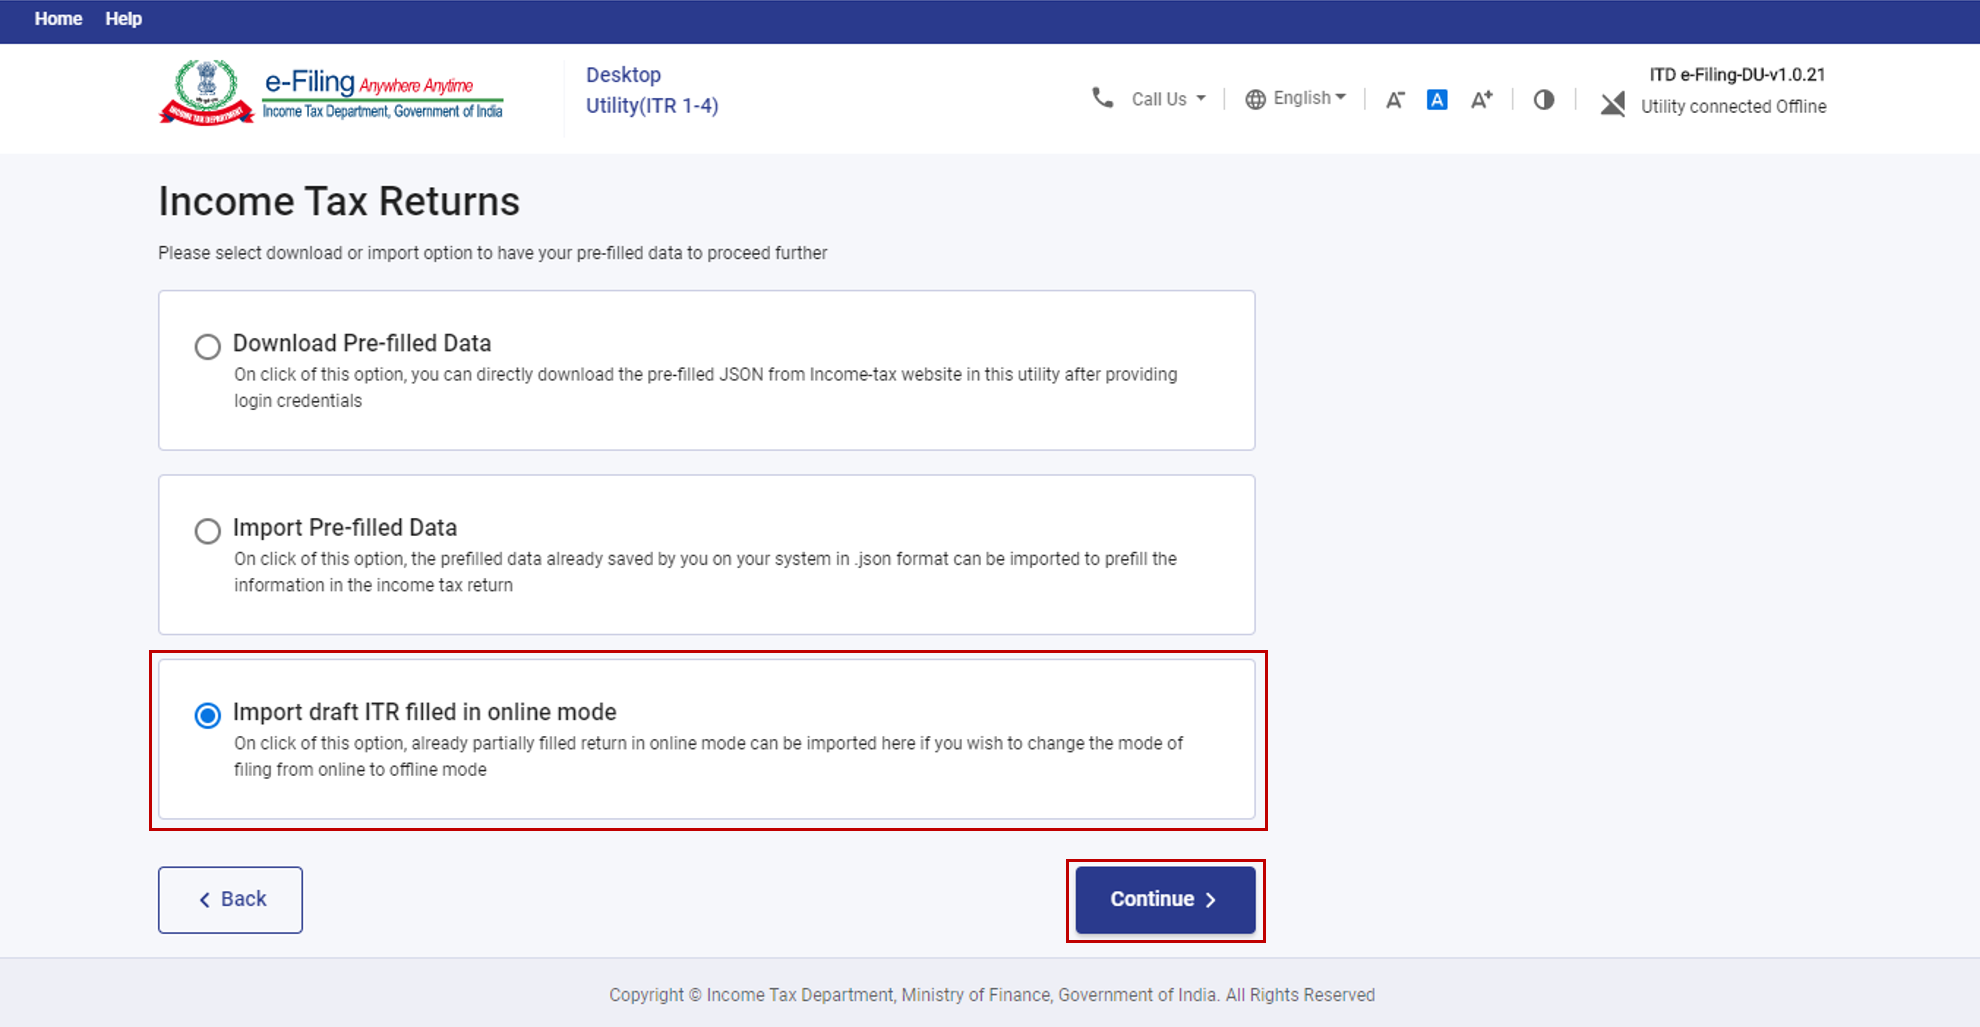
Note: If you have a partially filled ITR in online mode and wish to change the mode of filing to offline, the Import draft ITR filled in online mode enables you to do that.
Step 2: Click Attach file, select the draft ITR JSON which you previously downloaded from the e-Filing portal and saved on your computer.
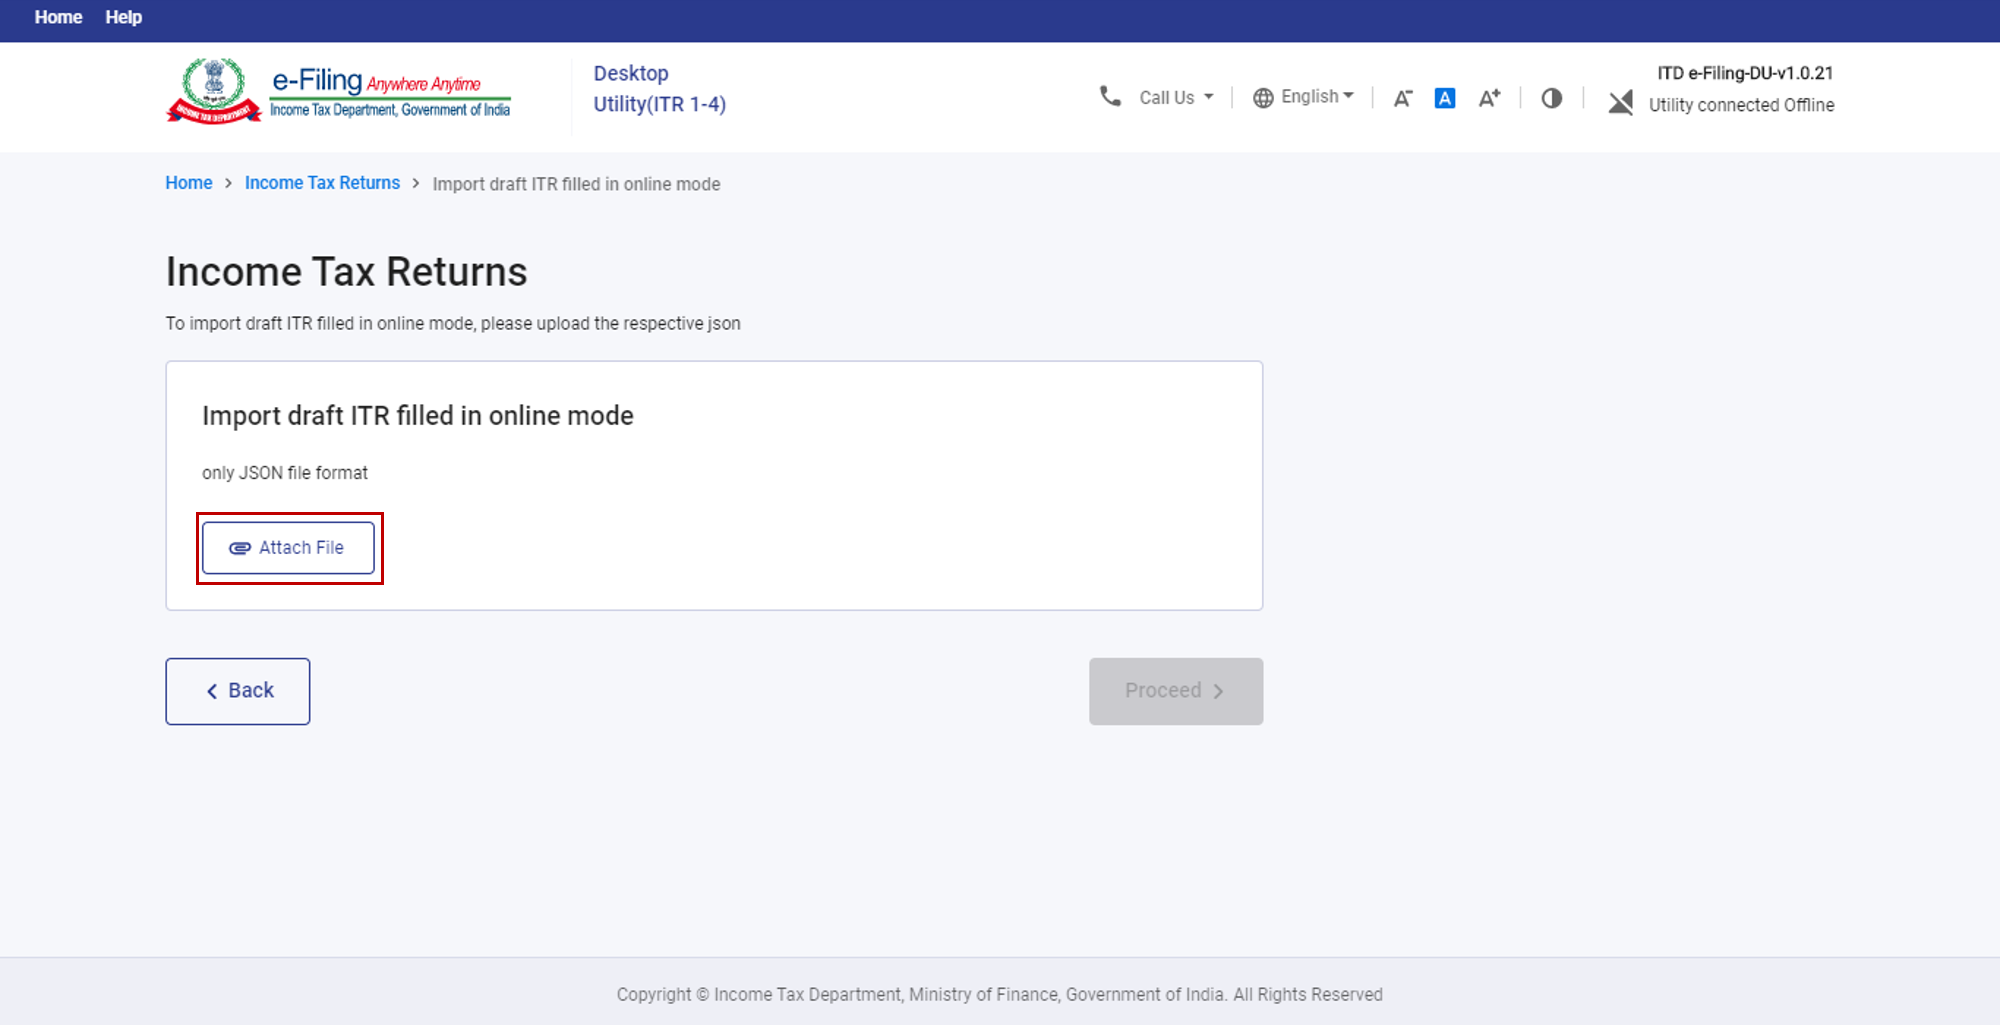
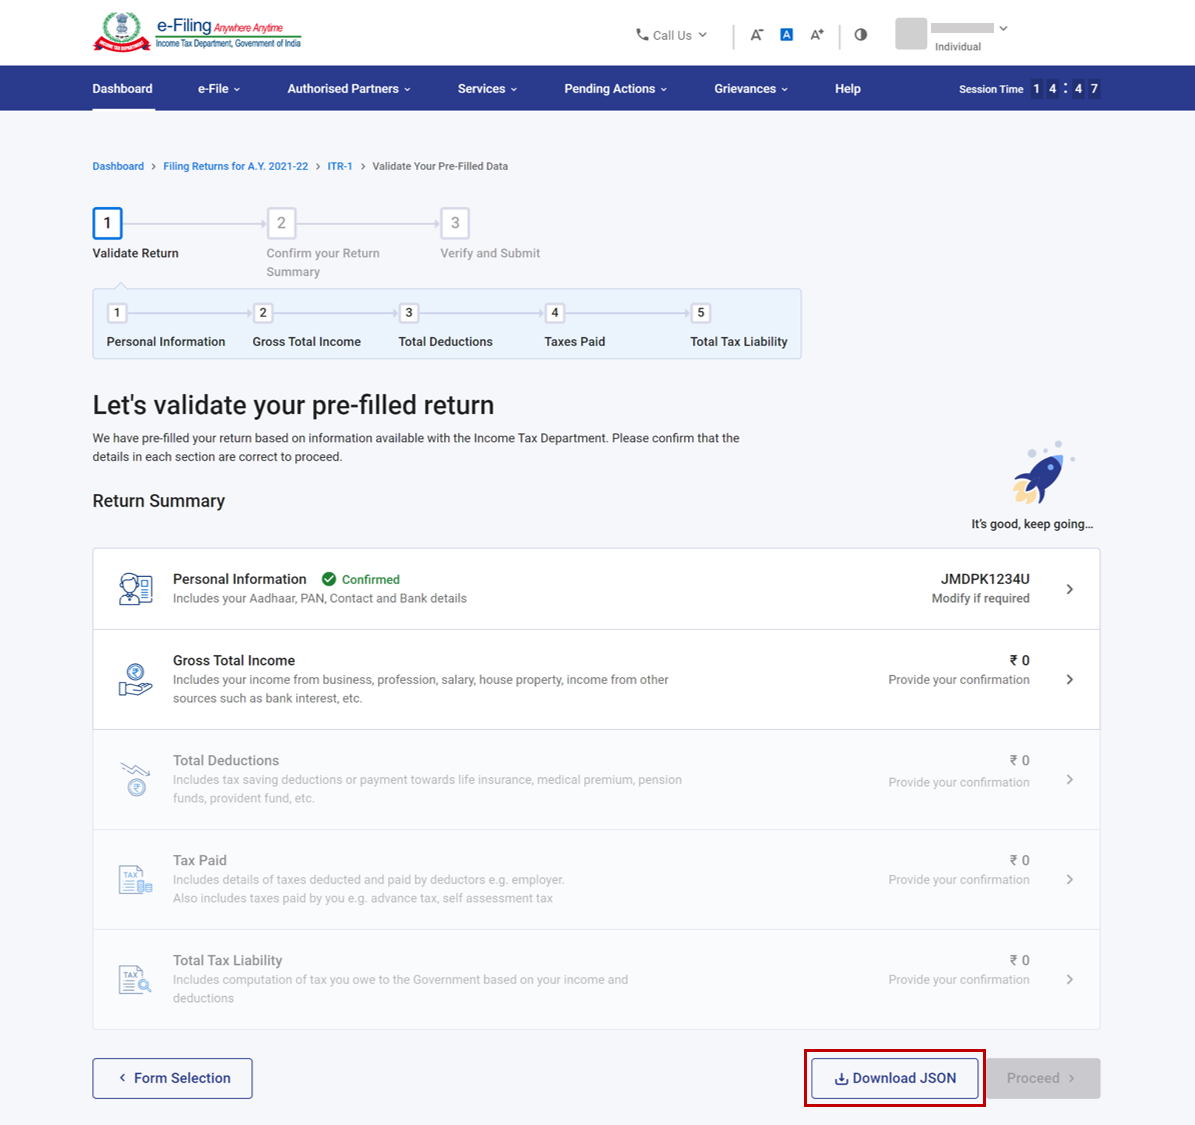
Note: You can download the draft online ITR JSON by clicking Download JSON from the Return Summary page on the e-Filing portal. You can arrive at this page by clicking:
- e -File > Income Tax Returns > File Income Tax Return
- Then, select the AY > Mode of Filing (Online) > Resume Filing
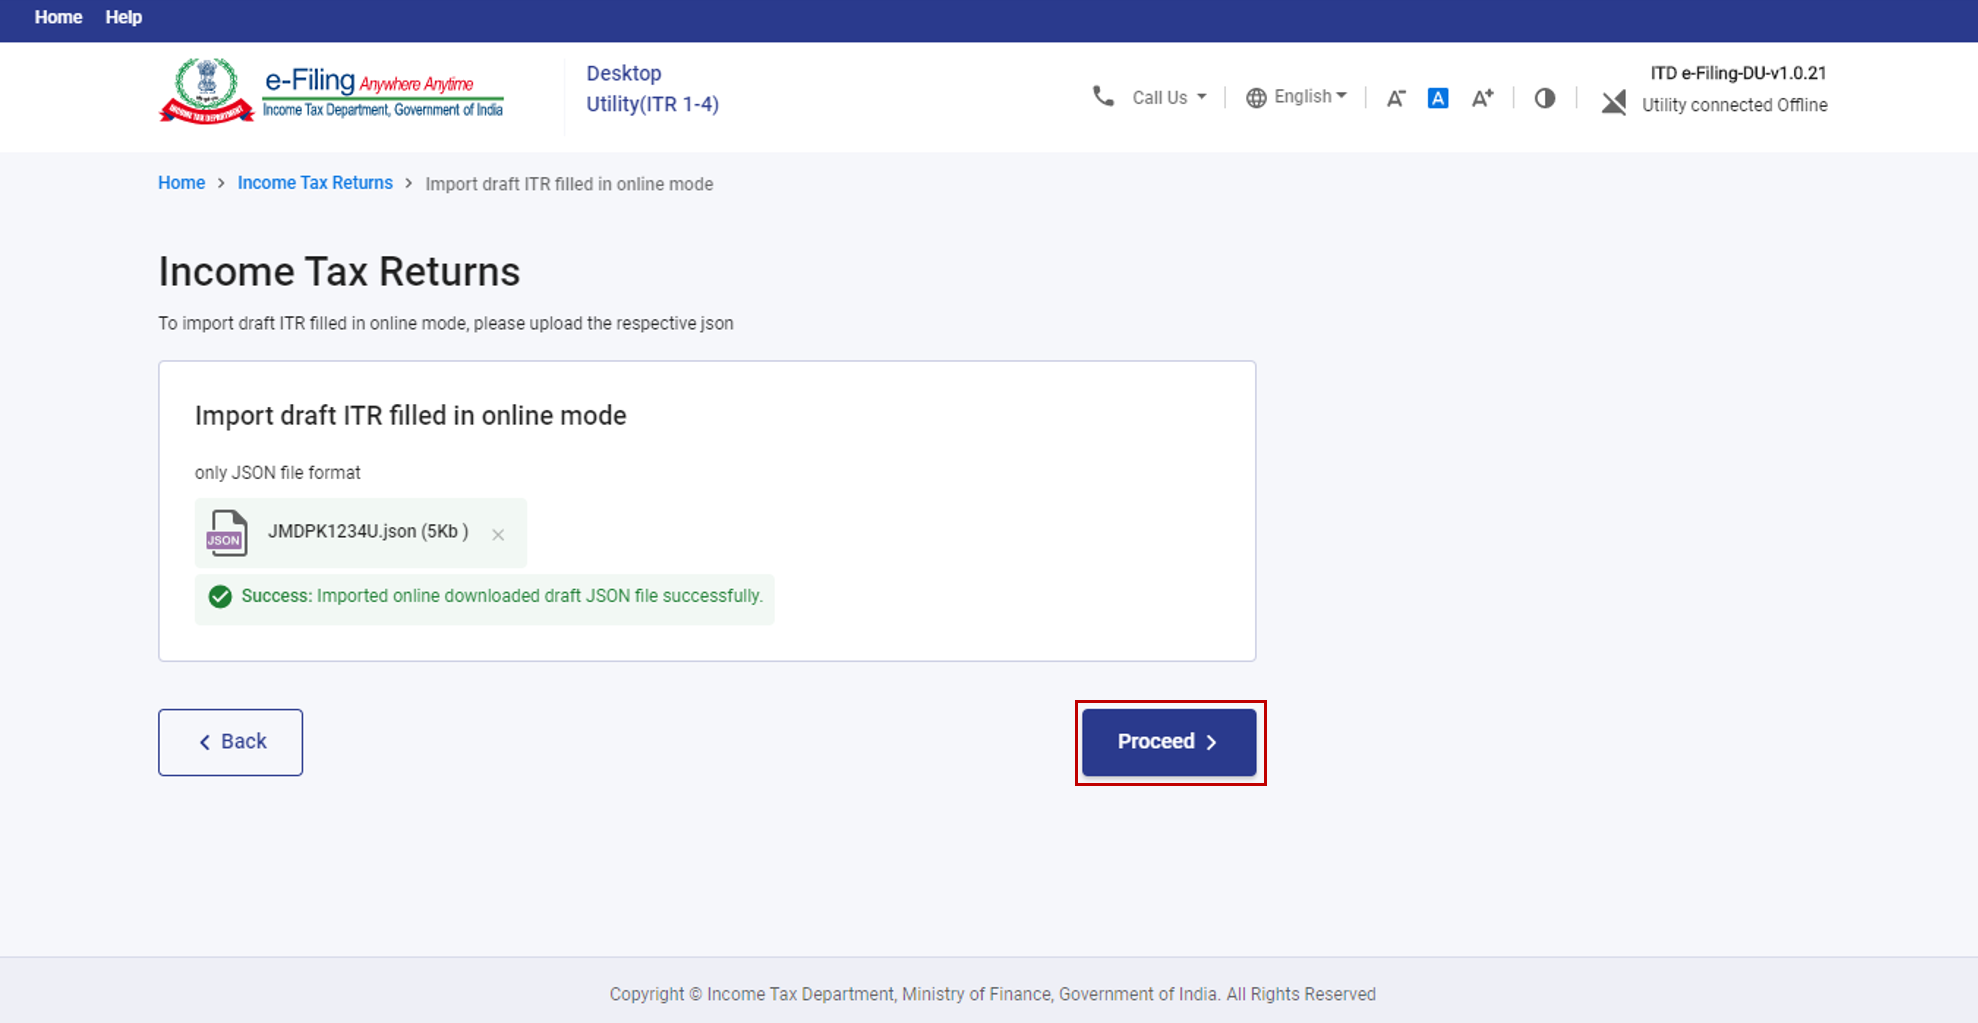
Step 3: Once the JSON is uploaded, click Proceed.
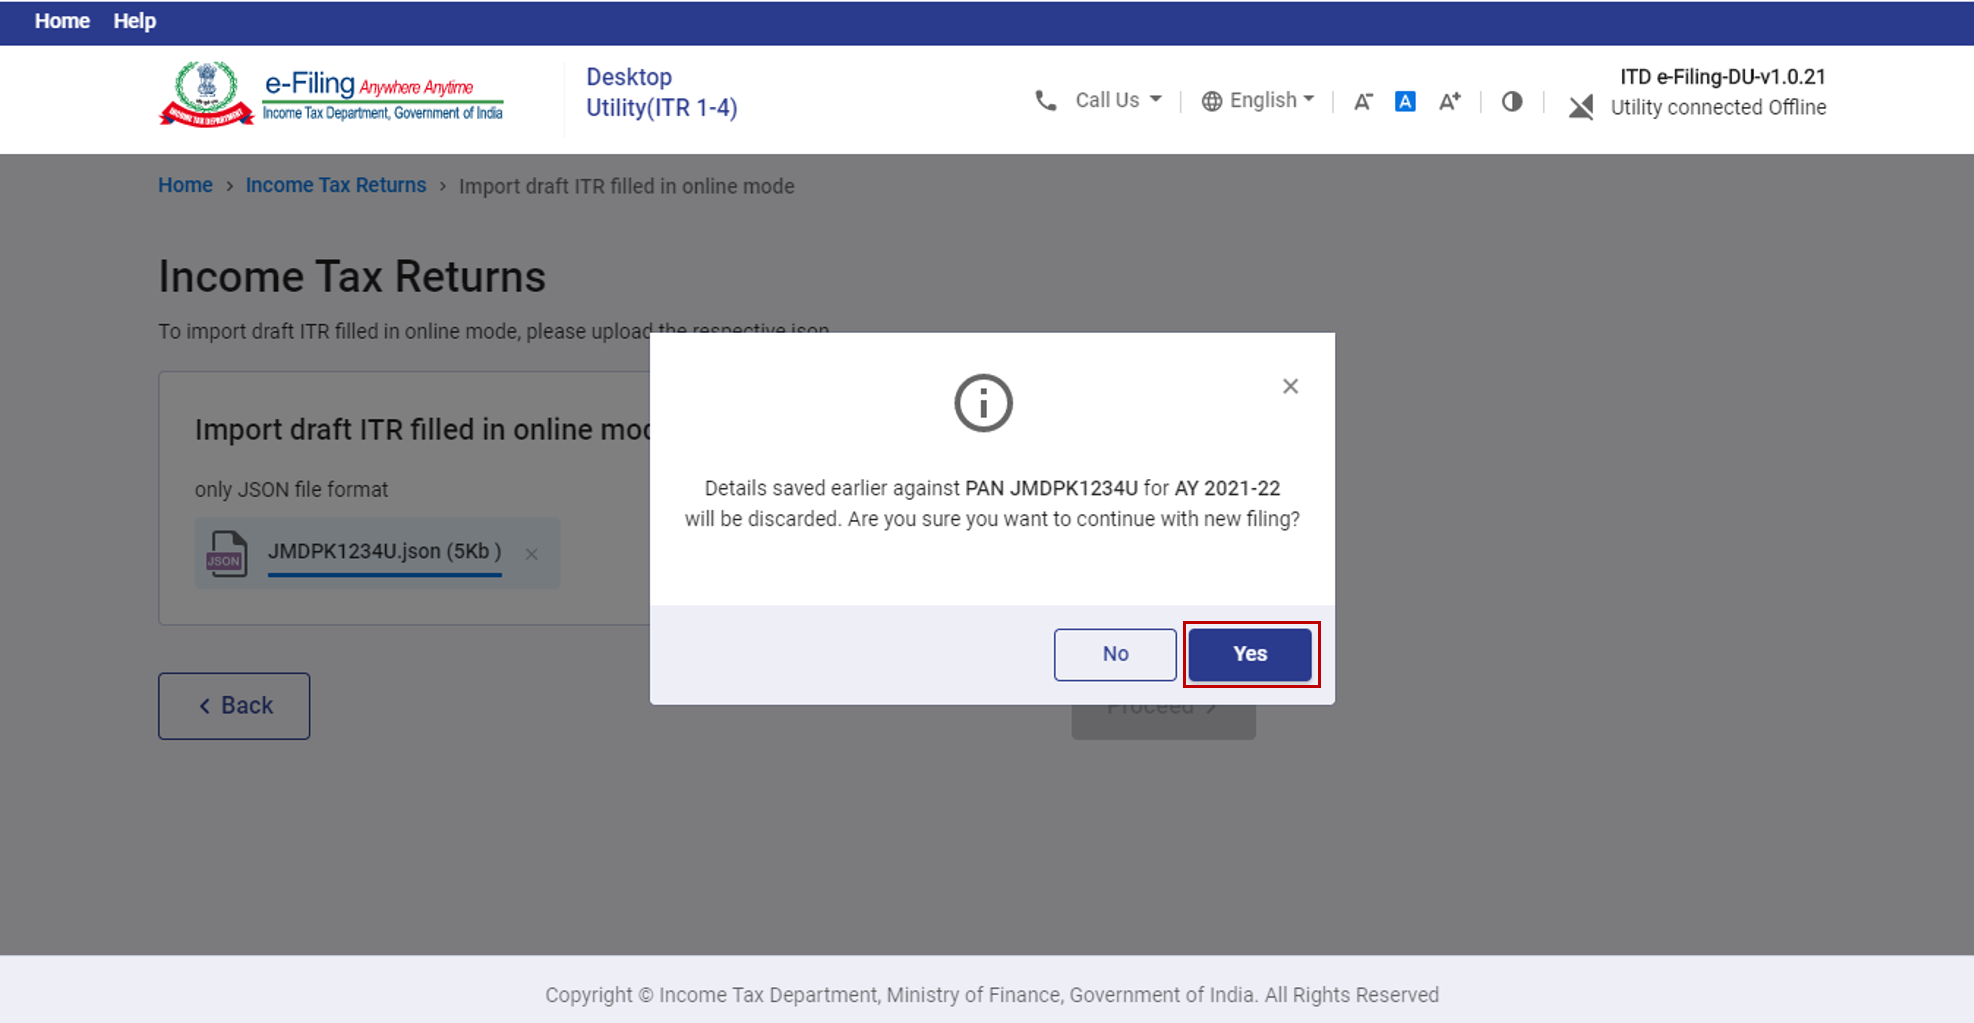
Step 4: Click Yes if you want to proceed.
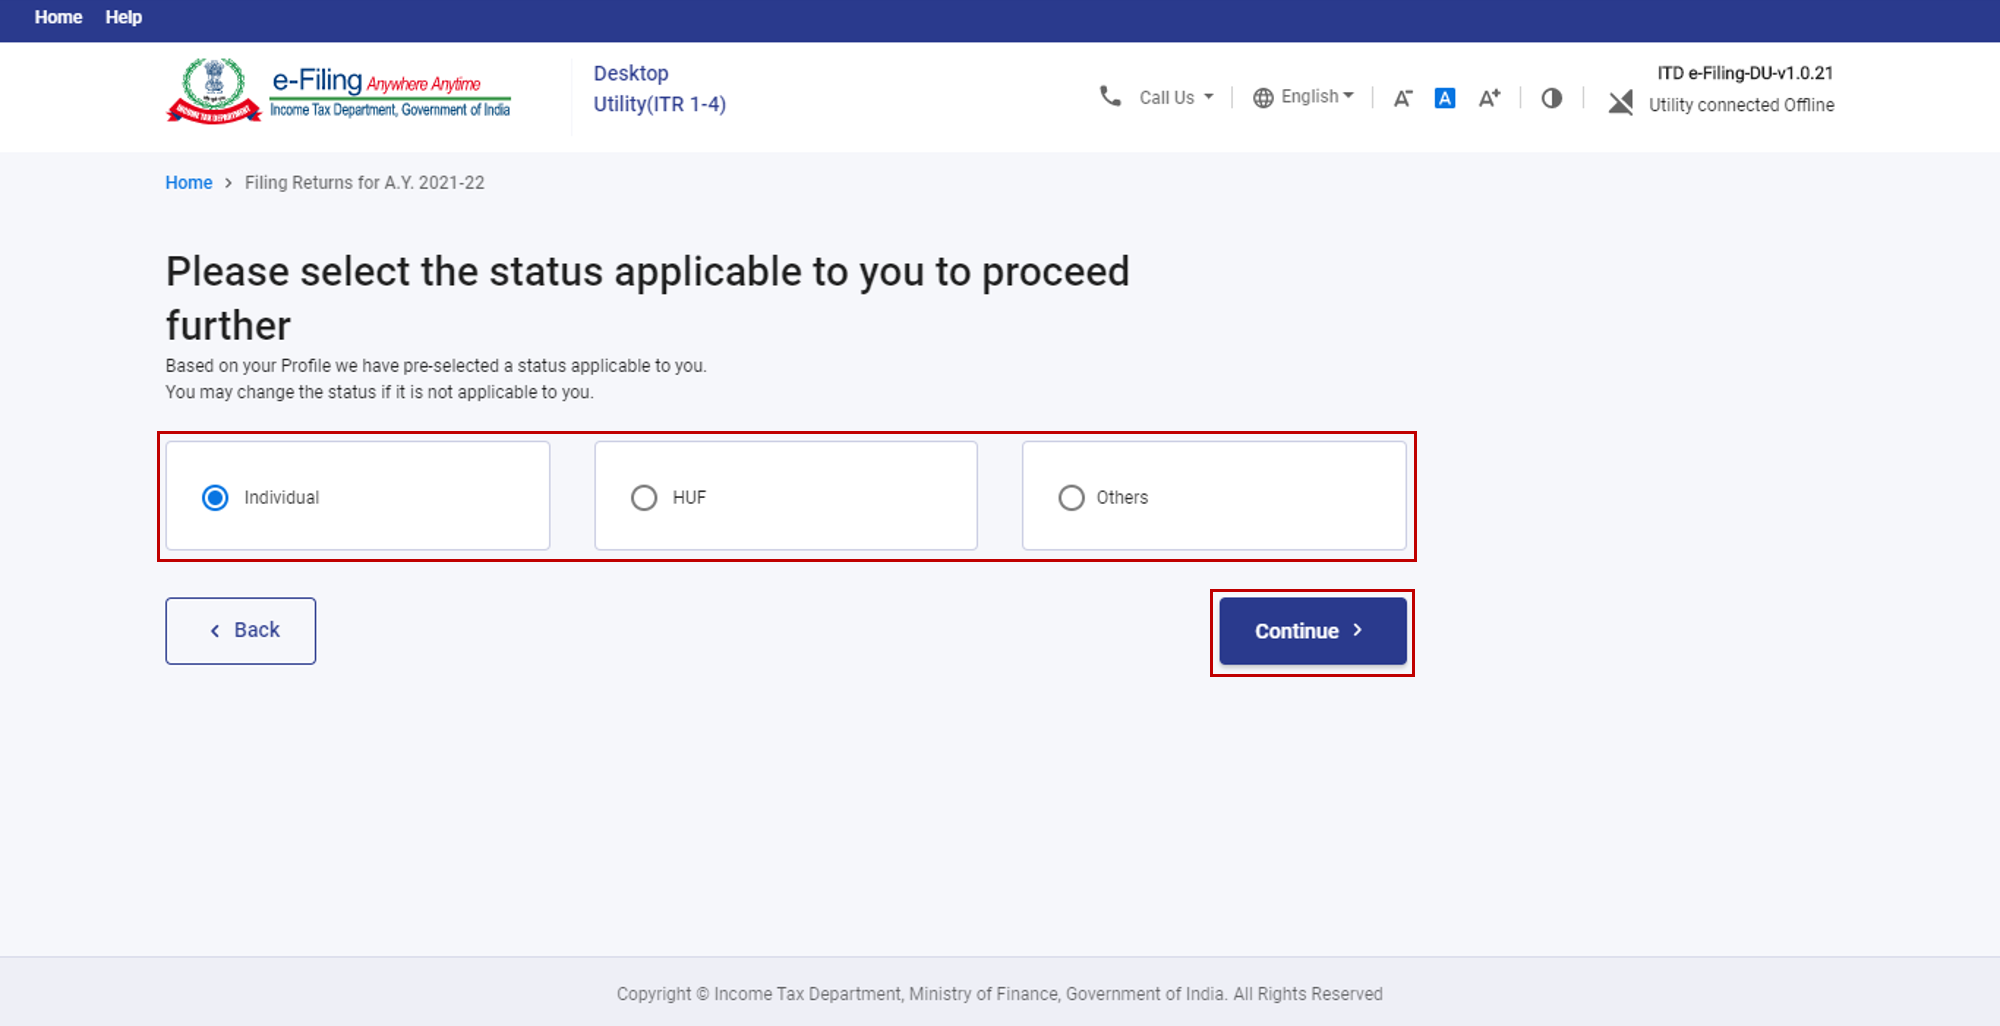
Then, you will be taken to the starting page of your ITR form to continue with the filing process.
Refer to section 4.4 File, Preview and Submit Income Tax Returns to learn the rest of the process (Step 3 onwards).
4.4 File, Preview and Submit Income Tax Returns
Step 1: After downloading or importing your pre-filled data and clicking File Return, you will arrive on this page. Select the status applicable to you, and click Continue.
Step 2: You have two options to select the type of income tax return:
- Help me decide which ITR Form to file: Click Proceed. Once the system helps you determine the correct ITR, you can proceed with filing your ITR.
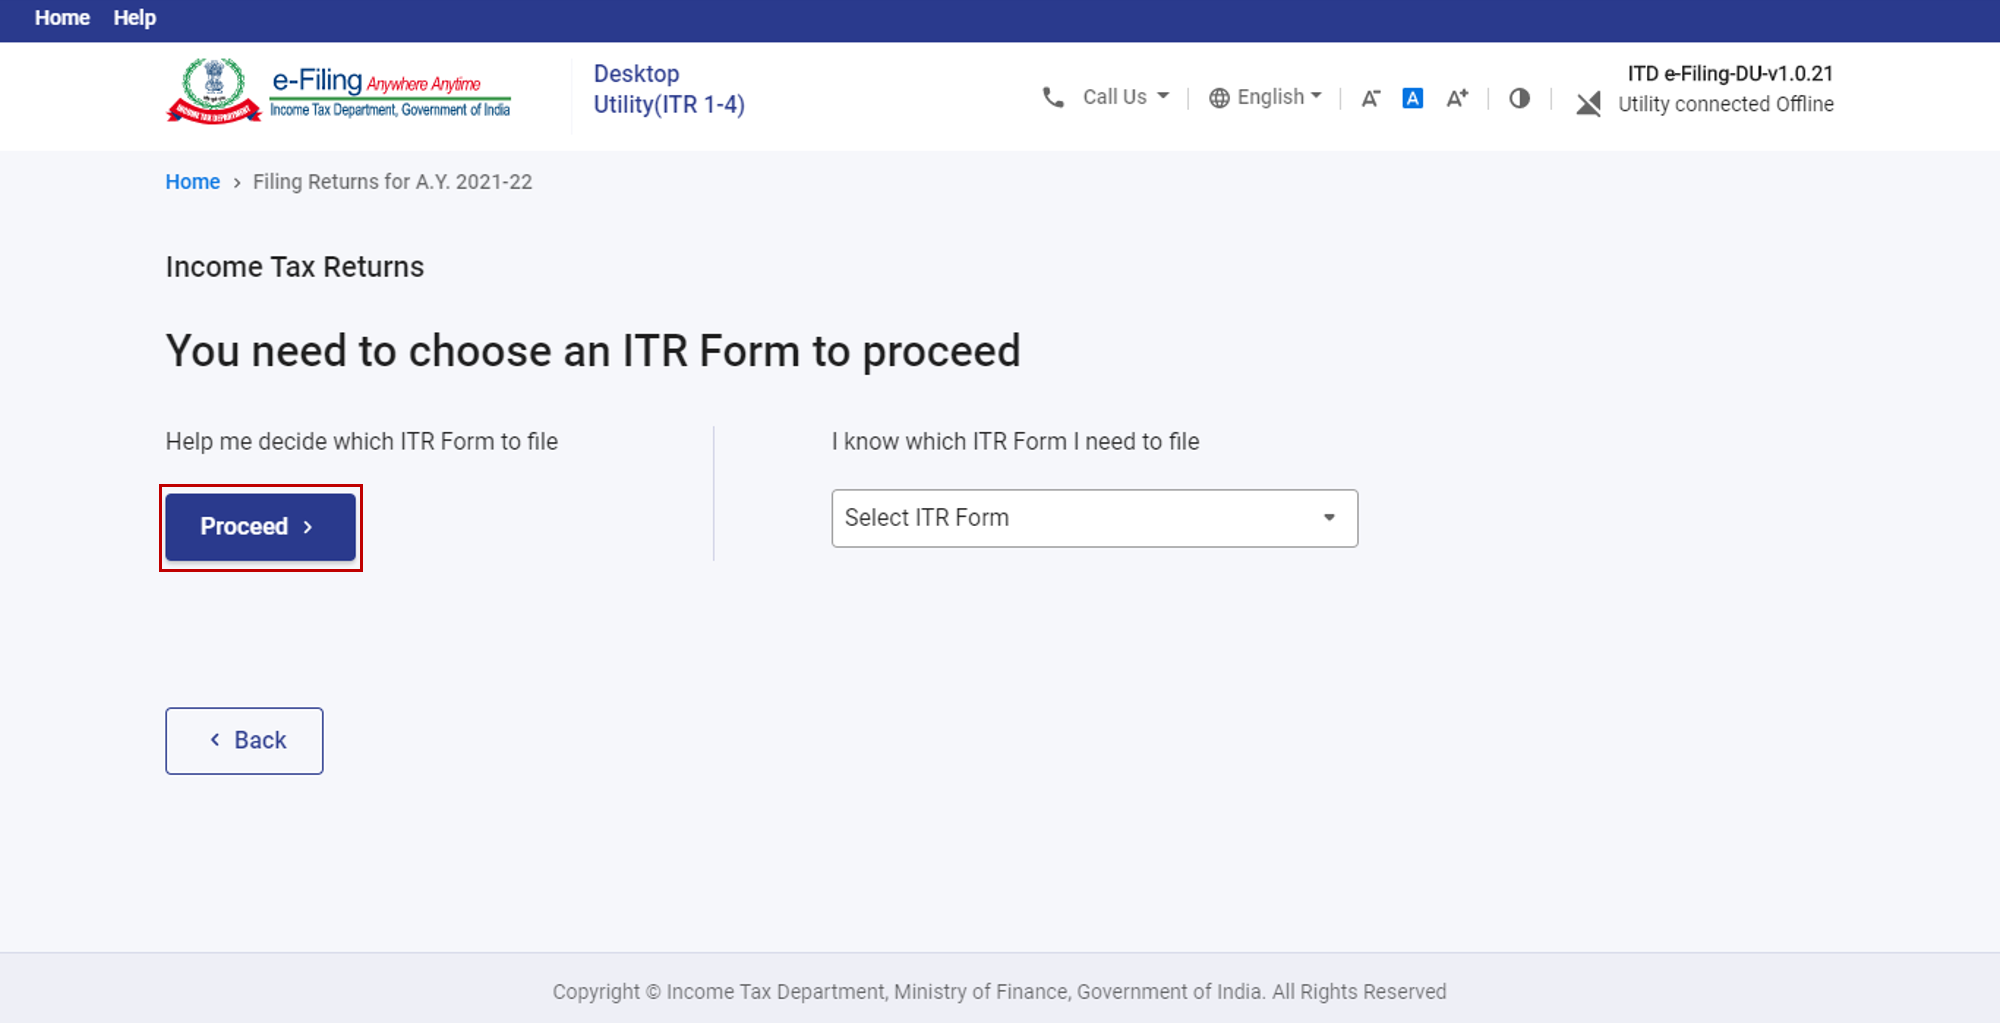
- I know which ITR Form I need to file: Select the applicable income tax return form from the dropdown and click Proceed with ITR.
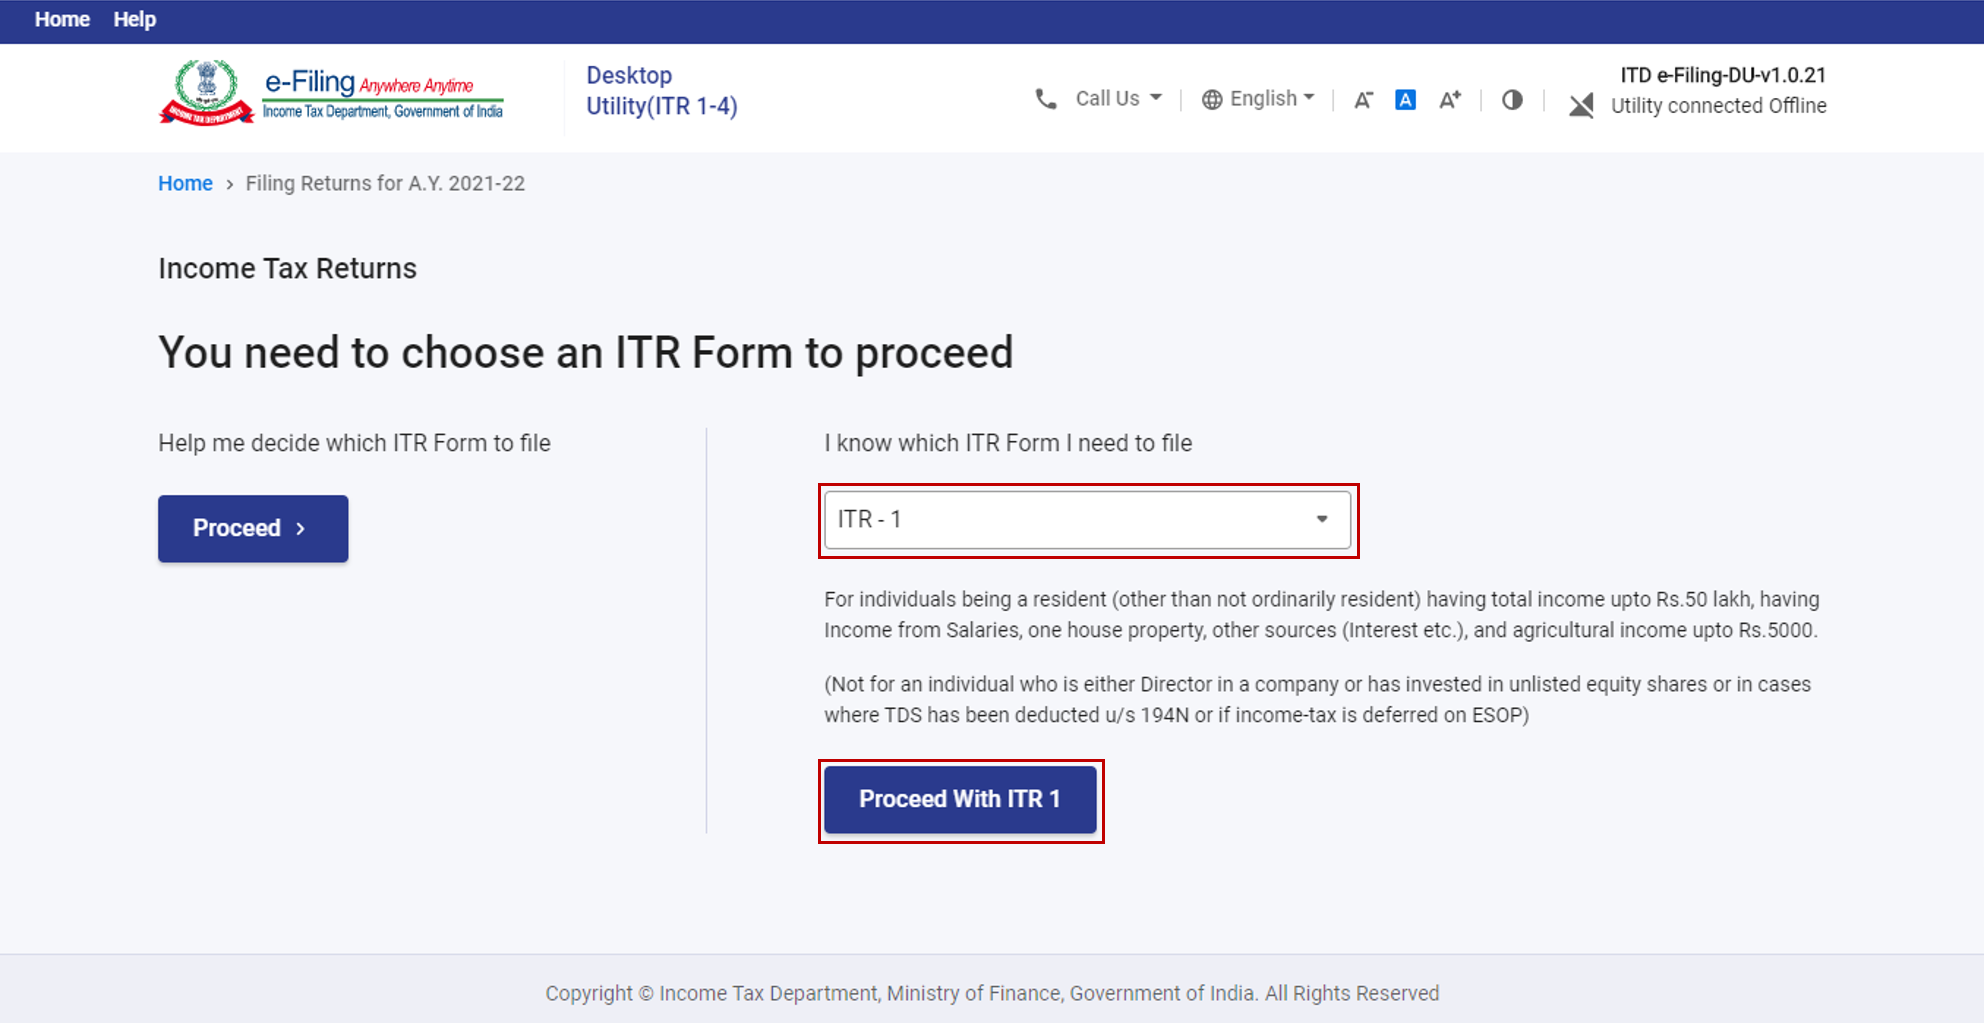
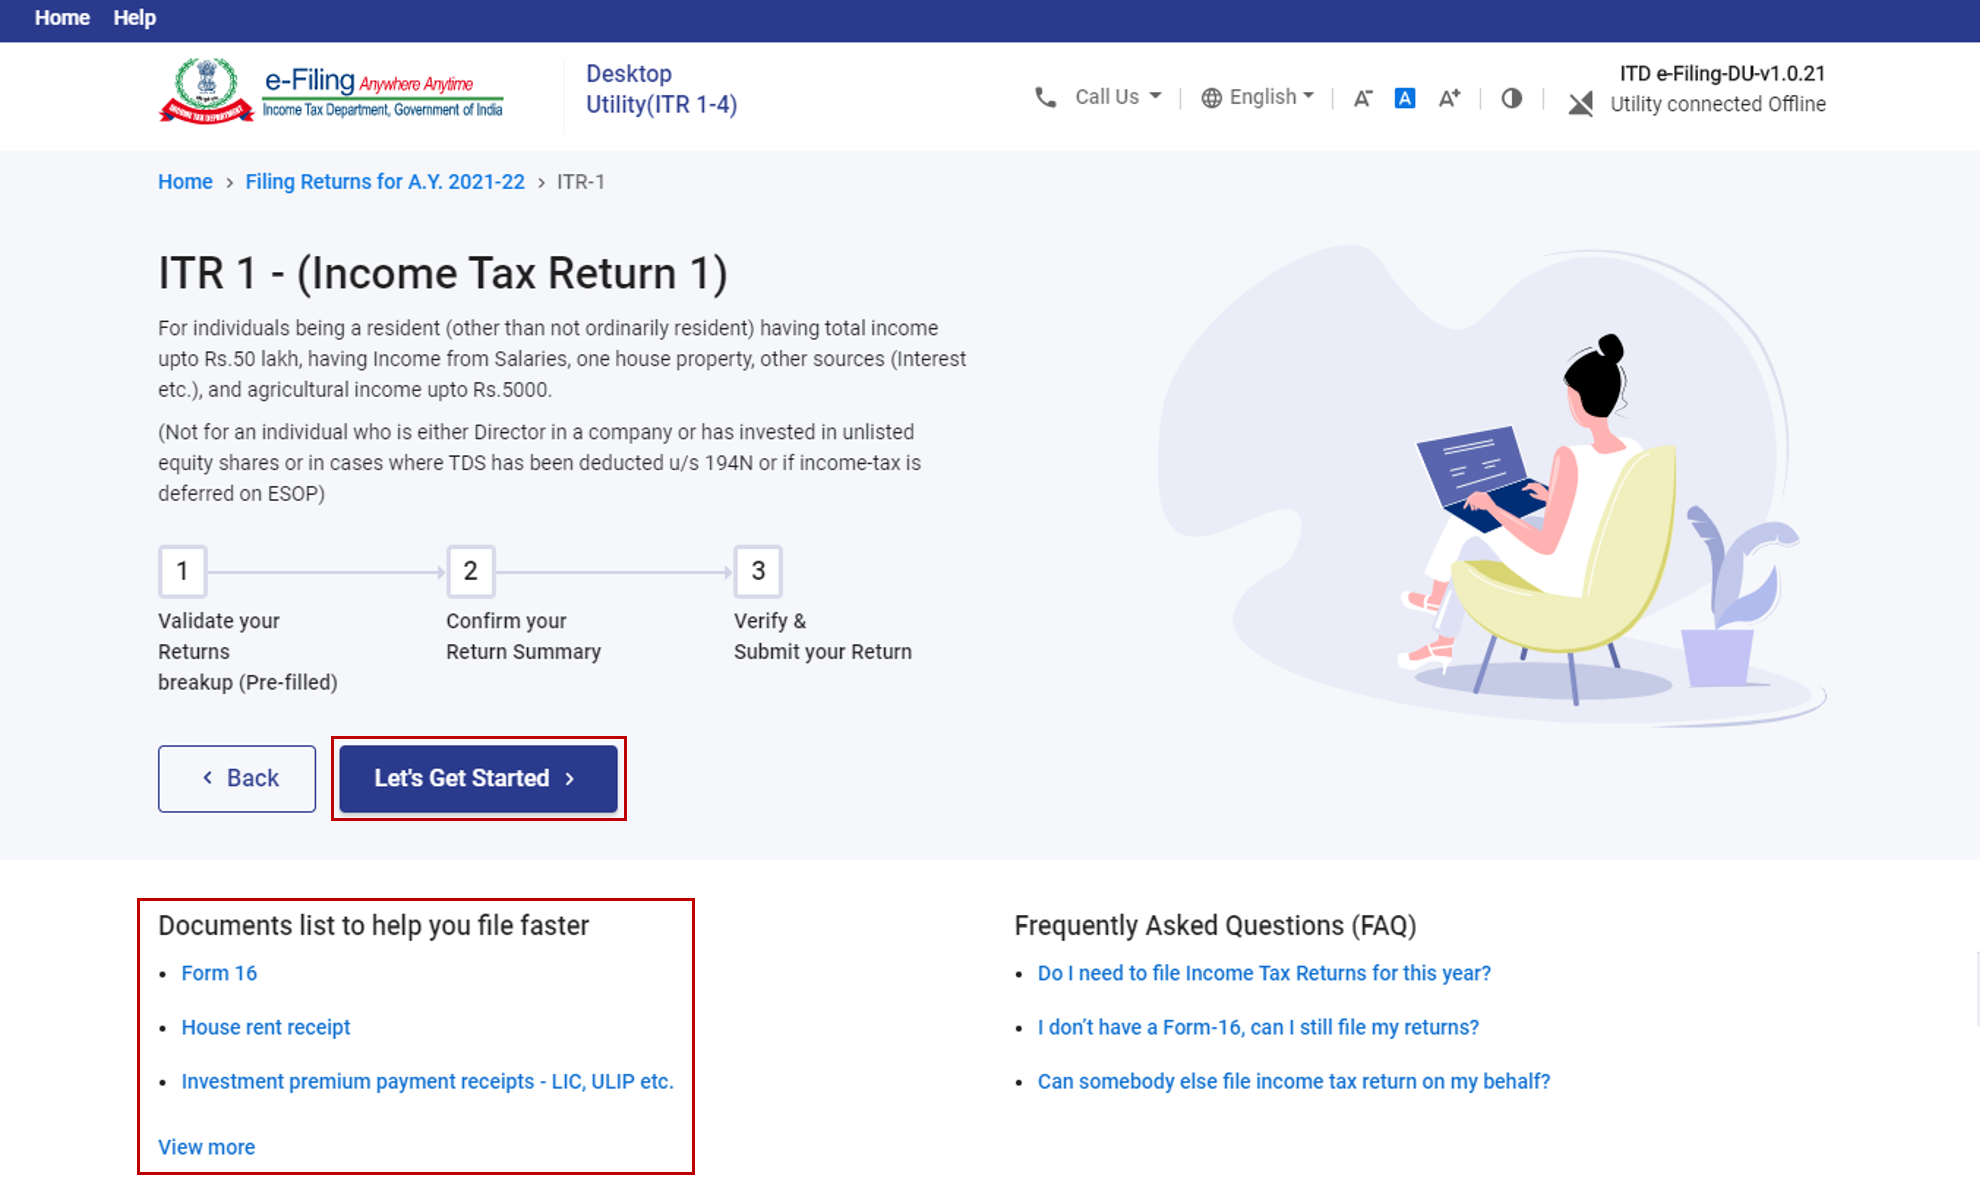
Step 3: Once you have selected the ITR applicable to you, note the list of documents needed, and click Let's Get Started.
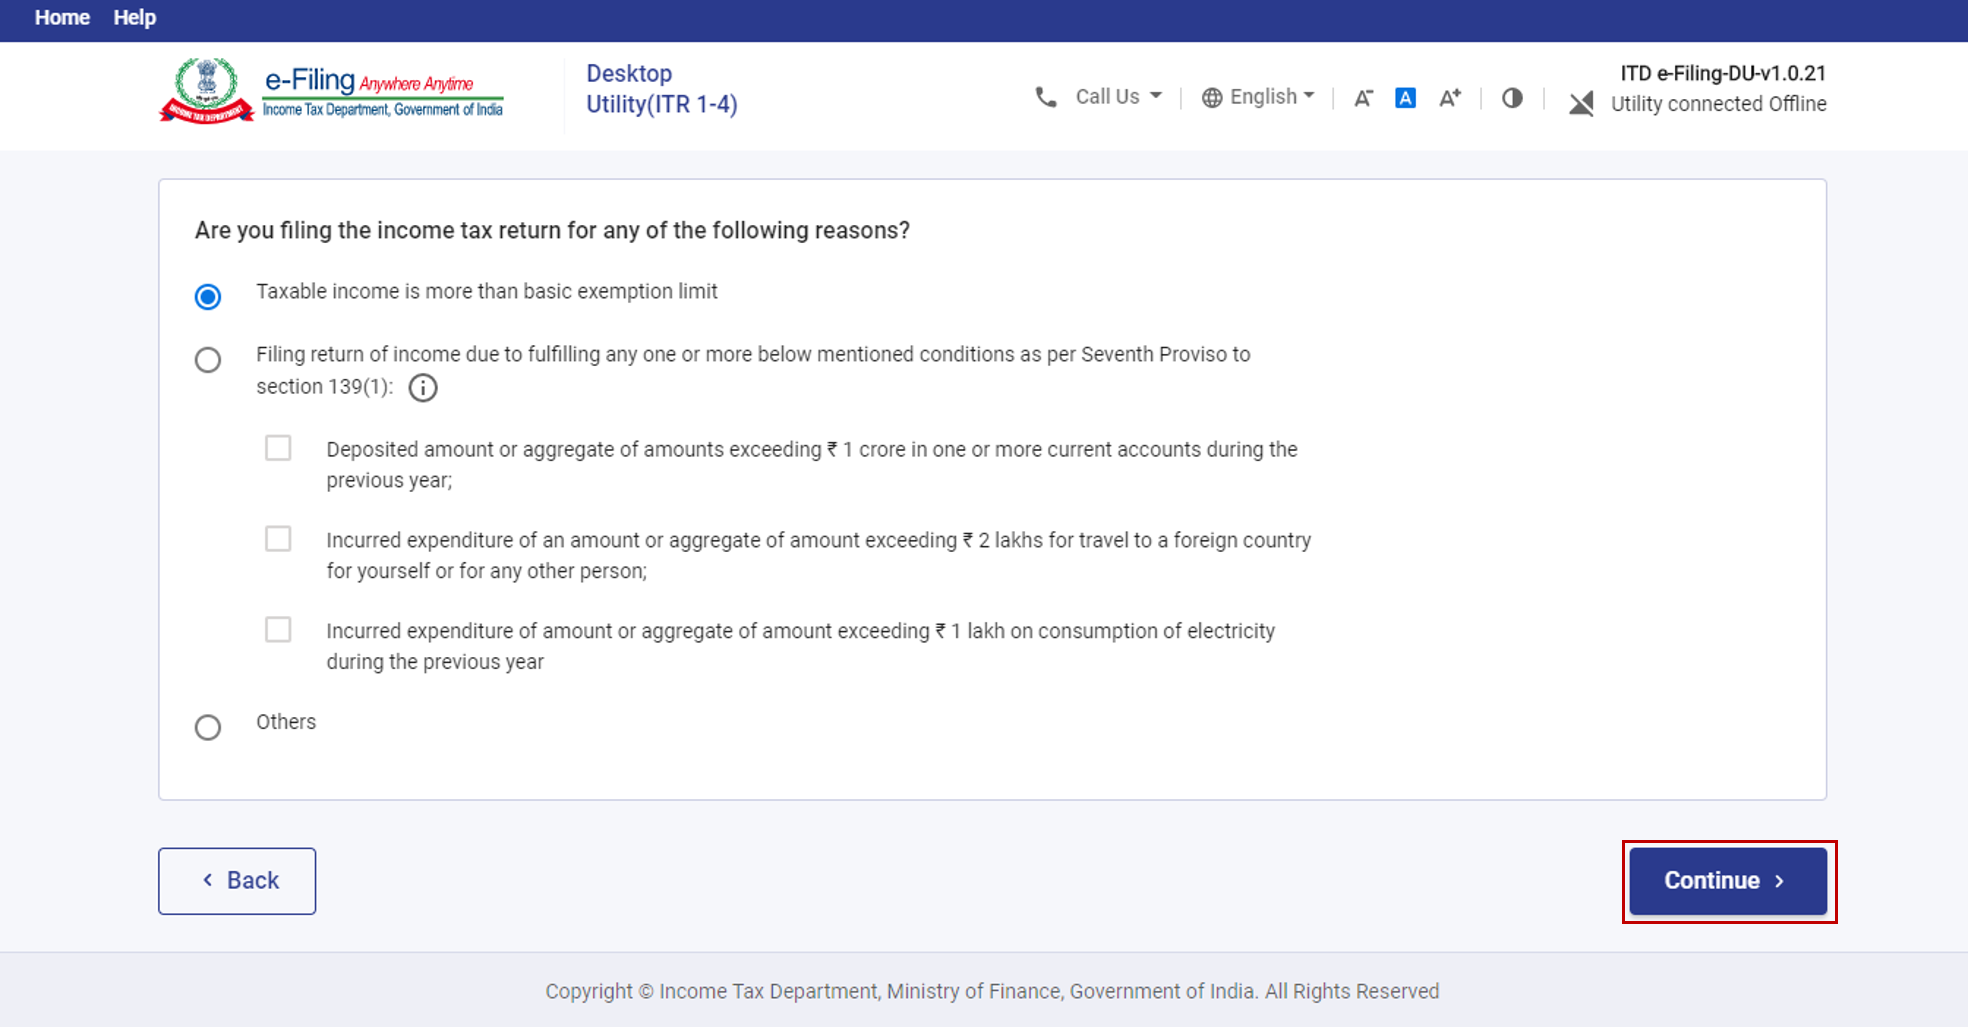
Step 4: Select the applicable reason(s) as to why you’re filing the income tax return, and click Continue.
Step 5: In each section of your ITR (Refer to the Instructions to File ITR issued by CBDT for details on how to fill the ITR):
- Review the pre-filled data downloaded / imported
- Edit your pre-filled data (if necessary)
- Enter your remaining / additional details
After completing and confirming all the sections of the form, click Proceed.
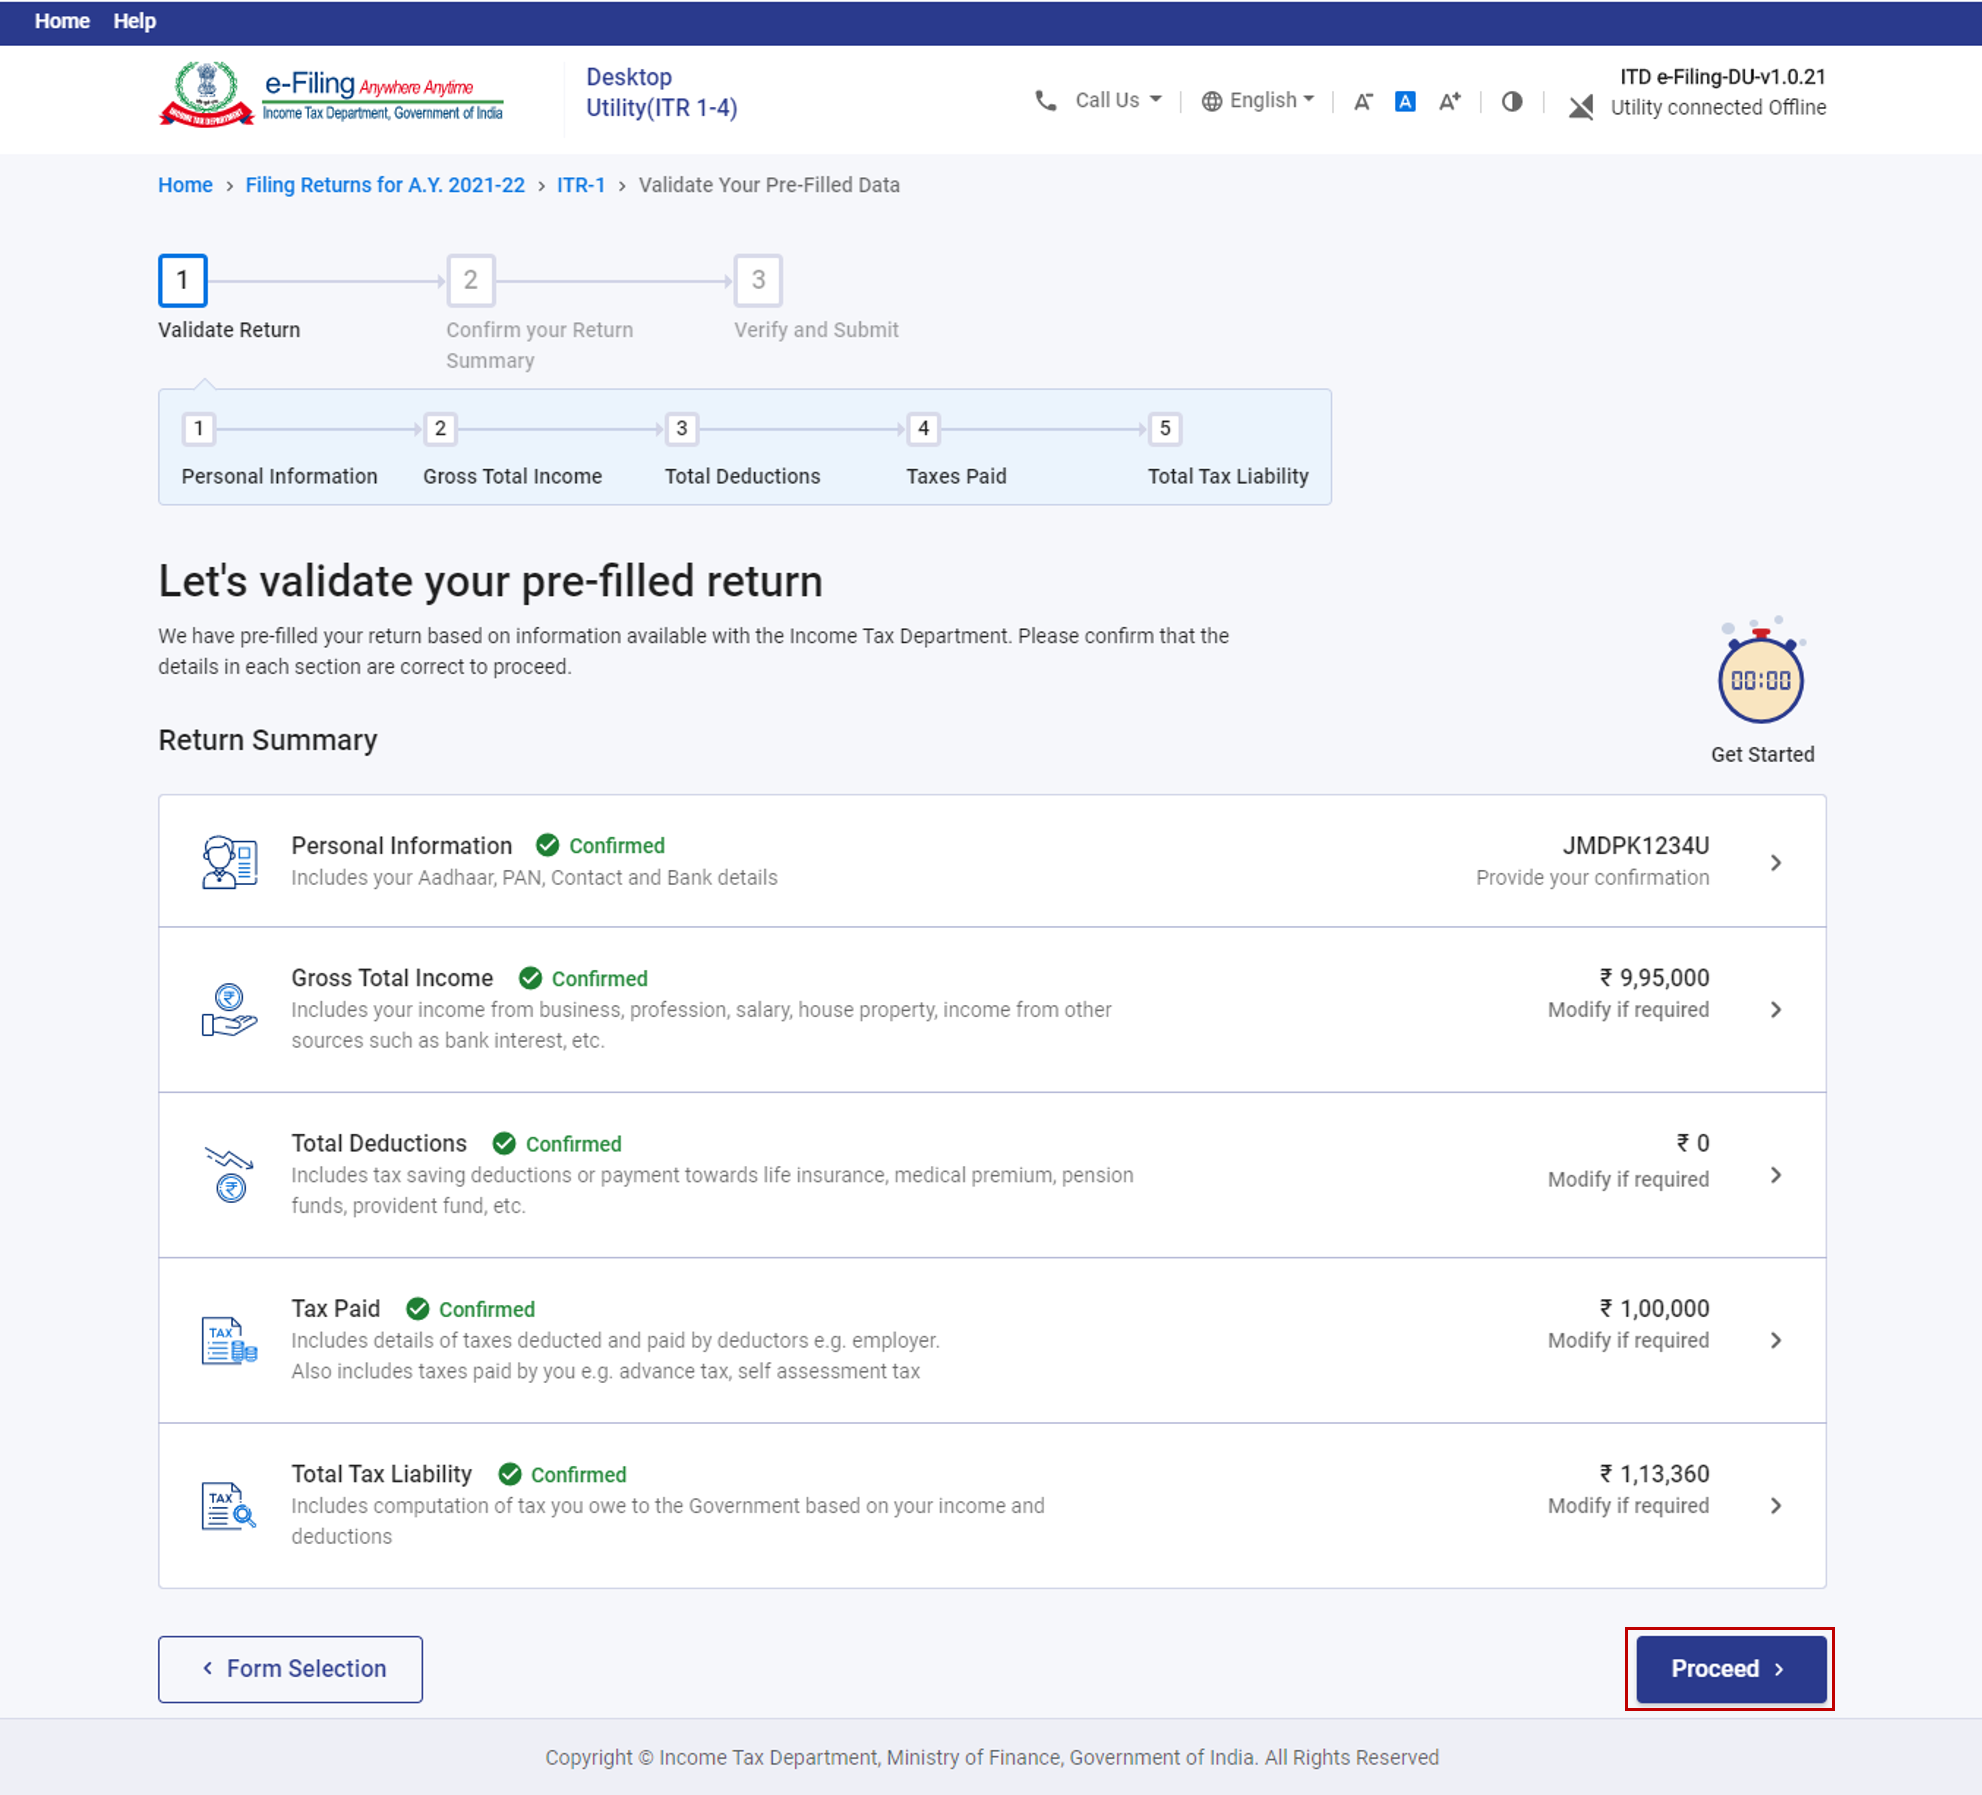
Step 6: On the Confirm Your Return Summary page, you will be shown a summary of your tax computation based on the details you provided.
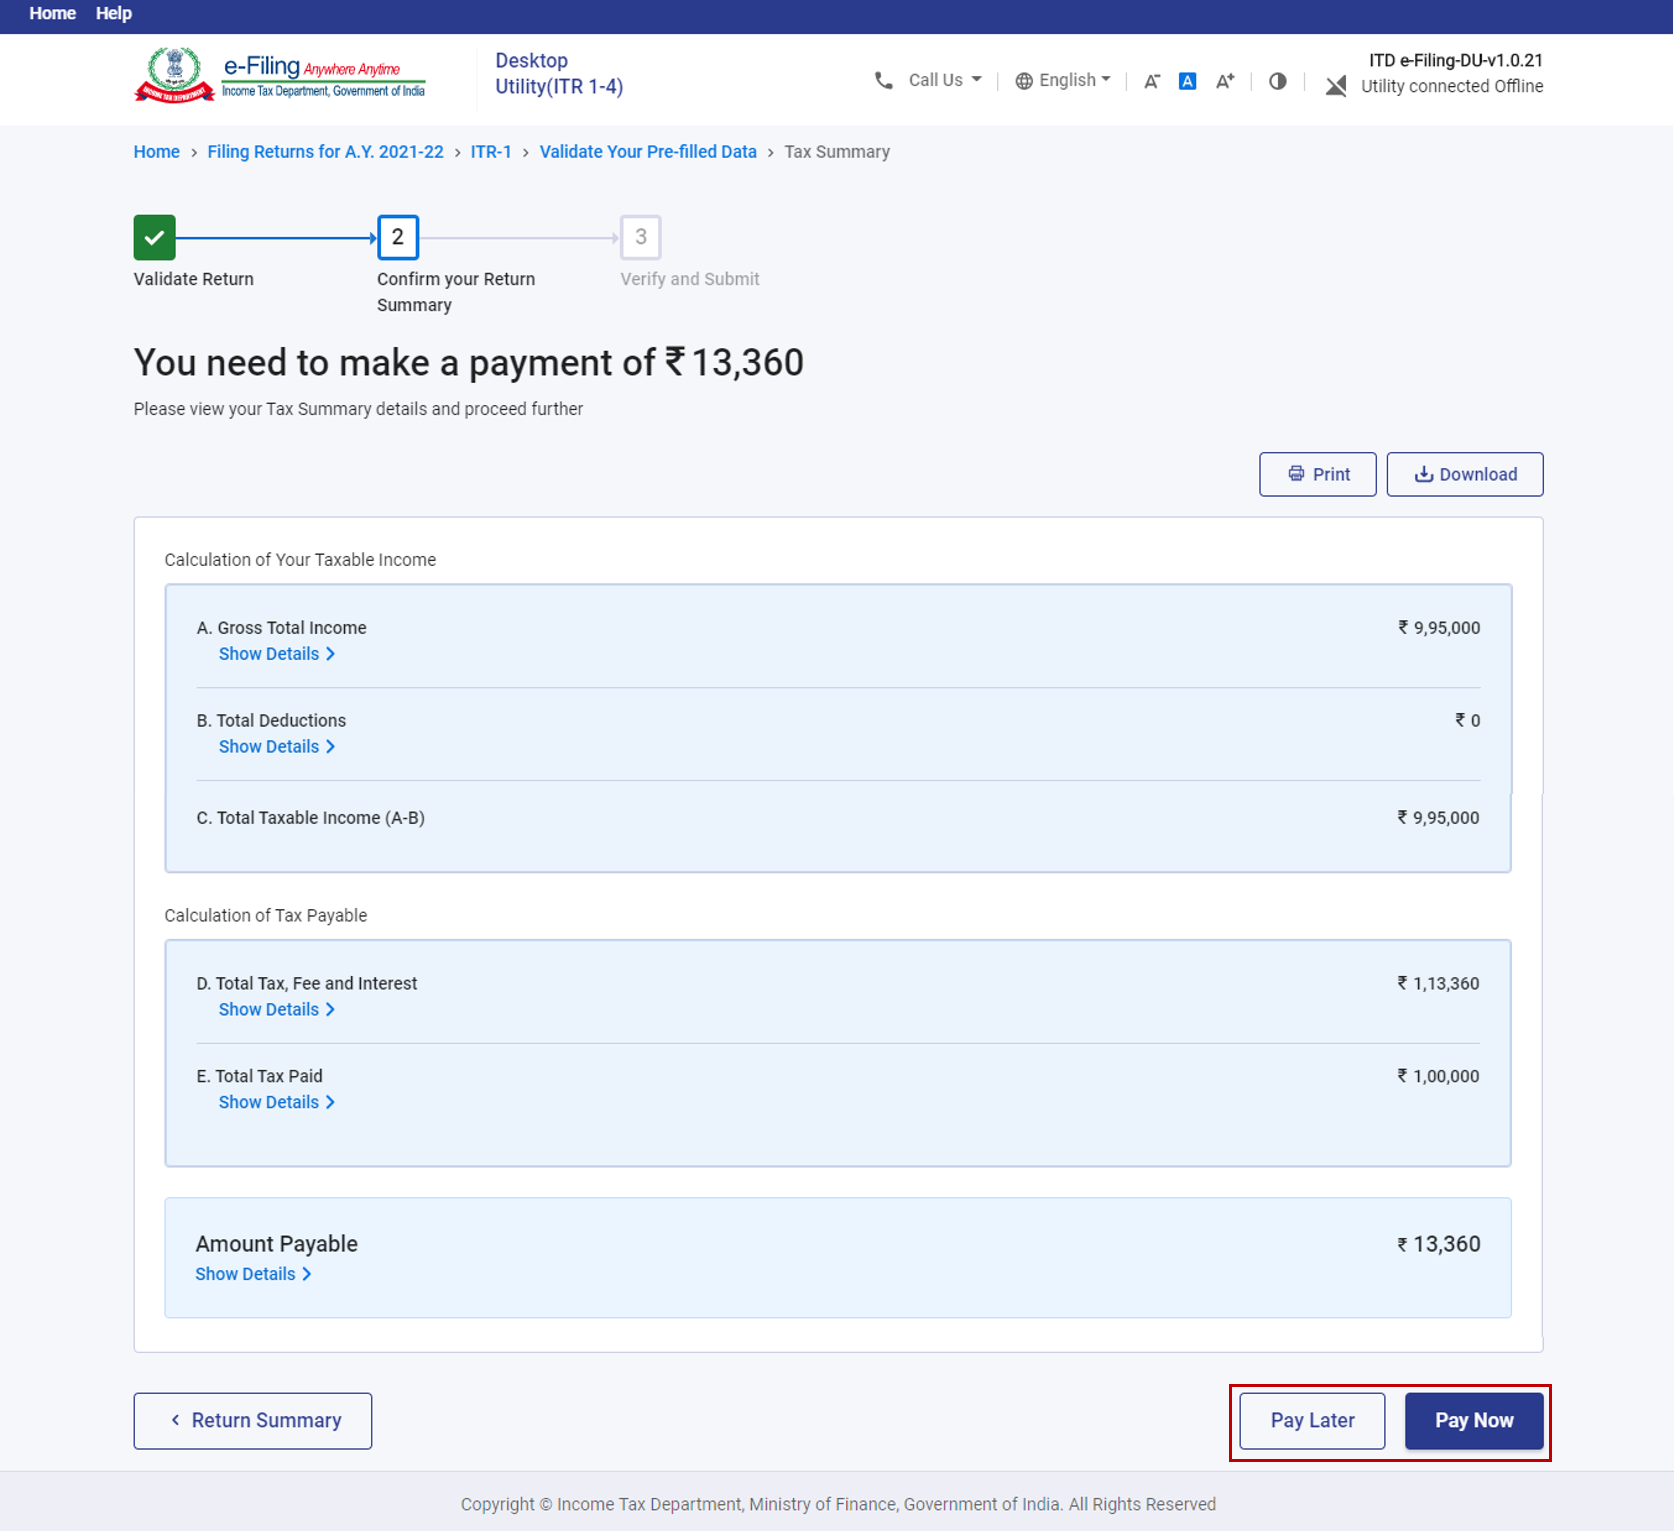
a) In case there is a tax liability:
If there is tax liability payable based on the computation, you will get the Pay Now and Pay Later options at the bottom of the page.
Note:
- It is recommended to use the Pay Now option. Carefully note the BSR Code and Challan Serial Number and enter them in the details of payment.
- If you opt to Pay Later, you can make the payment after filing your income tax return, but there is a risk of being considered as an assessee in default, and liability to pay interest on tax payable may arise.
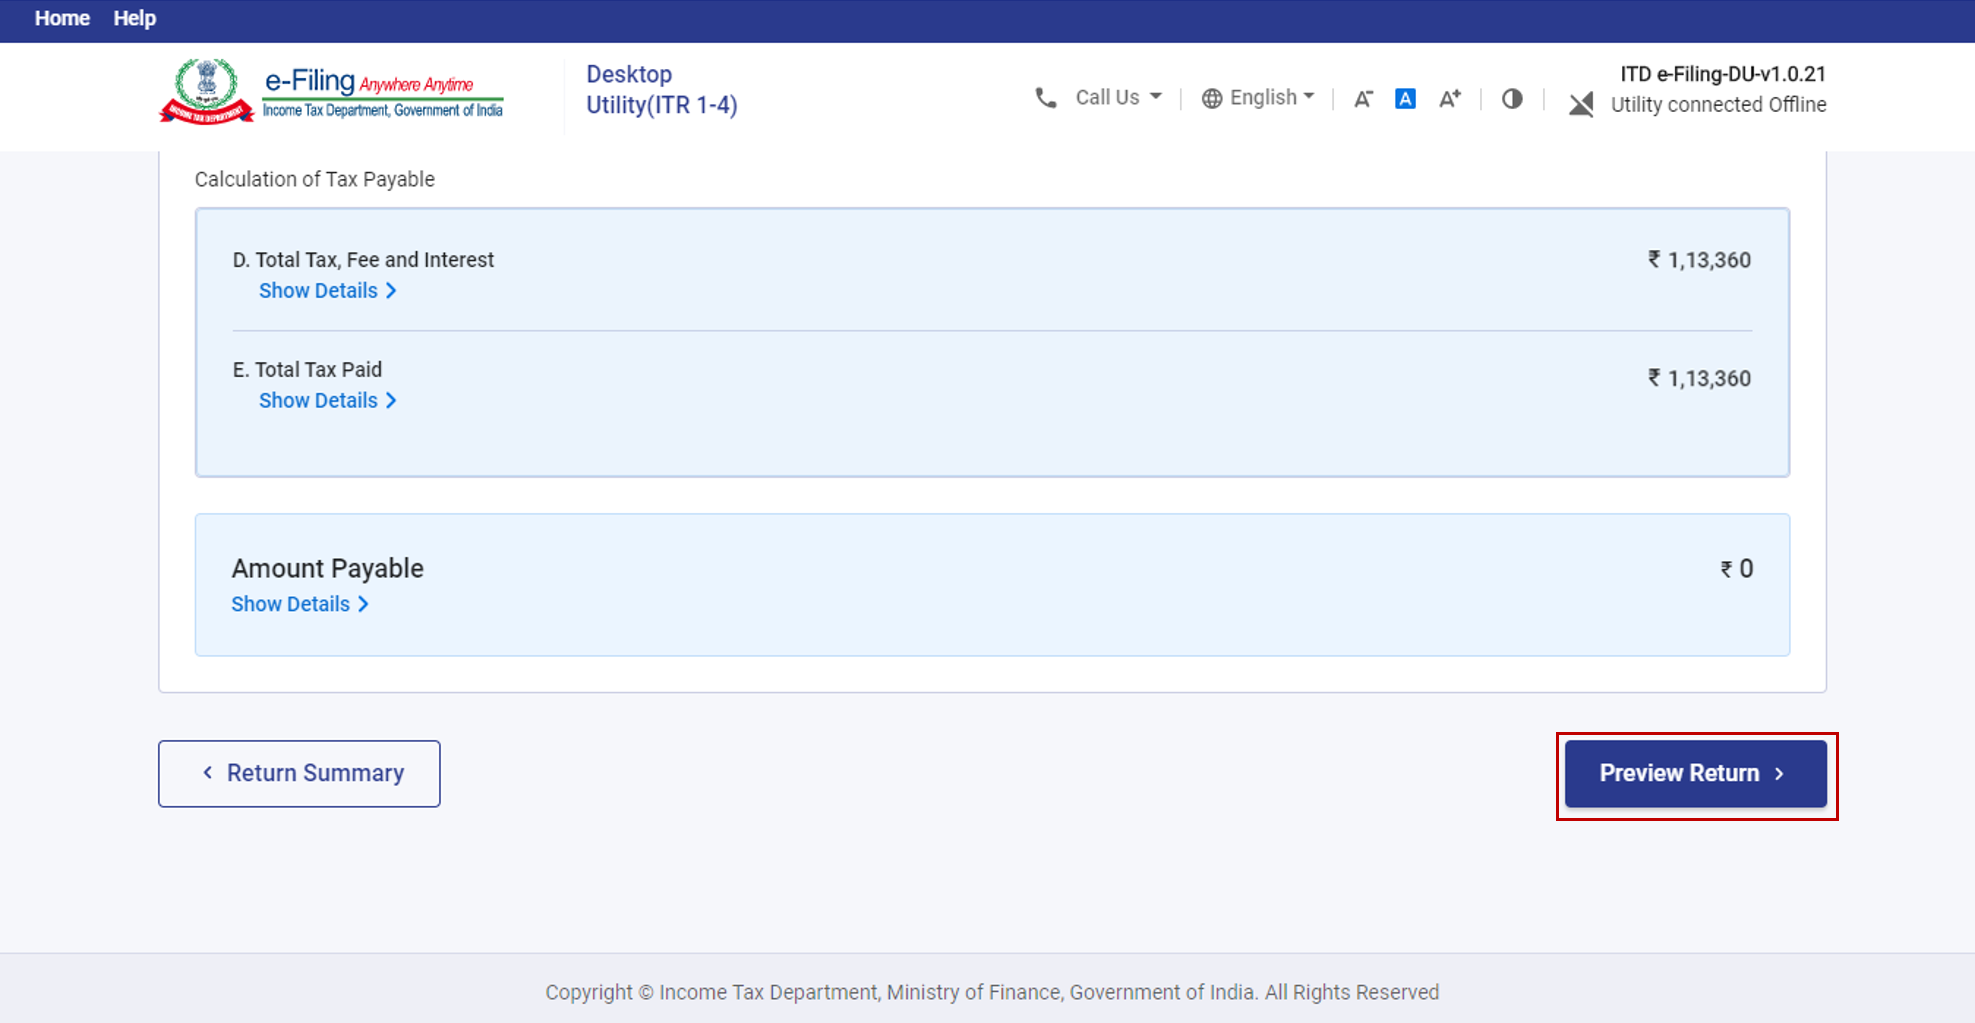
b) In case there is no tax liability (No Demand / No Refund), or if you are eligible for a refund:
If there is no tax liability, or if there is a refund based on your tax computation, you will get the option to directly preview your return. Click Preview Return.
Step 7: On the Preview and Submit your return page, click the declaration checkbox, enter the required details. Click Proceed to Preview.
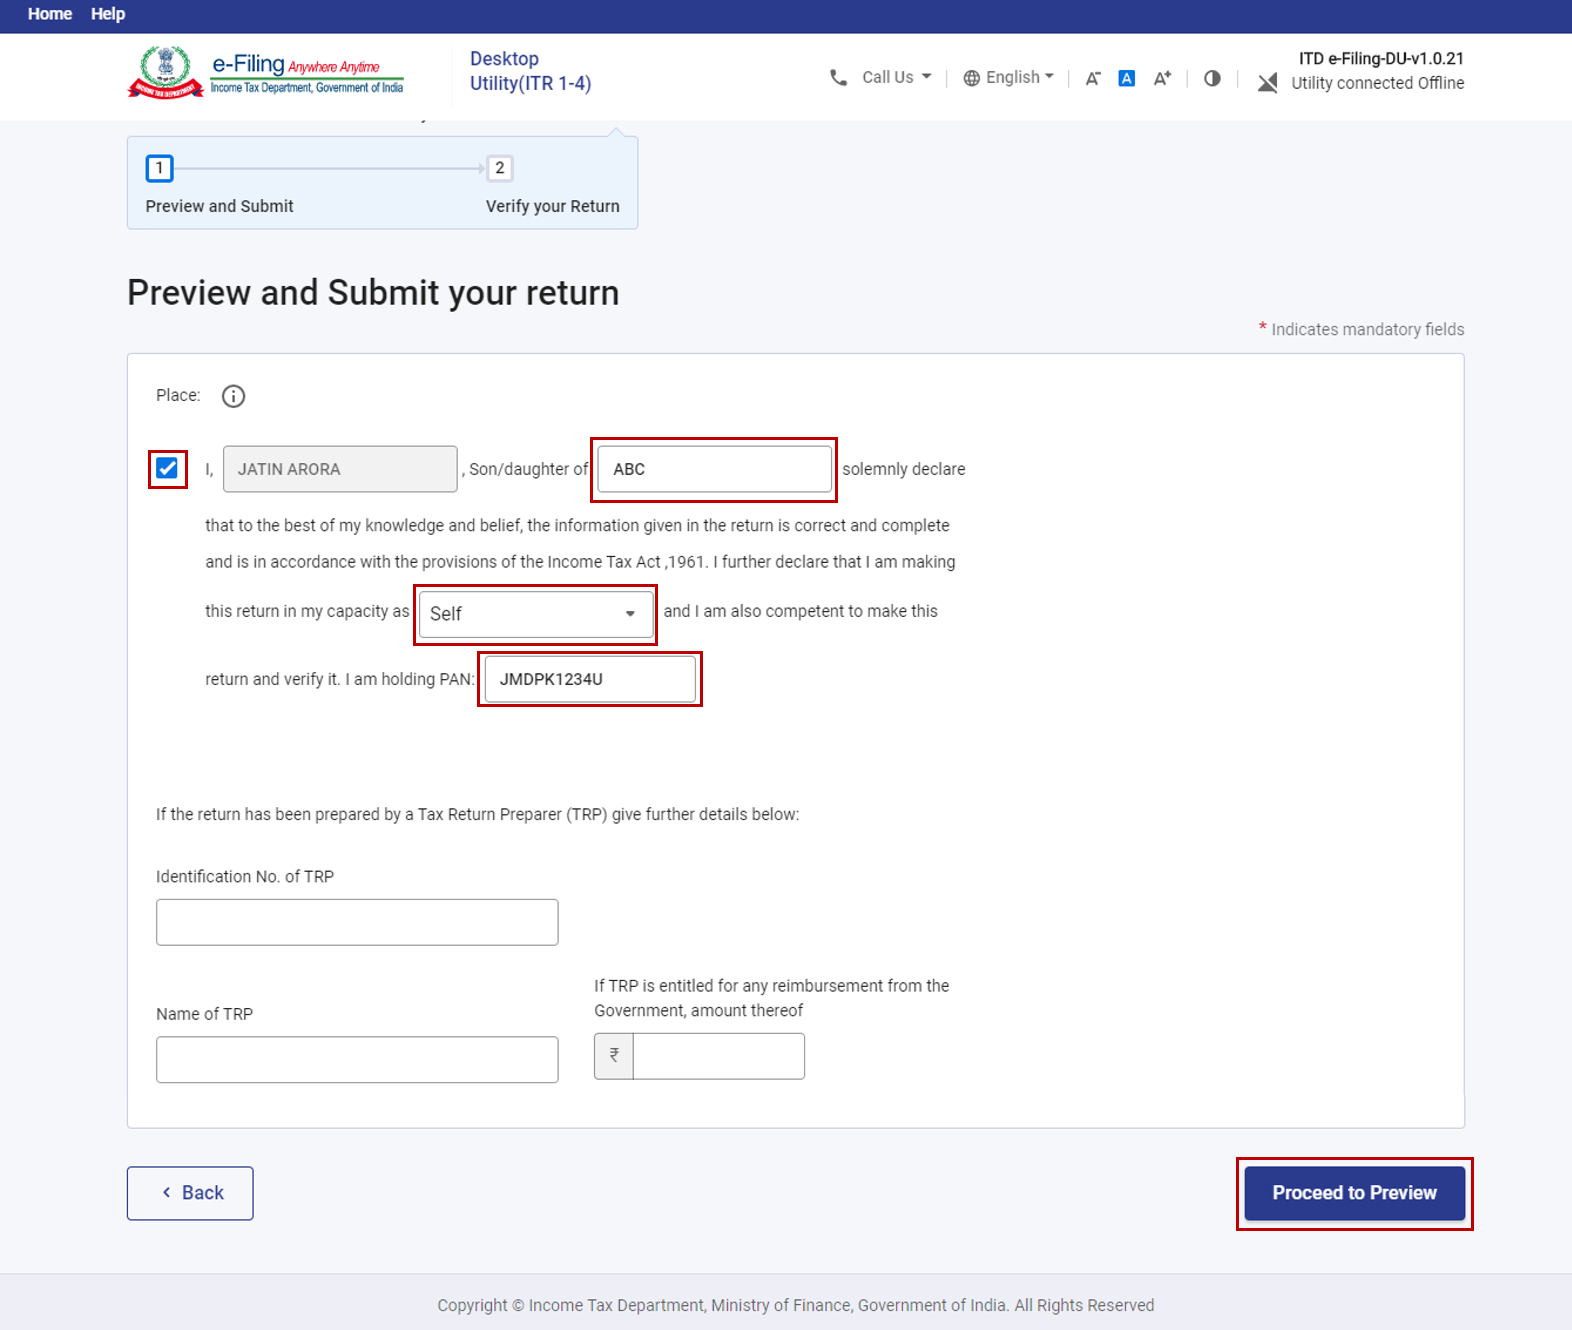
Note: If you have not involved a tax return preparer or TRP in preparing your return, you can leave the textboxes related to TRP blank.
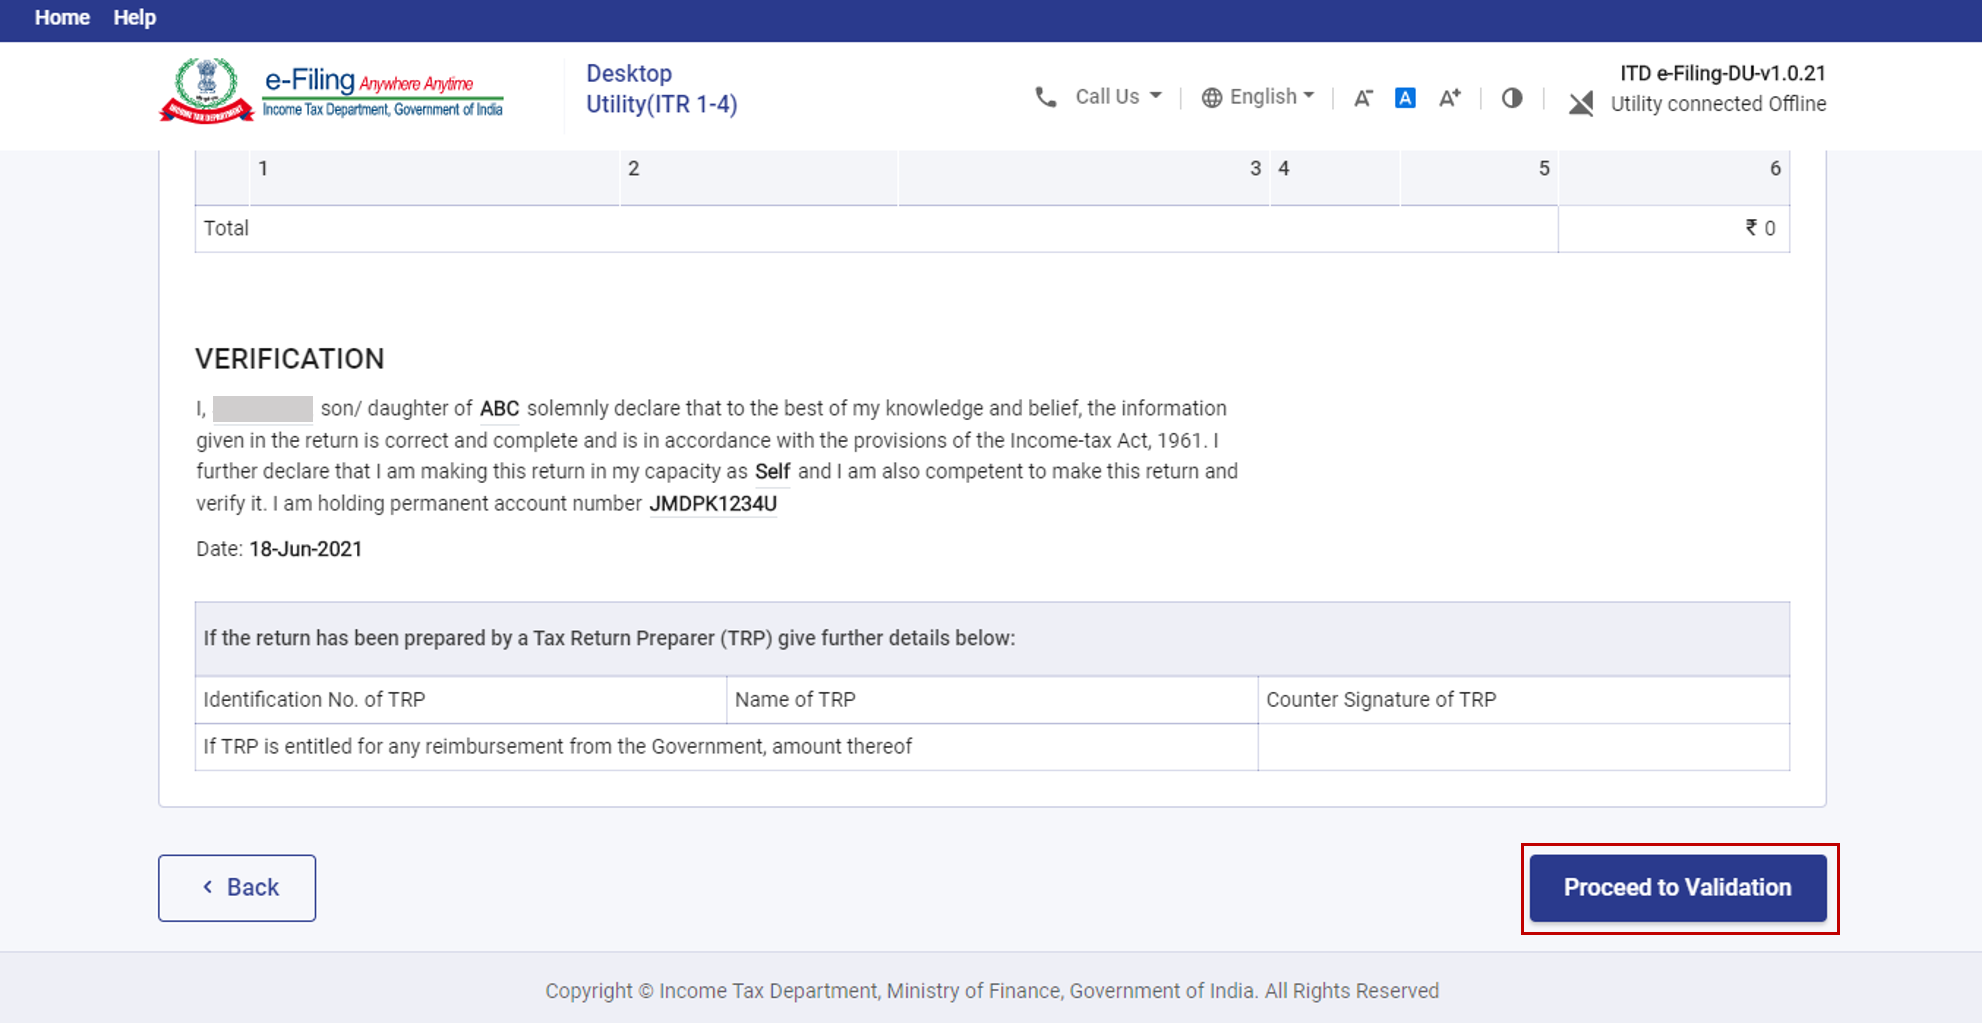
Step 8: On the Preview and Submit Return page, click Proceed to Validation.
Step 9: The system will run validation checks on your return. The list of errors, if any, will be shown on the Preview and Submit your Return page. You will have to go back and correct errors in your form if there are validation errors. If not, you will get a message about successful validation.
On successful validation, click Proceed to Verification to complete the return filing process.
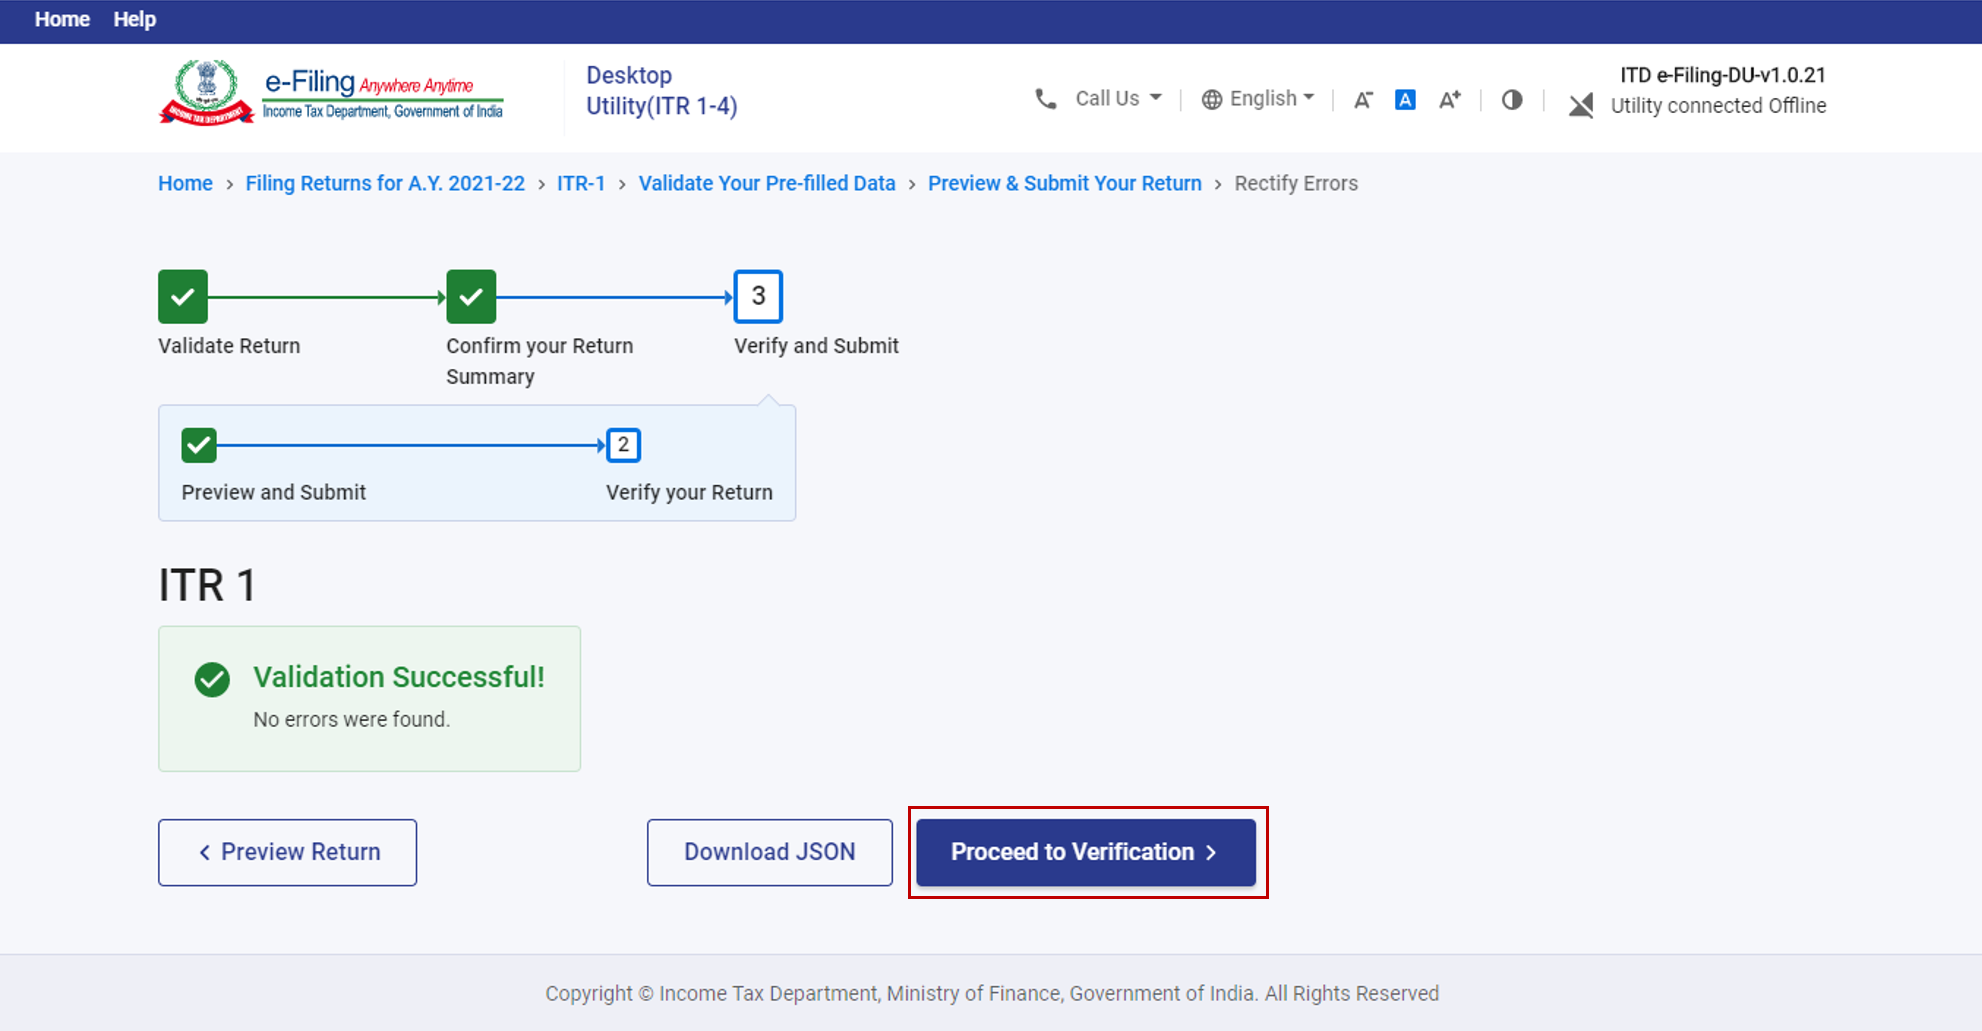
Note: If you click Download JSON, the JSON of your prepared and validated return is saved on your computer. You can upload it on the e-Filing portal later, or submit it from the offline utility (elaborated in the steps below).
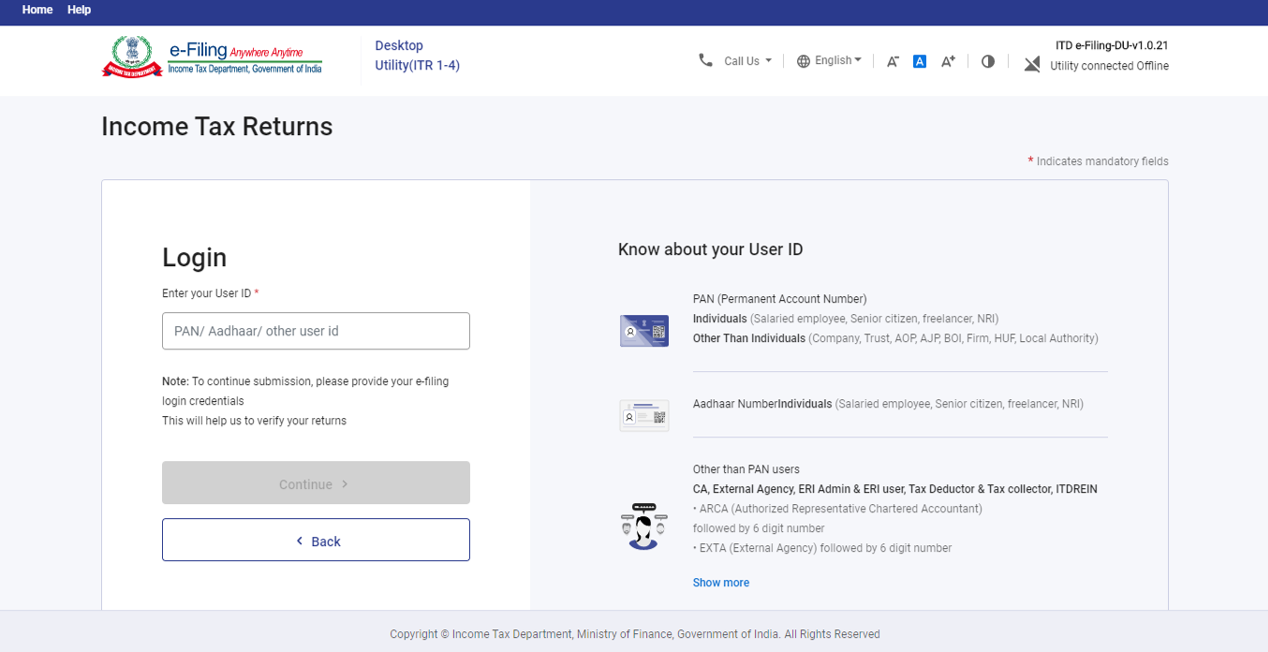
Step 10: When you click Proceed to Verification, you will be taken to the Login page through the utility. Log in using your e-Filing user ID and password.
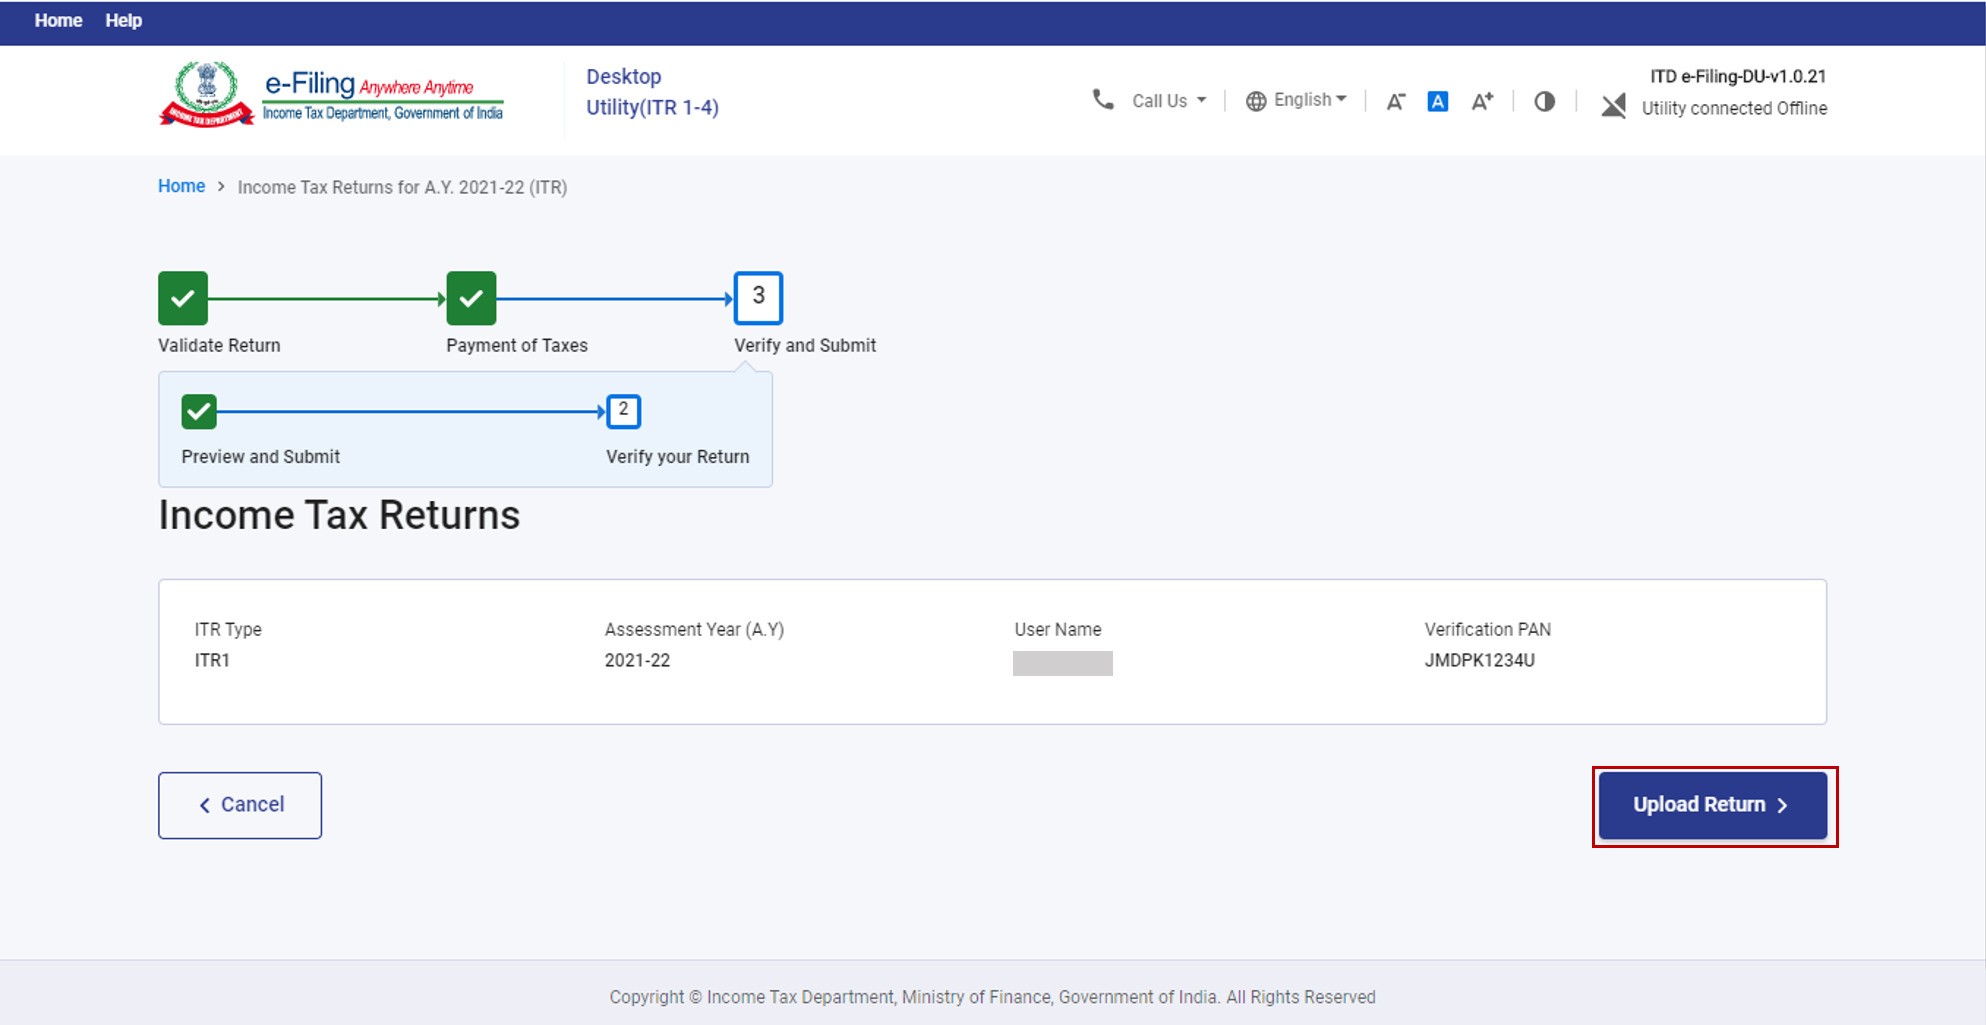
Step 11: Post login through the Offline Utility, you will get the option to upload your return. Click Upload Return.
Step 12: Click OK.
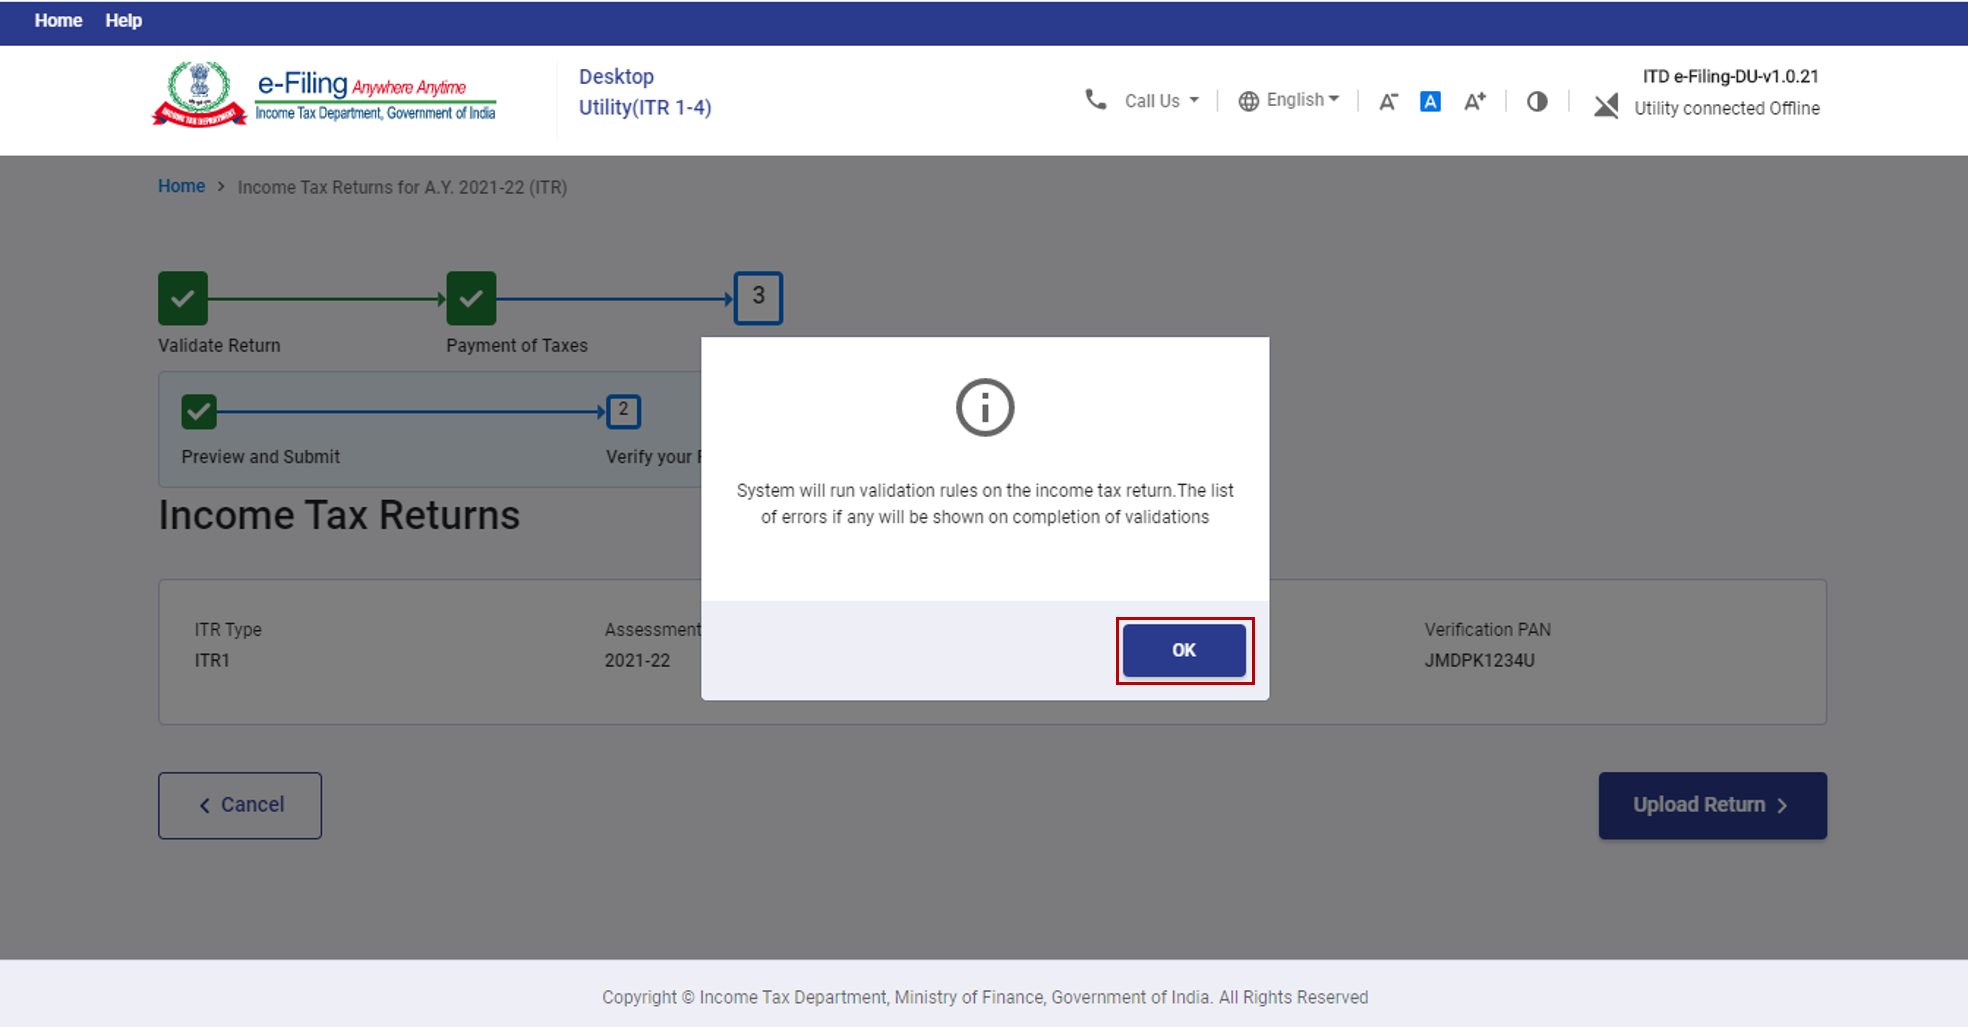
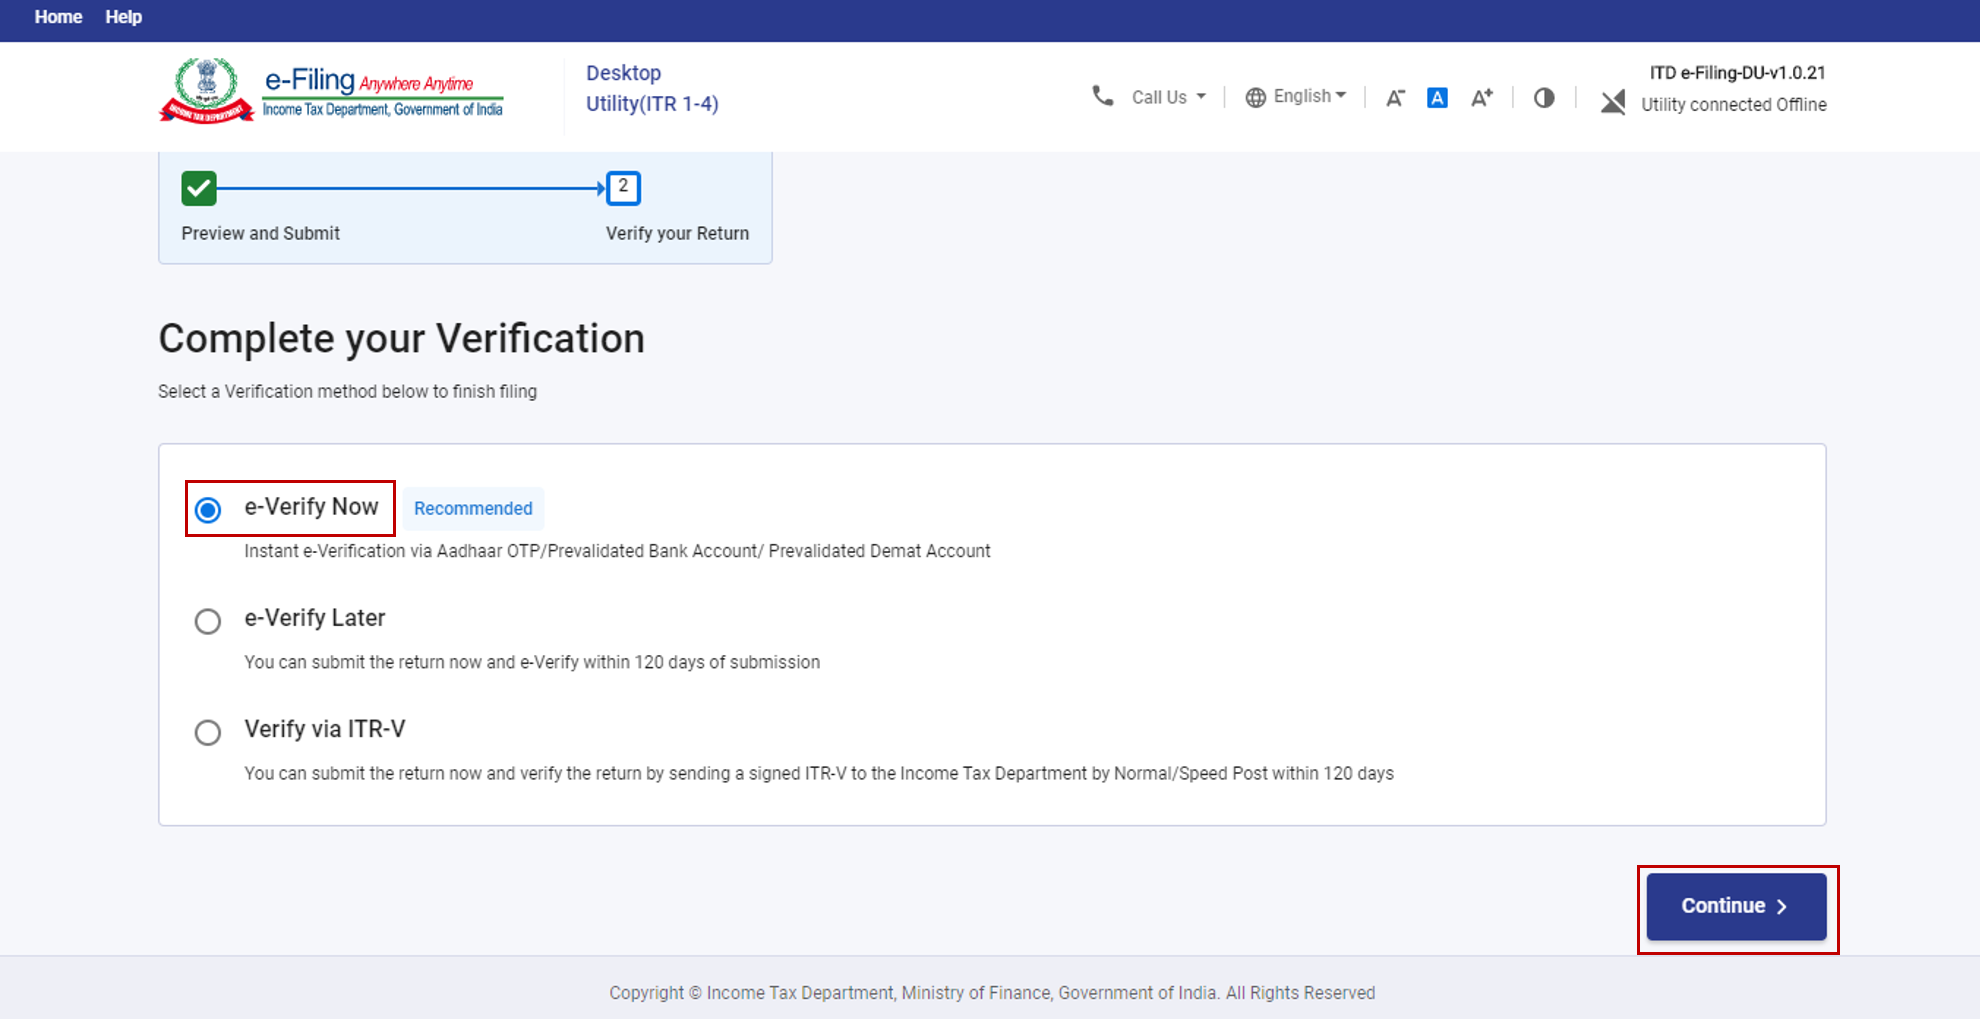
Step 13: On the Complete your Verification page, select your preferred option, and click Continue.
It is mandatory to verify your return, and e-Verification (recommended option - e-Verify Now) is the easiest way to verify your ITR – it is quick, paperless, and safer than sending a signed physical ITR-V to CPC by post.
Note:
- Refer to the How to e-Verify user manual to learn more.
- If you select e-Verify Later, you can submit your return, however, you will be required to e-Verify your return within 120 days of filing of your ITR.
- If you select Verify via ITR-V, you need to send a signed physical copy of your ITR-V to Centralized Processing Center, Income Tax Department, Bengaluru 560500 by normal / speed post within 120 days.
- Please make sure you have pre-validated your bank account so that any refunds due may be credited to your bank account.
- Refer to the My Bank Account user manual to learn more.
Step 14: If you clicked e-Verify Now, you will be taken to the e-Verify page to e-Verify your return.
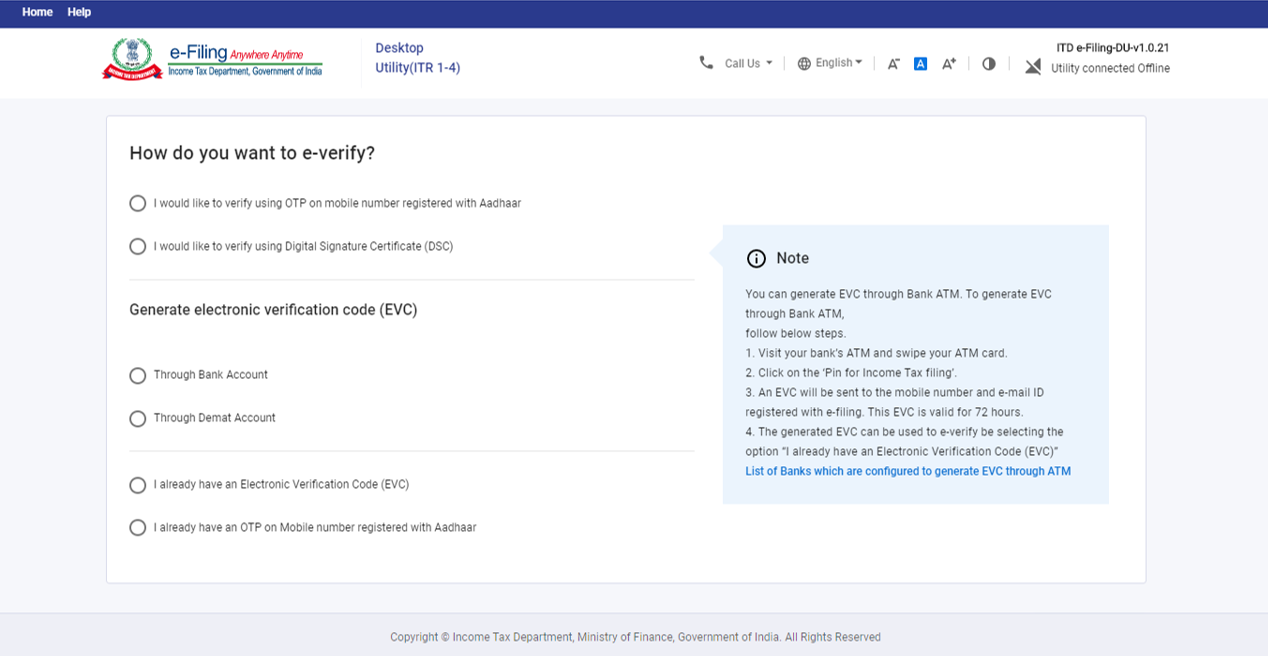
Note: Refer to the How to e-Verify user manual to learn more.
On successful e-Verification of the ITR, a success message is displayed along with a Transaction ID and Acknowledgement Number. You will also receive a confirmation message on the email ID and mobile number registered on the e-Filing portal.


