1. Overview
The My Bank Account service is available to all registered taxpayers on the e-Filing portal post-login, who have a valid PAN and a valid bank account. This service allows you to:
- Add a bank account and pre-validate it
- Remove a closed or deactivated bank account
- Nominate a validated bank account to receive Income Tax refund and for net banking Login
- Remove a bank account from nomination so as not to receive tax refund in that account
- Enable or disable EVC for the validated bank account (only for individual taxpayers, only for e-filing integrated banks)
- Revalidate bank accounts for which pre-validation has failed
2. Prerequisites for availing this service
- Registered user on the e-Filing portal with valid user ID and password
- PAN must be linked with the bank account which is to be pre-validated
| Service | Prerequisites |
|---|---|
| Add and Validate a Bank Account |
1. Account must be linked with PAN
Note*: Verification options are available based on the user login type |
| Remove a Bank Account |
1. Access to any one verification method*:
Note*: Verification options are available based on the user login type |
| Nominate a bank account or Remove Bank Account from Nomination for Refund |
1. Validated bank account |
| Enable EVC |
1. Account in one of the e-filing integrated banks |
3. Step-by-Step Guide
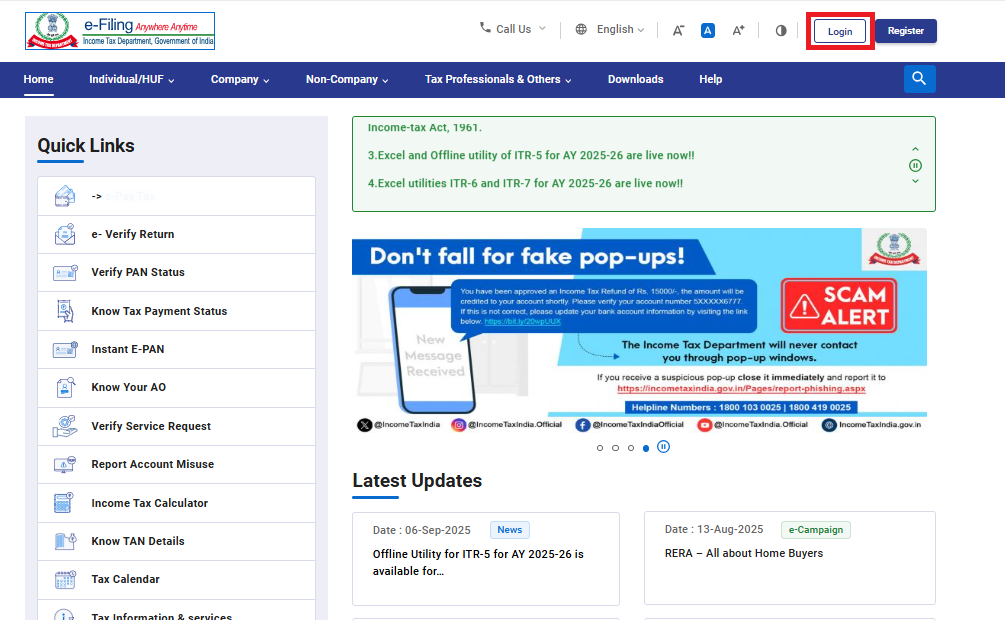
Step 1: Log in to the e-Filing portal using your user ID and password.
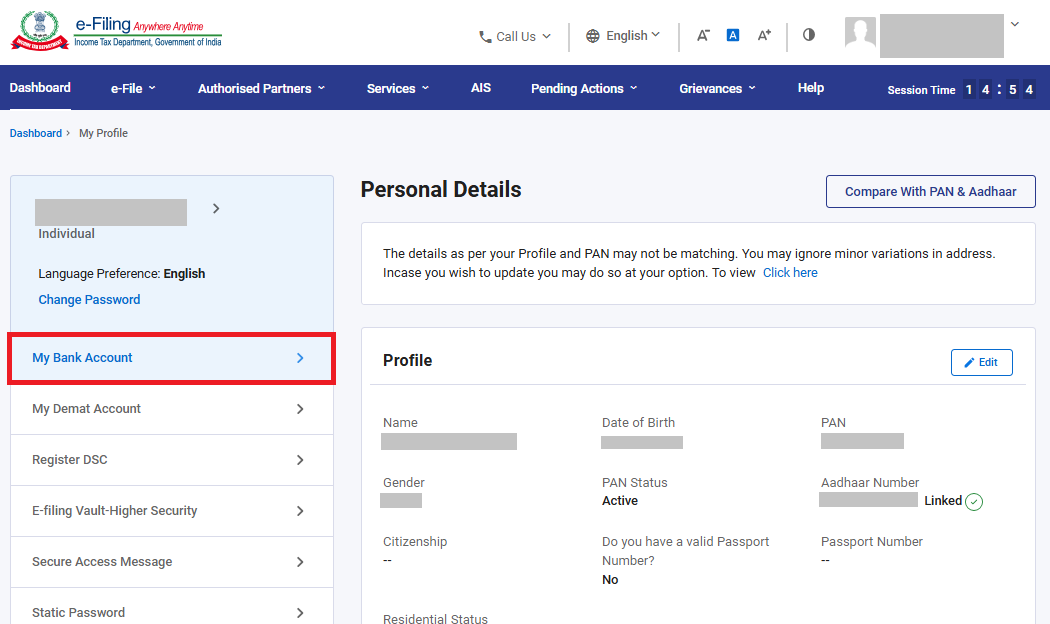
Step 2: Go to the My Profile page from the Dashboard.

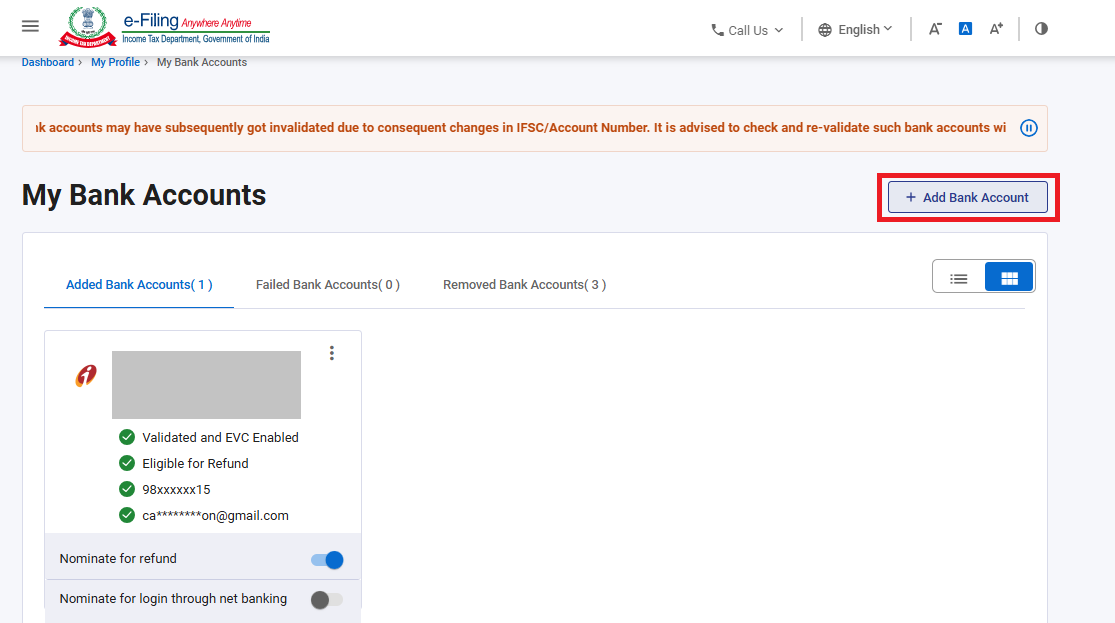
Step 3: Click My Bank Account.
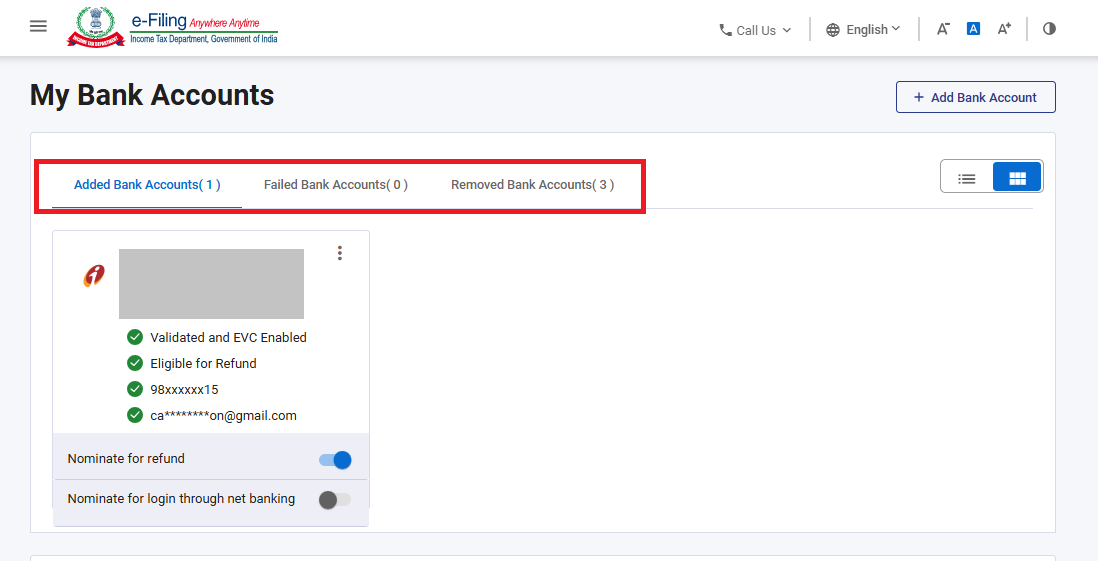
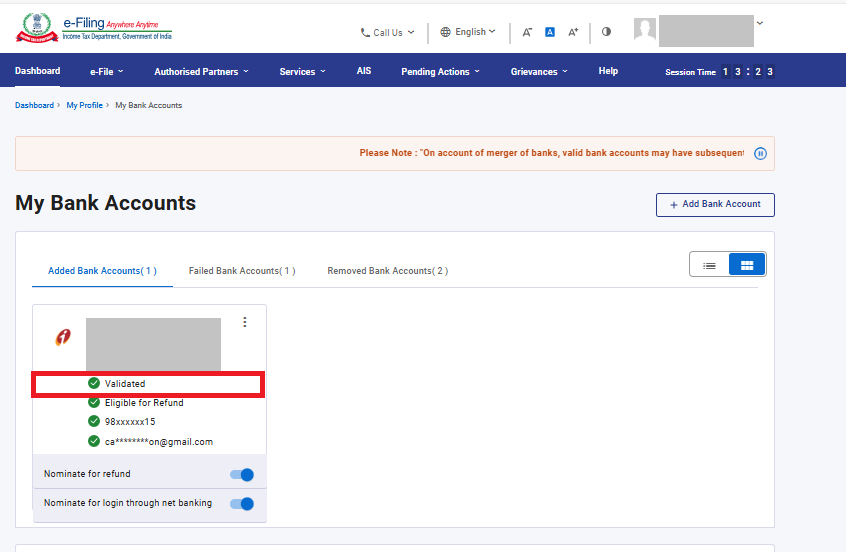
On the My Bank Accounts page, the Added, Failed and Removed Bank Accounts tabs will be displayed.
To learn how to use the different facilities under the My Bank Account service, refer to the following sections:
| Add and Pre-Validate a Bank Account | Go to Section 3.1 |
| Remove a Bank Account | Go to Section 3.2 |
| Nominate a bank account or Remove Bank Account from Nomination for Refund | Go to Section 3.3 |
| Enable and Disable EVC | Go to Section 3.4 |
| Re-Validate a Bank Account | Go to Section 3.5 |
| Nominate a Bank Account for login through Net Banking | Go to Section 3.6 |
3.1 Add and Pre-Validate a Bank Account
By logging in to the e-Filing portal using PAN / Aadhaar
Step 1: On the My Bank Accounts page, click Add Bank Account.
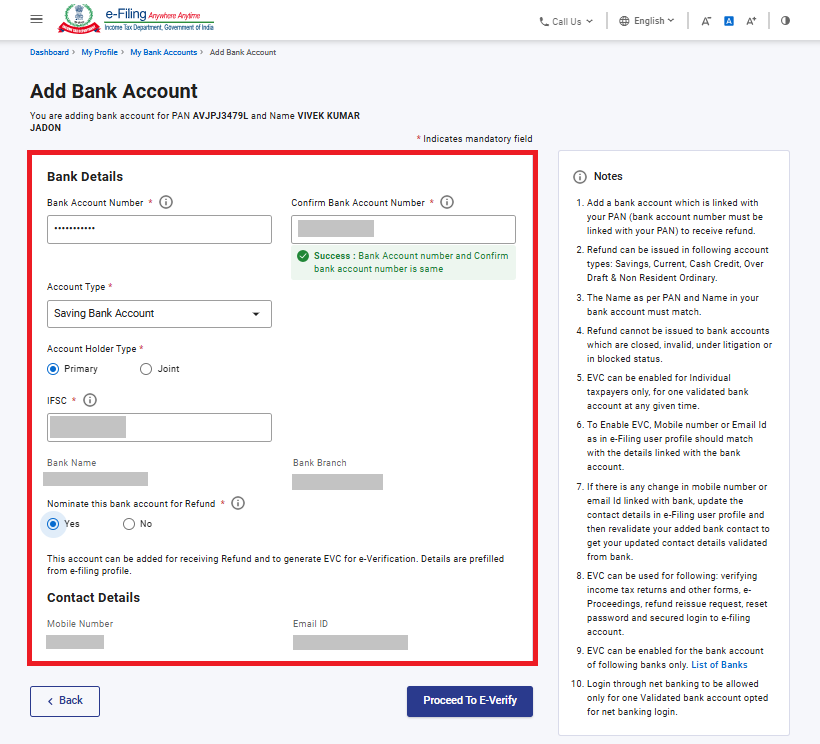
Step 2: On the Add Bank Account page, enter the Bank Account Number, select Account Type and Holder Type, and enter IFSC. Bank Name and Branch get auto-populated based on IFSC. If your bank is integrated with e-filing, your mobile number and email ID will be pre-filled from your e-Filing profile, and will not be editable.
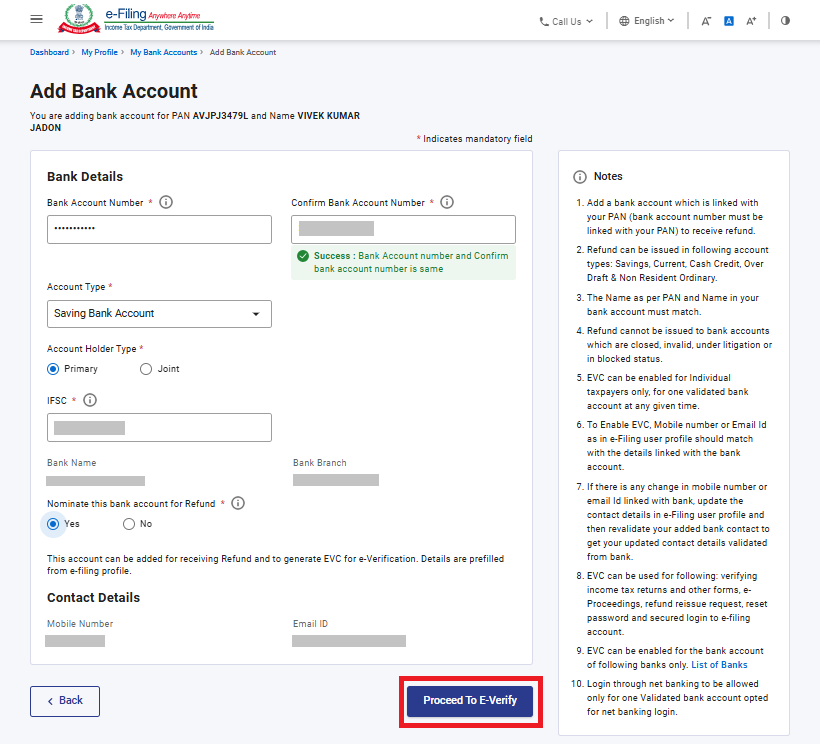
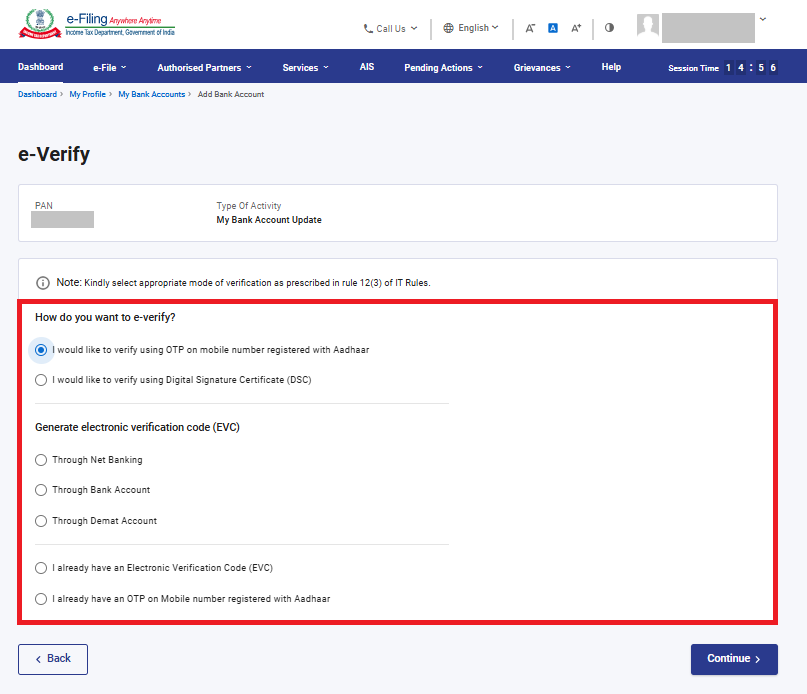
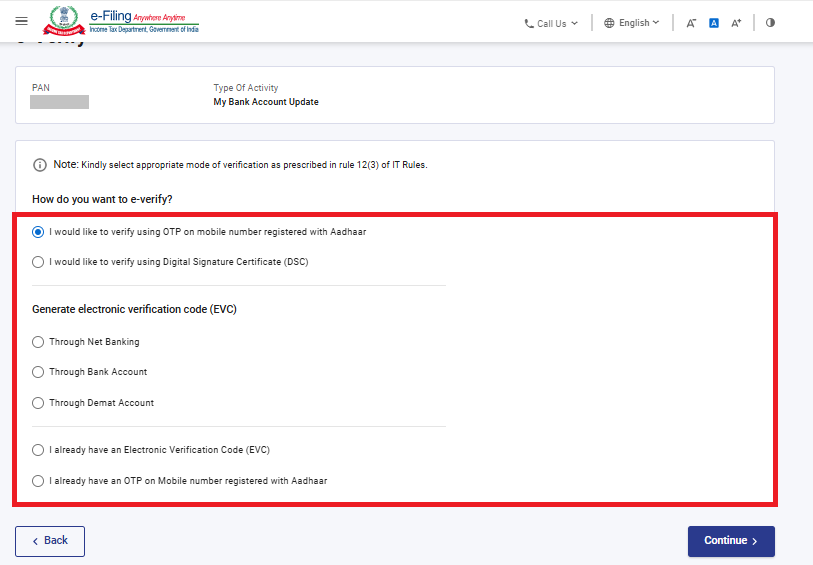
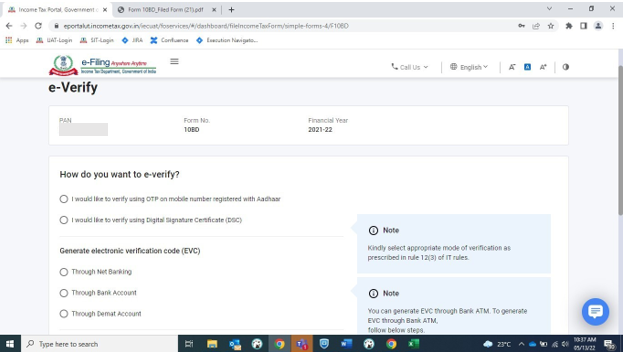
Step 3: Click on Proceed to E-Verify.
Choose option to E-Verify and click continue.
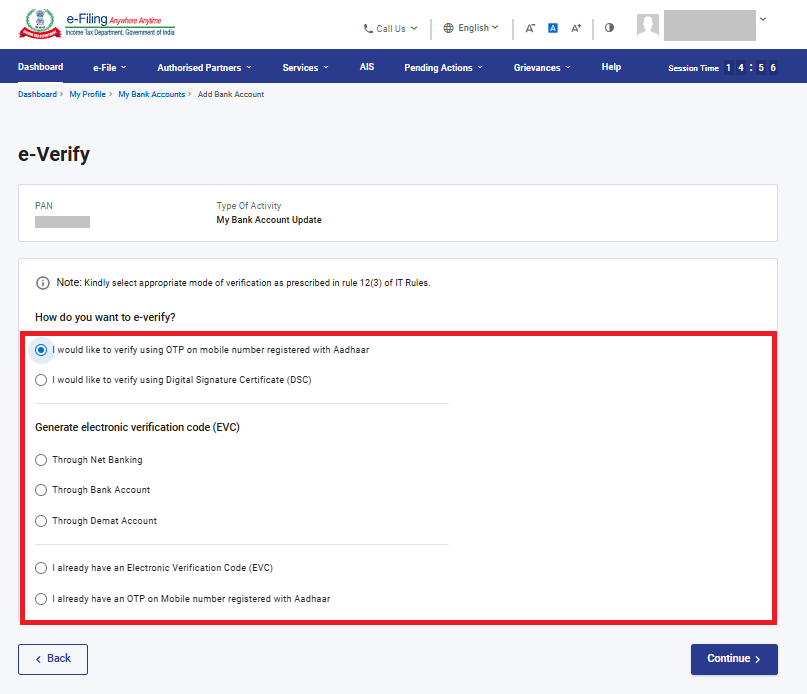
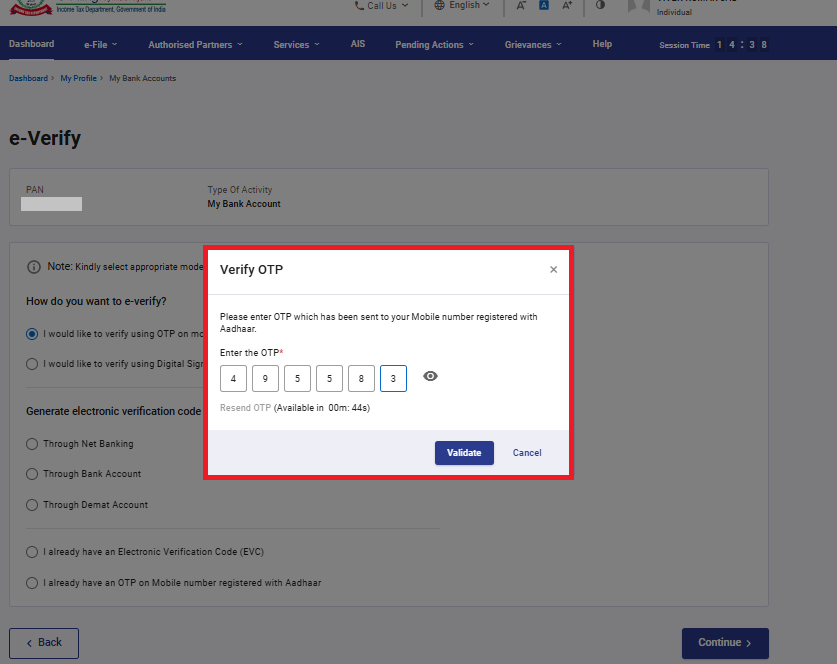
Enter OTP and validate.
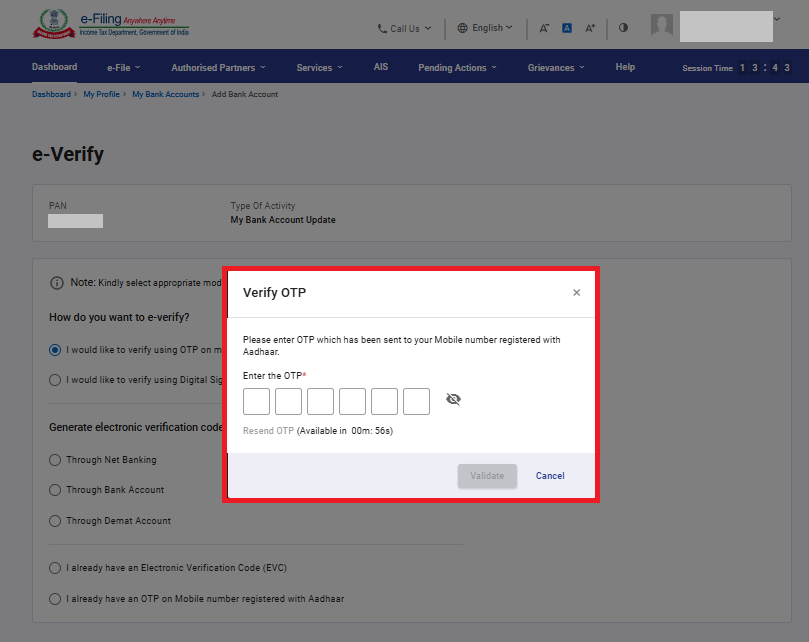
On successful Submission of validation request, a success message is displayed. Also, you will receive a message on your mobile number and email ID registered on the e-filing portal.

3.2 Remove Bank Account
Step 1: Click Remove Bank Account under the Action column for the desired bank account.
Step 2: Select a reason from the dropdown for removing the bank account. If you select Others, enter the reason in the textbox and click Continue.
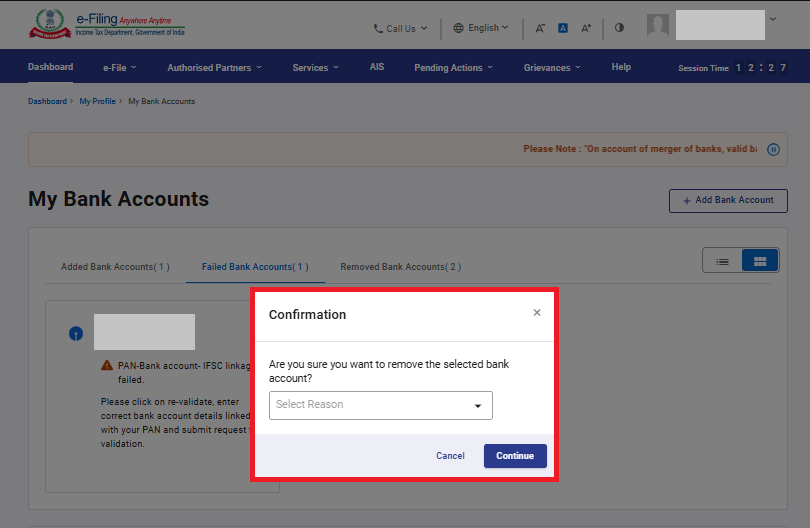
Step 3: Choose option to E-Verify and click continue
Step 4: Enter the OTP and validate.
On successful removal of the bank account, a success message is displayed.
You can remove a bank account with status ‘Validation in Progress’ and once removed you can try adding the same bank account with correct details.
3.3 Nominate a Bank Account or Remove Bank Account from Nomination for Refund
A. Nominate a bank account for refund
Step 1: To nominate a bank account for refund, click the Nominate for Refund toggle / switch (the switch will be positioned on the left) for the bank account you wish to nominate for refund.
Step 2: Click Continue to confirm that you want to nominate the selected bank account.
On success, the switch will move to the right.
B. Remove a bank account from nomination for refund
Step 1: To remove a bank account that is nominated for refund, click the Nominate for Refund toggle / switch (it will be positioned on the right) for the bank account you wish to remove from nomination.
Step 2: Click Continue to confirm that you want to remove nomination of the selected bank account.
On success, the switch will move to the left.

3.4 Enable and Disable EVC
A. Enable EVC
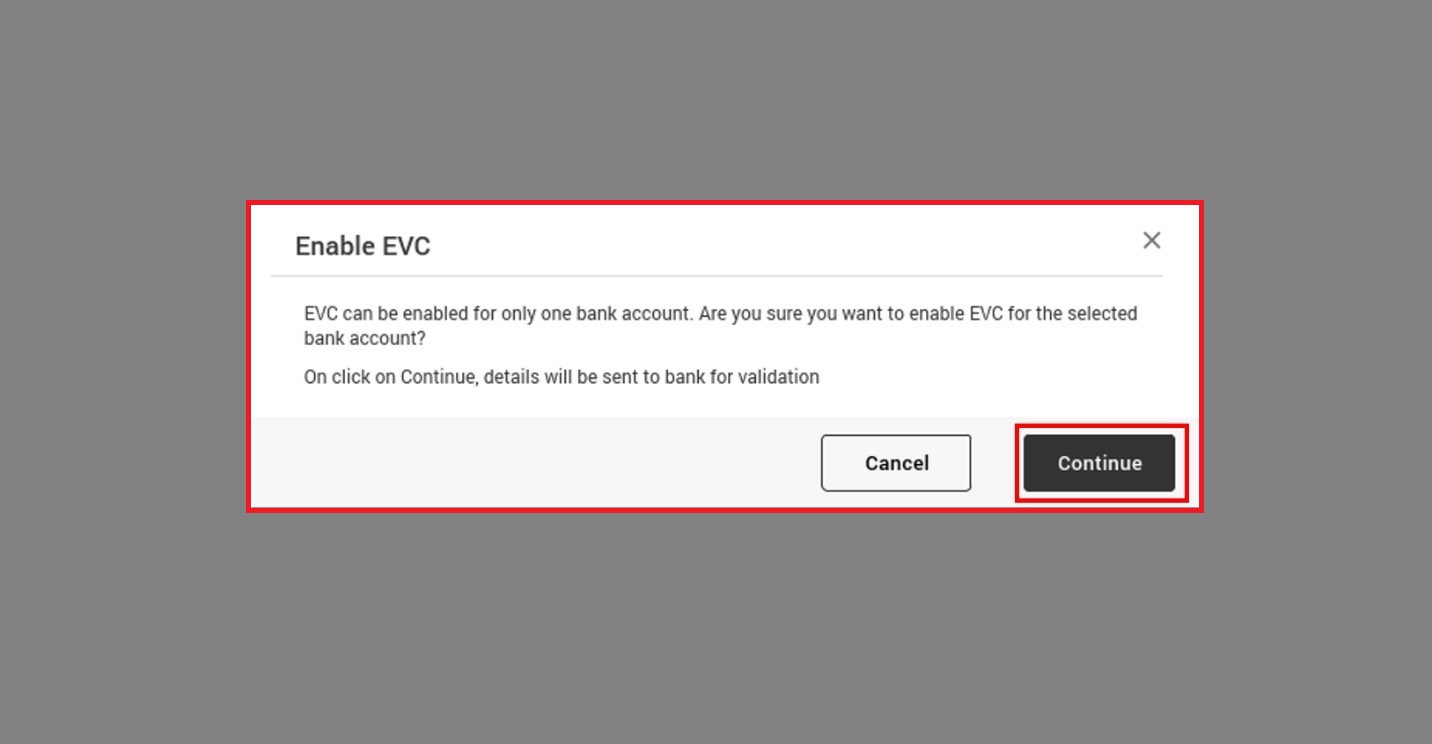
Step 1: Click Enable EVC under the Actions column on the bank account for you wish to enable EVC.
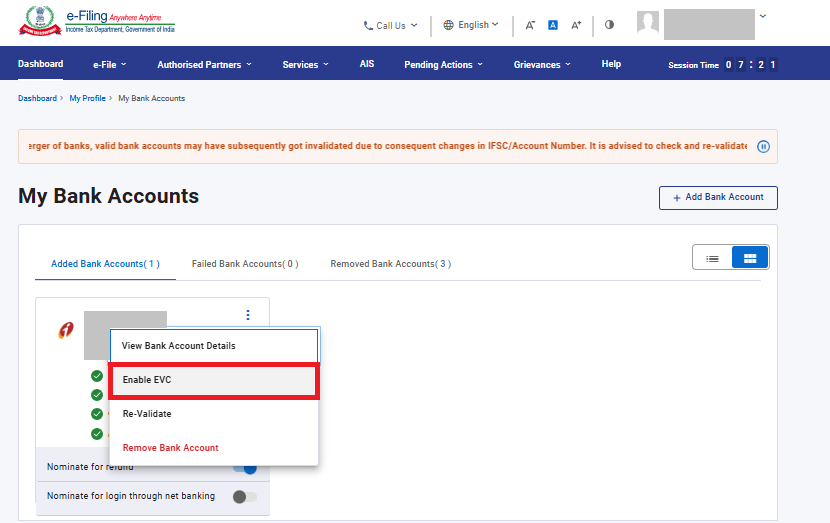
Step 2: A confirmation message is displayed. Click Continue.
Note:
- EVC can be enabled for a validated bank account only if the following conditions are fulfilled:
- Your mobile number or email ID should be verified by the bank.
- Your mobile number registered with e-Filing should the same as the one verified by the bank. To ensure they match, either update your mobile number in your e-Filing profile to be the same as the one linked with the bank or update your mobile number with your bank to be the same as the one in your e-Filing profile.
- EVC should not be enabled for any other bank account.
- Your bank should be integrated with e-Filing. The list of banks integrated with e-Filing can be found on the: Login > My Profile > My Bank Account > In notes Section > click on “List of banks”
- If you wish to only pre-validate your bank account and not enable EVC, your e-Filing mobile or email do not need to match the contact details verified by your bank.
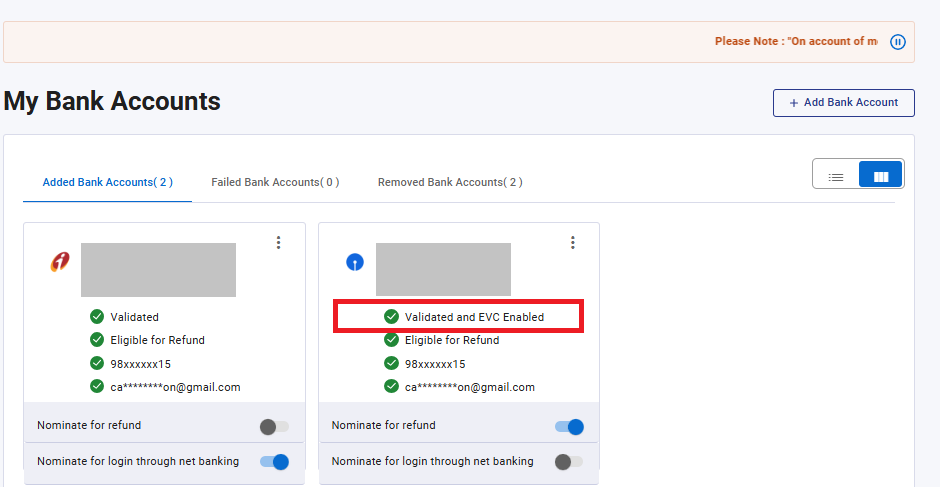
If the above conditions are fulfilled, EVC is successfully enabled for the selected bank account, and the status is updated to Validated and EVC enabled:
Step 3: If EVC is already enabled for one bank account, and you try to enable EVC for another bank account, a message is displayed notifying you of the same. Click Continue in the message, and EVC will be enabled for the bank account if the conditions specified in Step 2 are fulfilled. In such a case, EVC will be disabled for the bank account that was previously enabled.
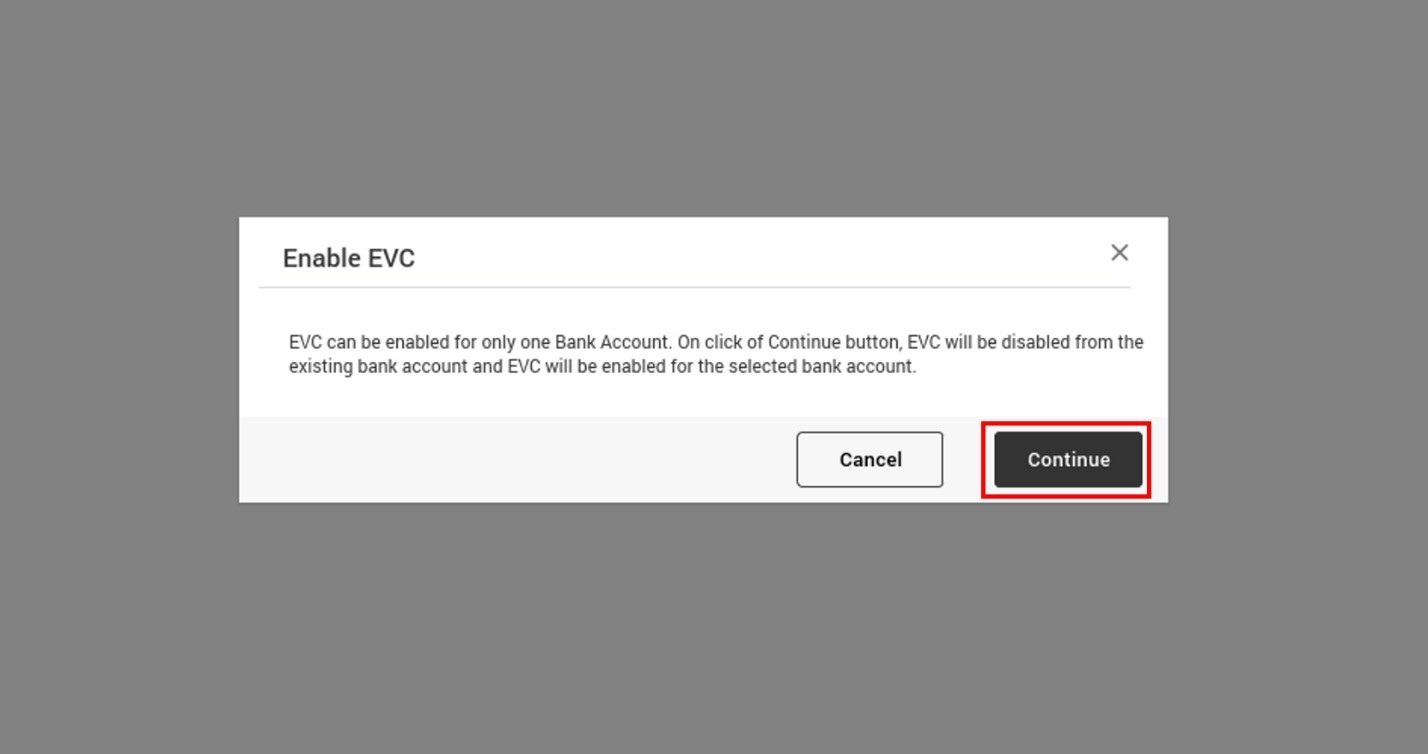
Note: If you click Cancel or close the message, EVC will remain enabled for the existing bank account.
B. Disable EVC
Step 1: Click Disable EVC under the Actions column on the bank account for which EVC is enabled.
Step 2: A confirmation message is displayed. Click Continue.
On success, EVC is disabled for selected account, and the status is updated to Validated only.
3.5 Re-Validate Bank Account
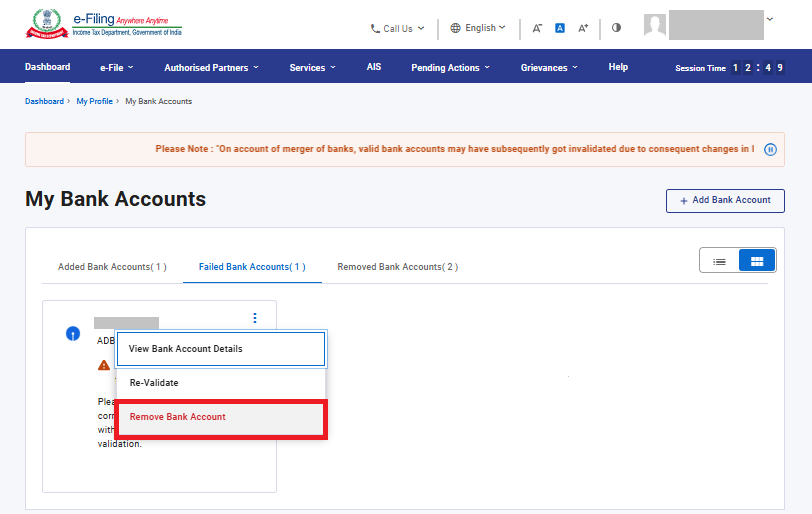
Step 1: In case the validation for a bank account failed earlier, you will see its details under the Failed Bank Accounts Tab. Click Re-Validate under the Action column for the bank account you need to revalidate.
You can revalidate the added bank account also if there is any update in your mobile/email linked with bank or in e-filing profile or if your account type/account status is updated.
Step 2: On the Add Bank Account page, the bank and contact details will be pre-filled. The bank details will be editable, and the contact details will be non-editable. Update the editable details if necessary. Click on proceed to E-Verify.

Step 3: Select Method for e-verification.
Enter the OTP received on Aadhaar registered mobile No.
On success, the bank account is added under the Added Bank Accounts tab, and the status is updated to Validation in progress.
Then, your contact details are verified with the bank details. If the account details are verified by the bank, your bank account gets validated. You can check the validation status in the Status column of the Added Bank Accounts tab.
If the validation still fails, take the following action based on the reason of failure (for integrated banks):
| Reason for Failure | Action to be Taken |
| PAN-Bank Account-IFSC linkage failed | Contact branch to link your PAN with the bank account, then click Re-Validate to submit request. Contact your branch for further information. |
| Name mismatch | Contact branch to update the name as per PAN. Then, re-validate, update the details and submit request for re-validation. |
| Bank Account Number mismatch | Click Re-Validate, enter the correct bank account number and submit the request for re-validation. |
| Account number does not exist | Enter the correct bank account number and submit the request for re-validation. |
| Bank account closed / inactive | Try with a different bank account number. Contact your branch for further information. |
In case an account is held in one of the non-integrated banks, the following action should be taken:
| Reason for Failure | Action to be Taken |
| PAN not linked with bank account | Link the PAN with bank account and click Re-Validate to submit request. Contact your branch for further information. |
| PAN mismatch | Link the correct PAN to the bank account and click Re-Validate to submit request. Contact your branch for further information. |
| Invalid account type | Click Re-Validate, select the correct bank account type, and submit the request for validation. |
| Account closed/Inactive account/Litigated account/Account frozen or blocked | Try with a different valid bank account number. Contact your branch for further information. |
| Account holder name invalid | Click Re-Validate and update the details. Contact your branch to update the Name as per PAN. |
If the bank validation status is ‘Validation cannot be done’, it means the bank details cannot be verified by the department. You can either add another account which is integrated with e-filing and can be verified by department or if refund is applicable, you can submit ECS mandate form while raising refund reissue request.
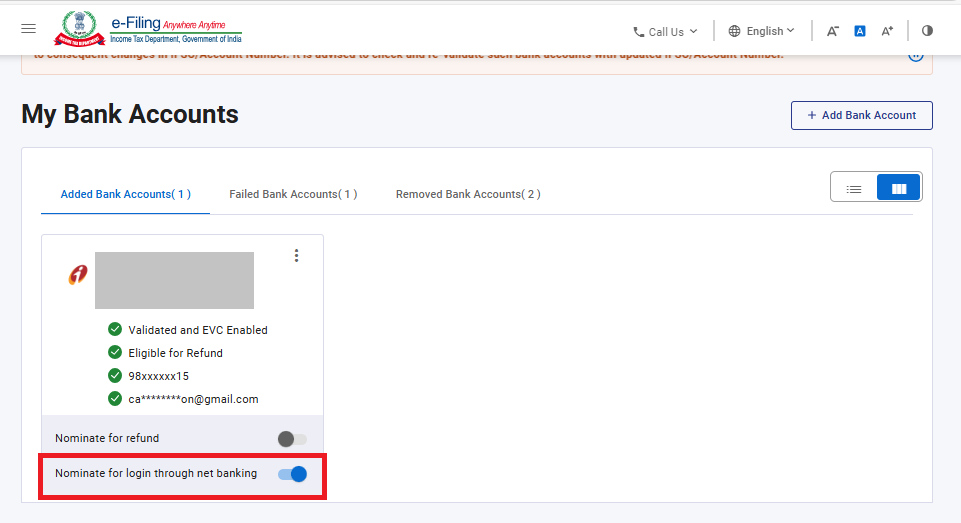
3.6 Nominate a validated bank account for login through net banking
Step 1: Enable the button Nominate for login through net banking:
Step 2: Click on Continue.
Step 3: Now, bank account is nominated for login through Net banking.